
Home / FAQs
Frequently Asked Questions
We have most of the answers.
If not, please contact us.
Everything you need to know about your free US suite address, package forwarding, consolidation, buy-for-me, and shipping to 200+ countries from the Middle East.
Common questions
Answers to what our 3,353+ customers ask us most.
Frequently asked questions43
Pick a question. Each answer shows you where to click, with pictures of the real screens.
No guide matches your search.
What is EarthShip? 5 steps
EarthShip is an international package-forwarding and shipping service. You get a personal US address with your own suite number, shop from any US store, and we receive, combine and ship your packages to your country.
-
Sign up free. You get your own US address with a suite number.
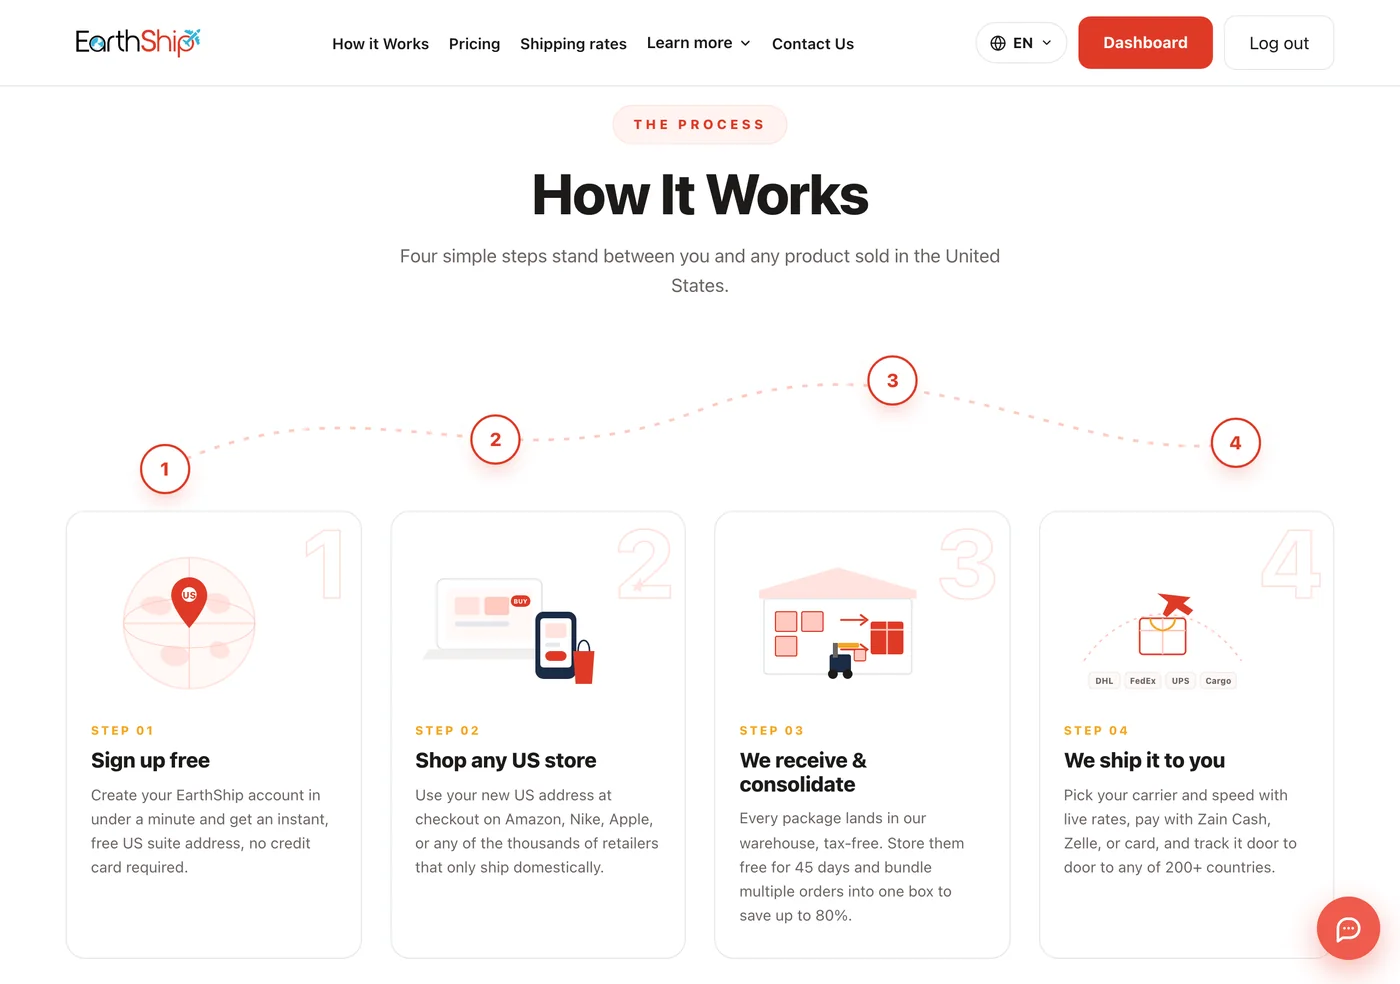
- Shop at any US store. Use your EarthShip US address as the delivery address at checkout.
- Wait for your packages. We receive them in our warehouse and can combine them into one box.
- Choose a carrier, pay, and we ship the box to your door.
-
Open your "Dashboard" any time. Use "New Shipment", "My Shipments", "Warehouse" and "Billing" to manage everything.
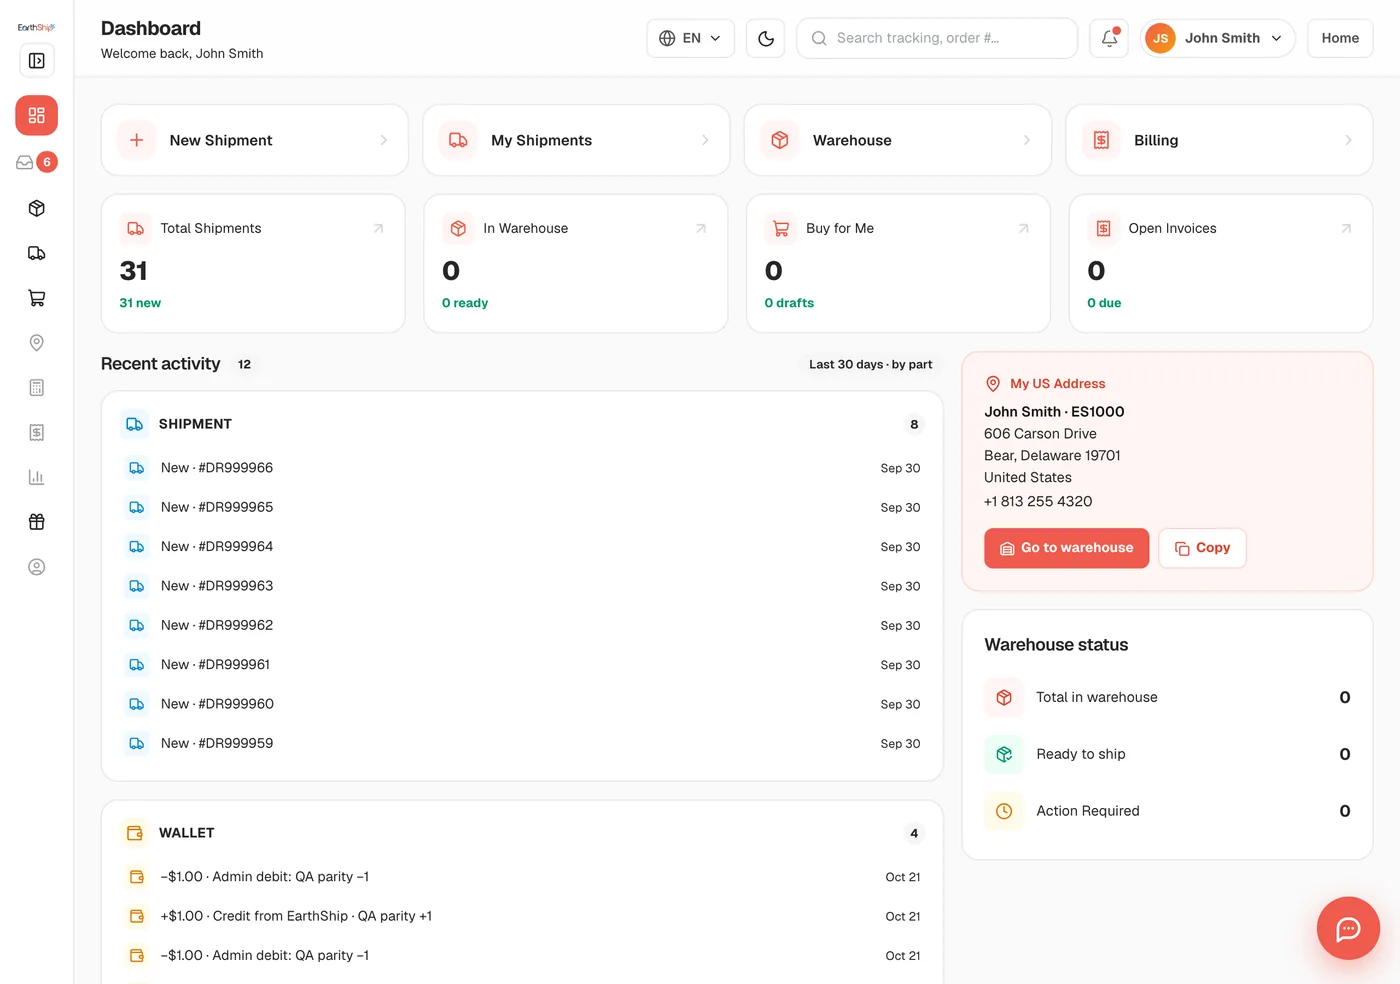
The four steps are also shown on the "How it Works" page.
See how it worksHow do I create an account? New 4 steps
Creating an account is free and takes about one minute. You get your US address as soon as your email is confirmed.
-
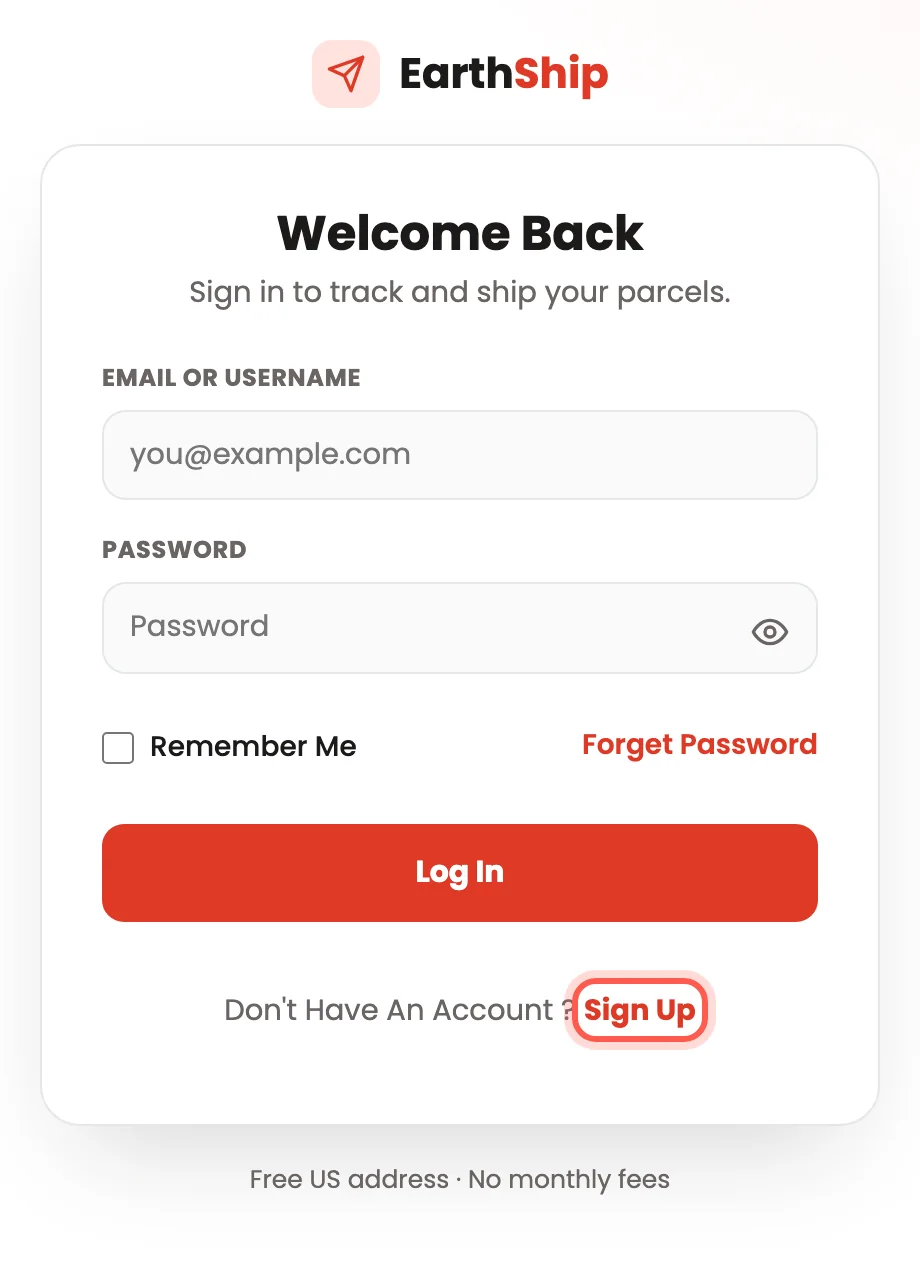
Open the sign-in page and click "Sign Up".
-
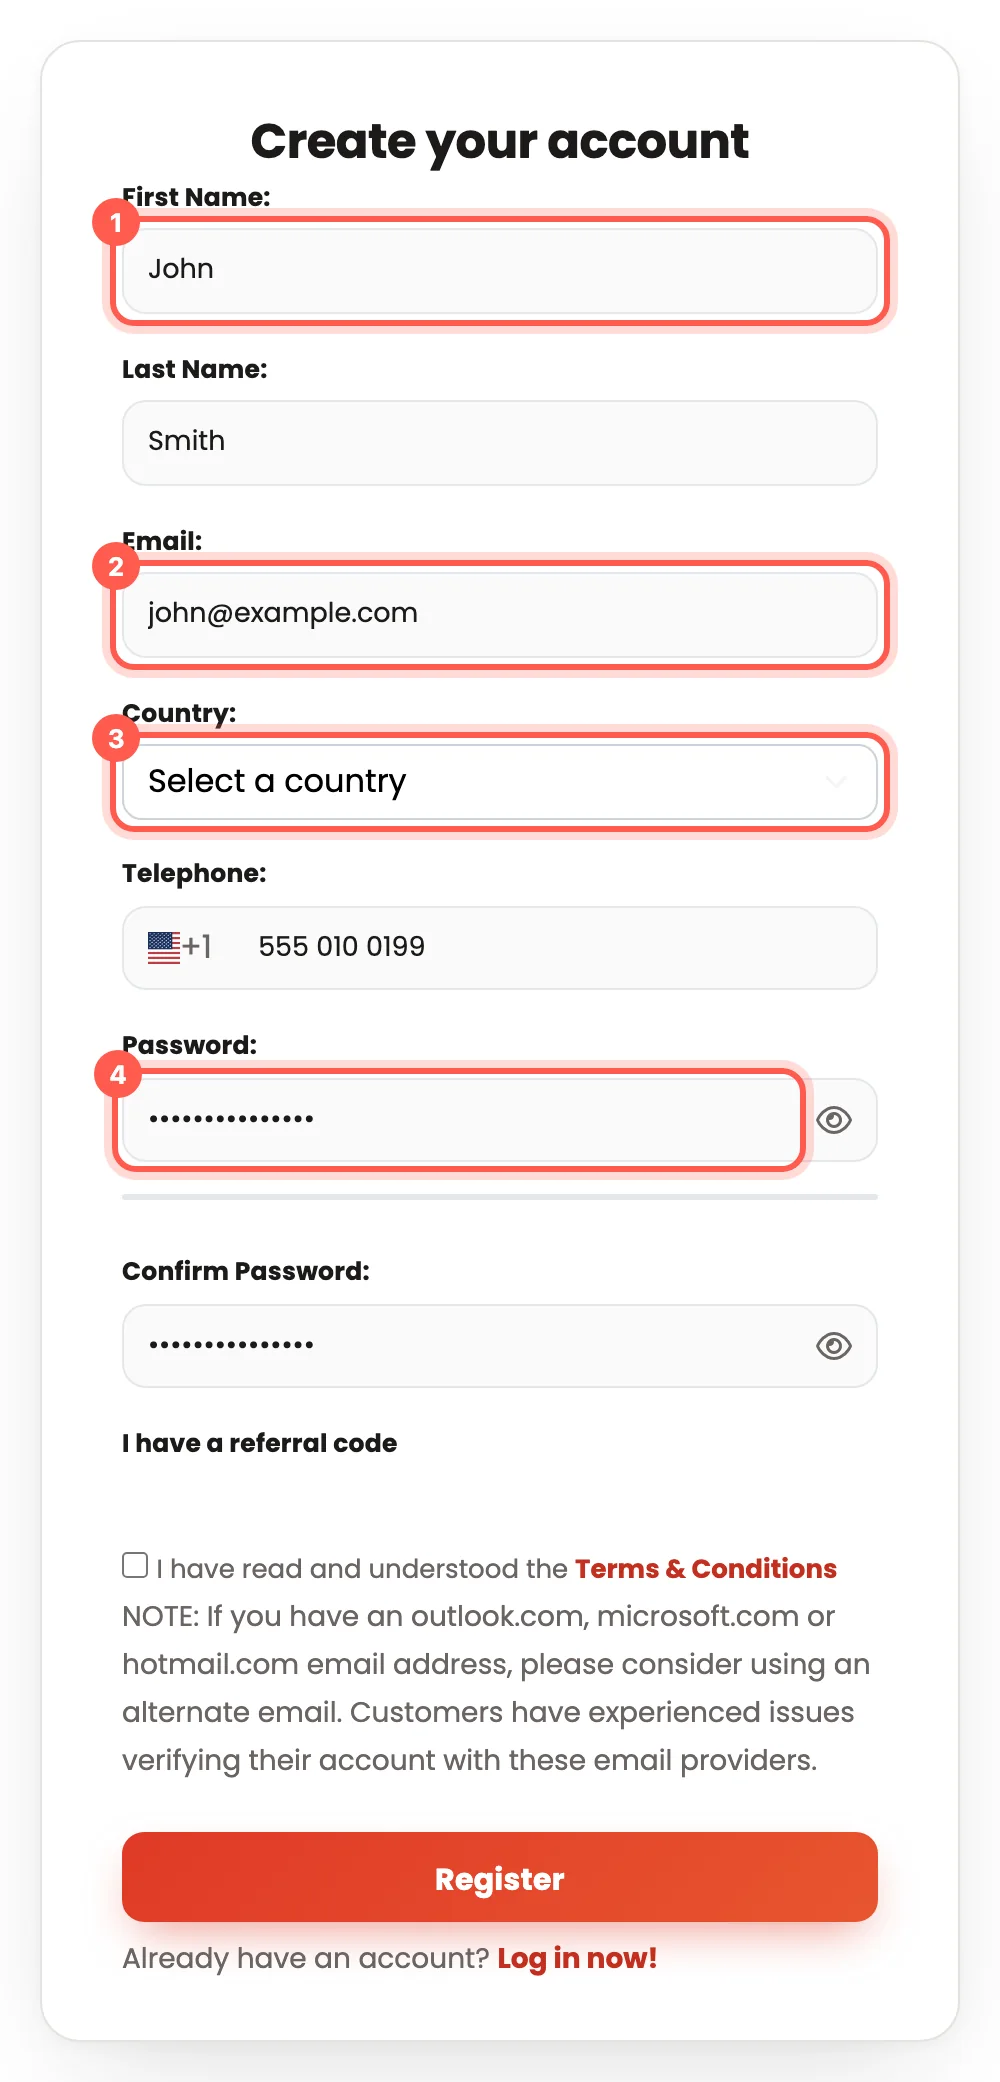
Type your name (1) and email (2), choose your country (3), add your phone number and choose a password (4).
-
Tick the Terms & Conditions box (1), then click "Register" (2).
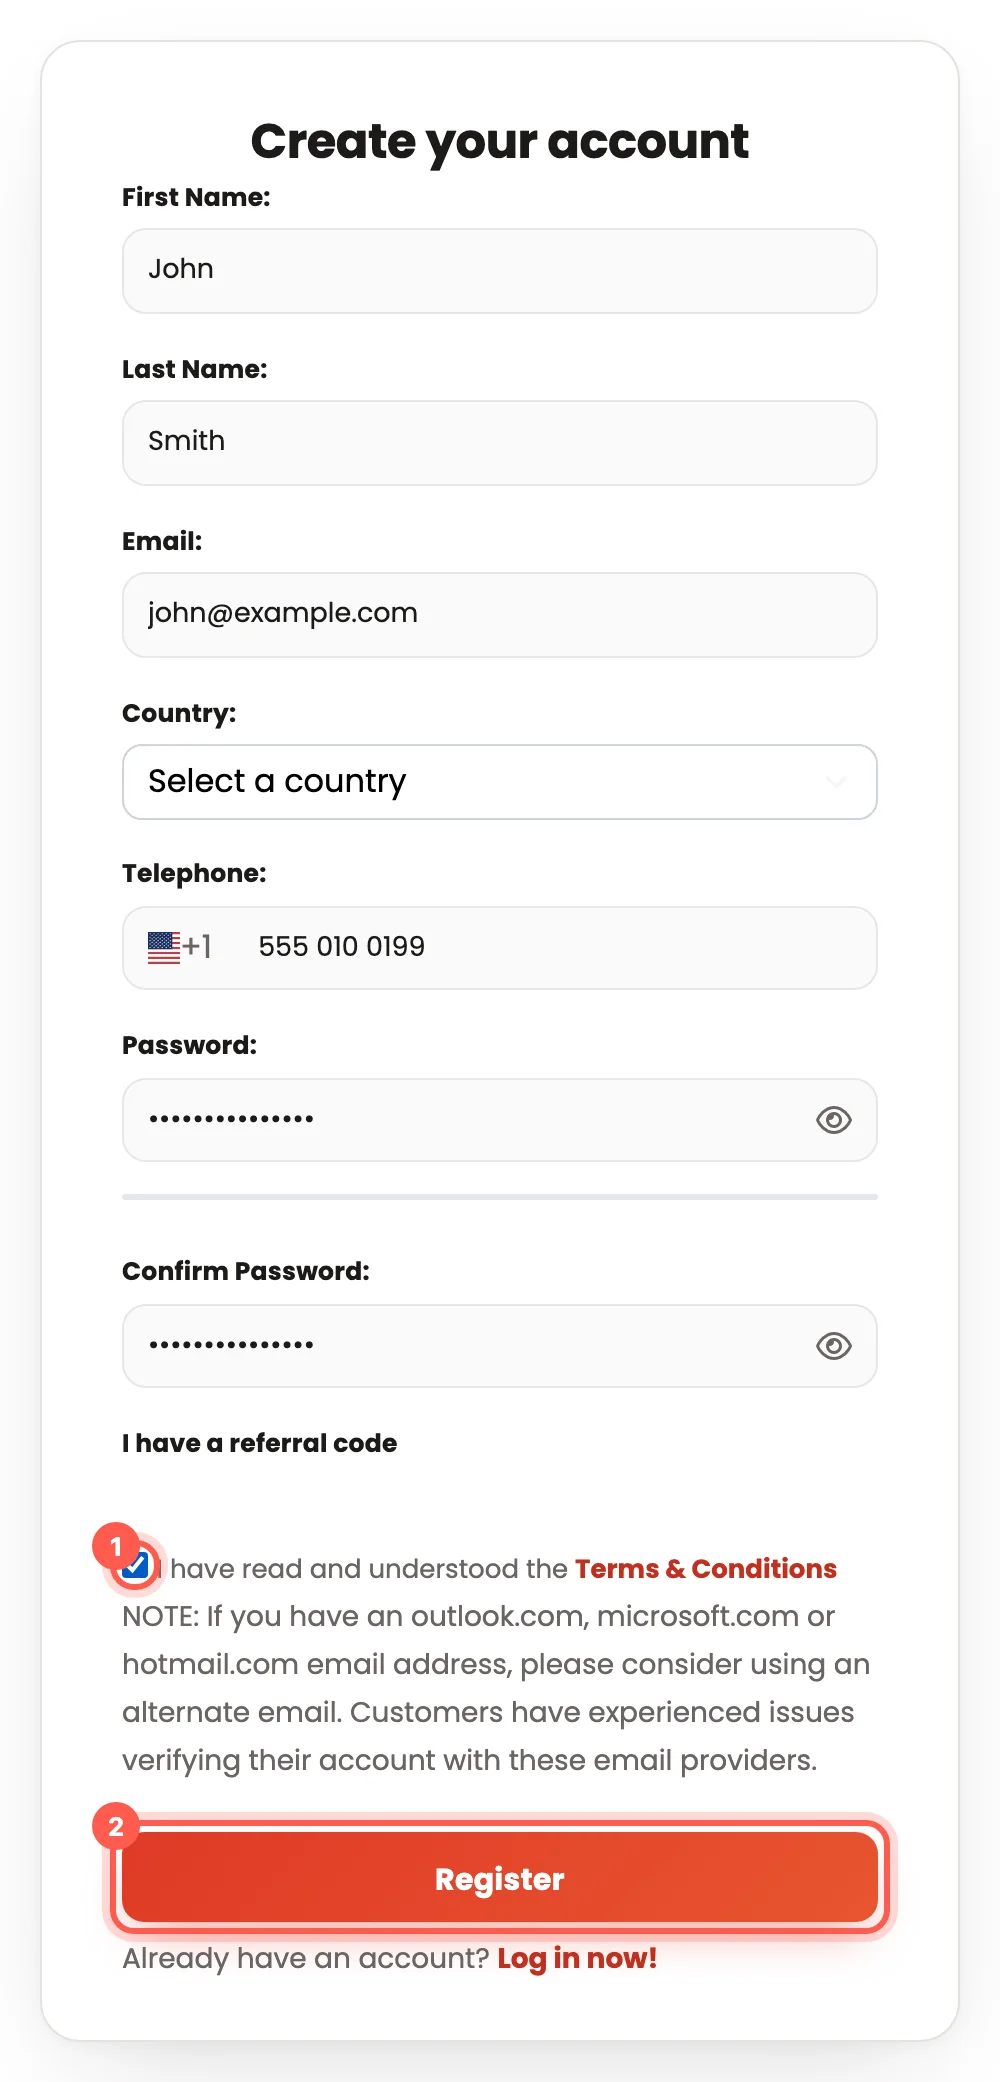
- We email you a confirmation code. Type the code on the next page to finish.
If a friend gave you a code, click "I have a referral code" and type it before you register.
Create my accountHow do I get my US shipping address? 3 steps
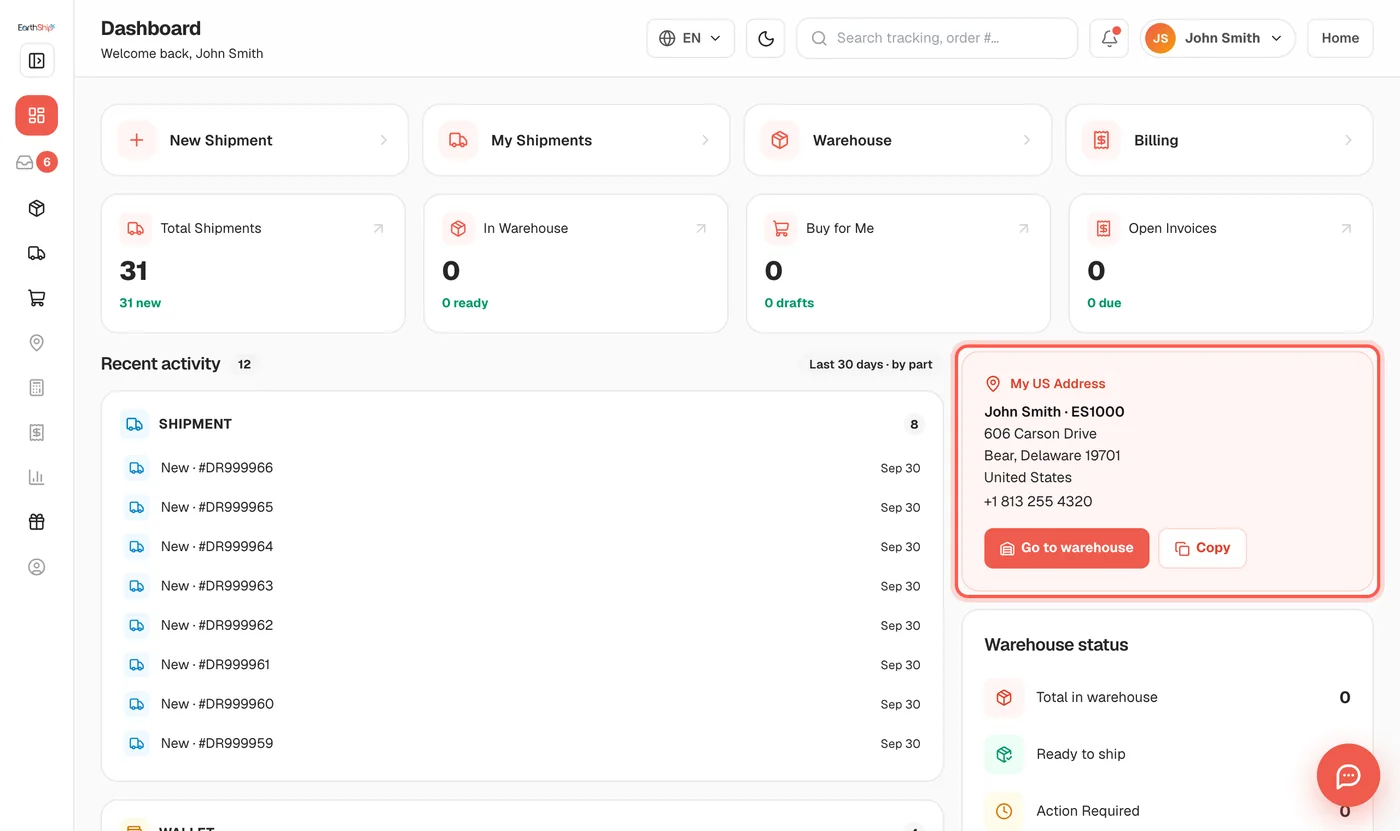
Your US address and suite number are created automatically when you sign up. You can see them on your Dashboard and on the Warehouse page, in the box called "My US Address".
-
Open your "Dashboard". Find the box "My US Address" on the right side.
-
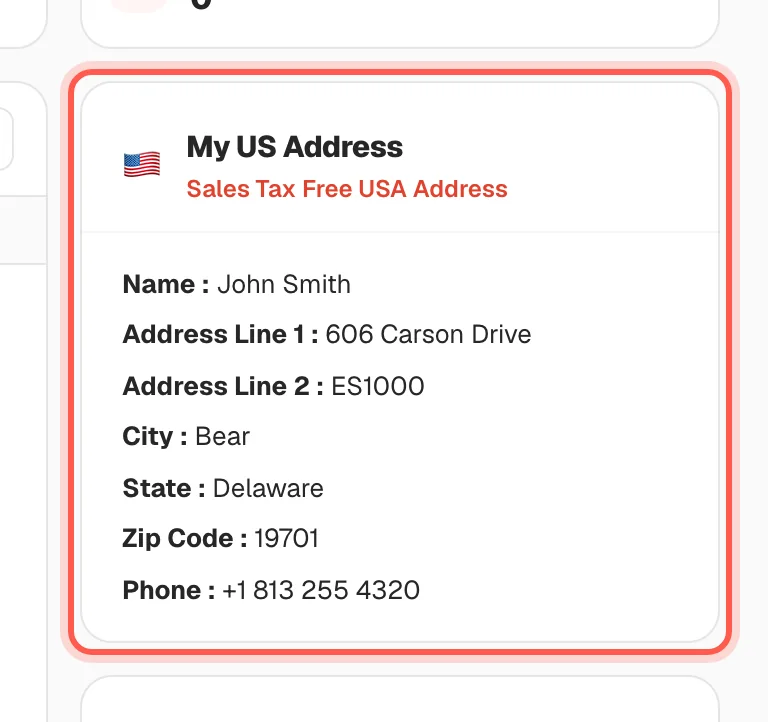
Click "Go to warehouse" to see the same address line by line, from "Name" to "Phone".
-
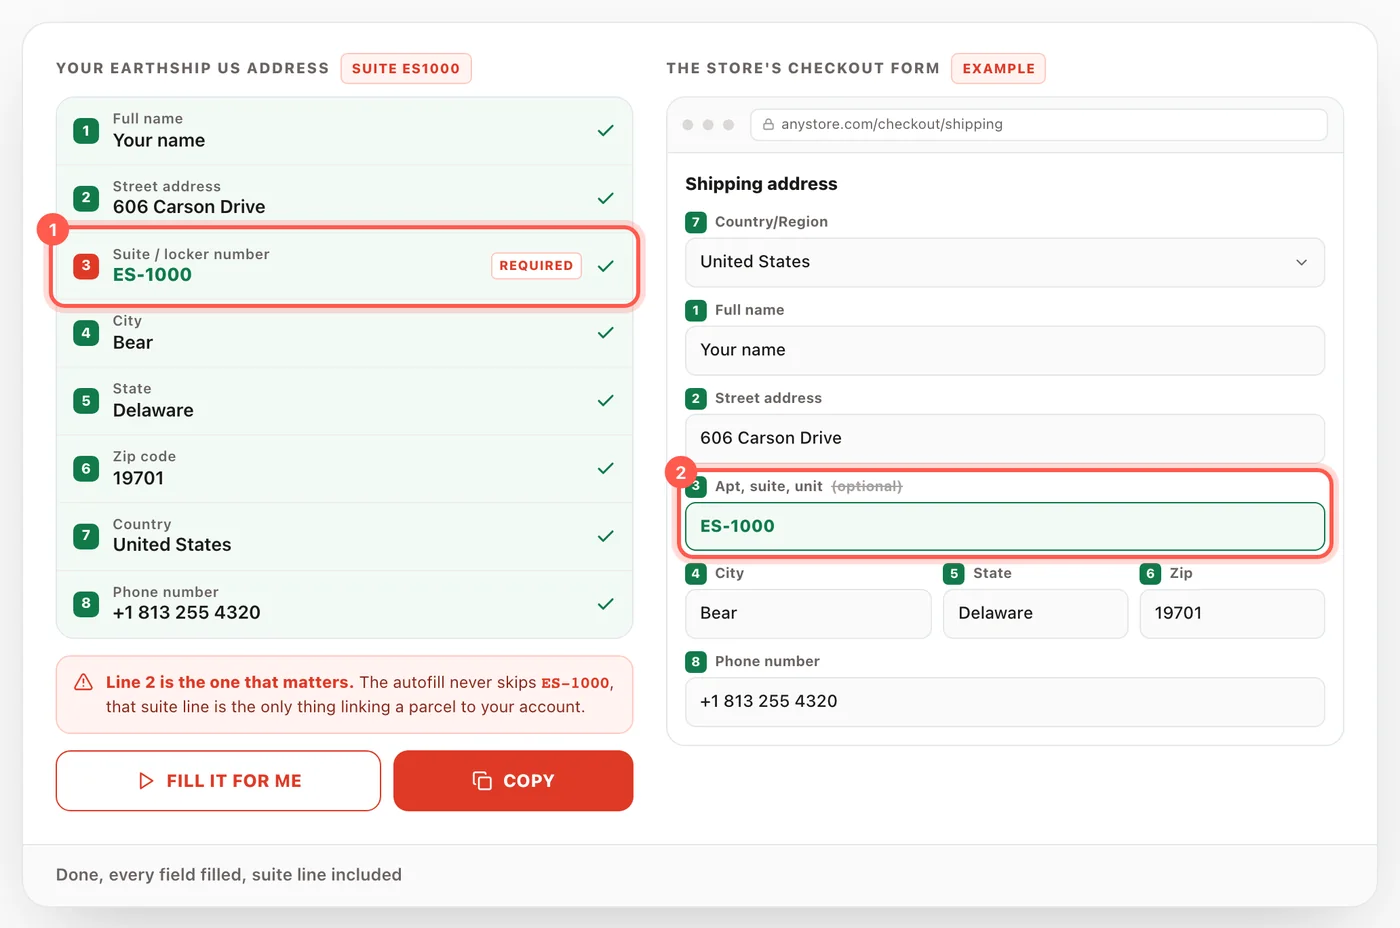
Go to the US store checkout. Type each line of your address into the store's shipping address form, like this example.
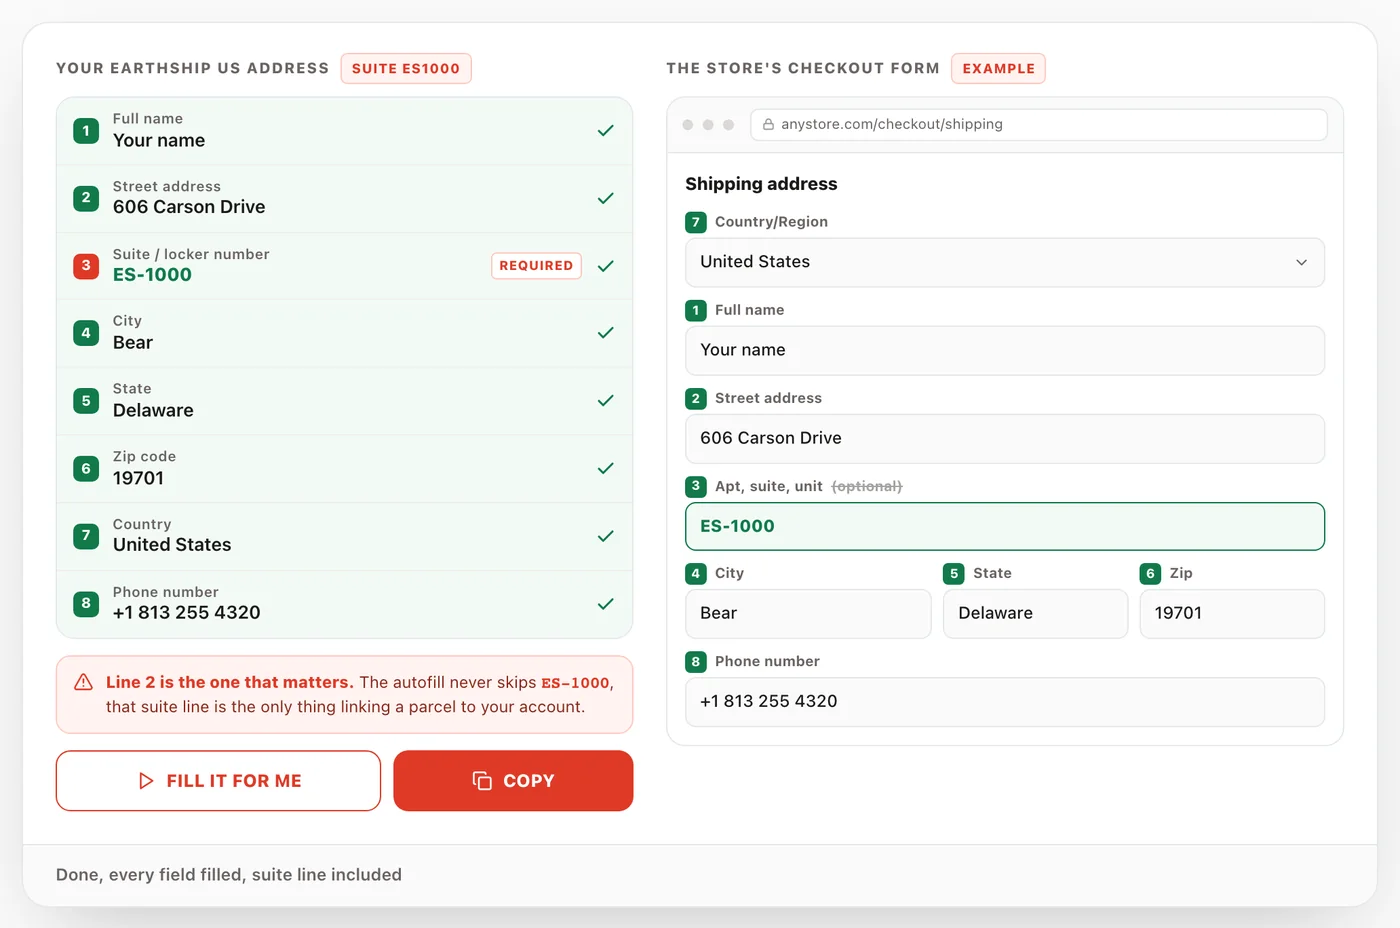
Always type your suite number (ES and your number) in the store's "Apt, suite, unit" box, even if the store says it is optional.
Show my US addressWhat is my suite number and why does it matter? 4 steps
Your suite number is the letters ES and your own number. It is the only thing that tells our warehouse a package or a payment is yours, so always include it.
-
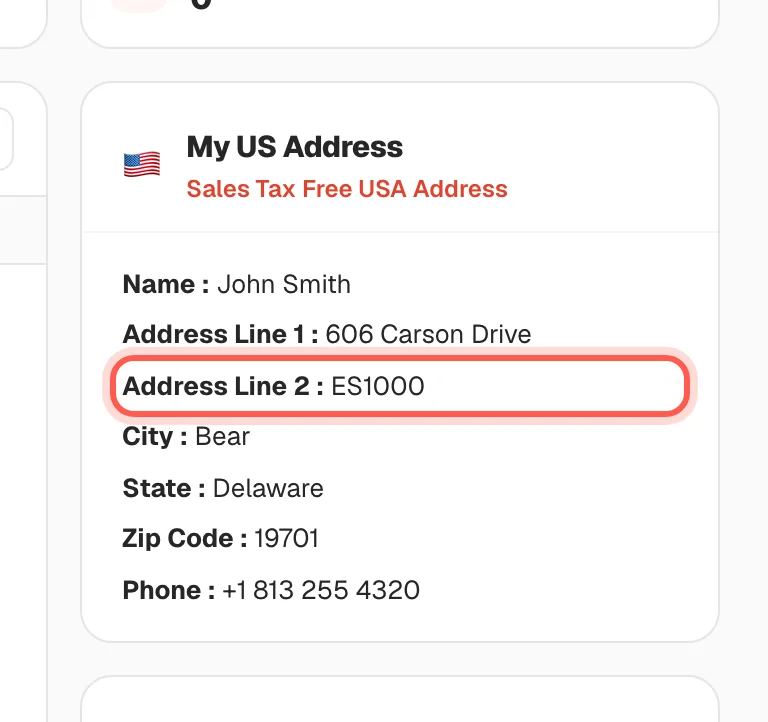
Open "Warehouse" and look at "My US Address". Your suite number is on "Address Line 2".
-
At the store checkout, type your suite number (1) into the "Apt, suite, unit" box (2). Do not leave it empty.
-
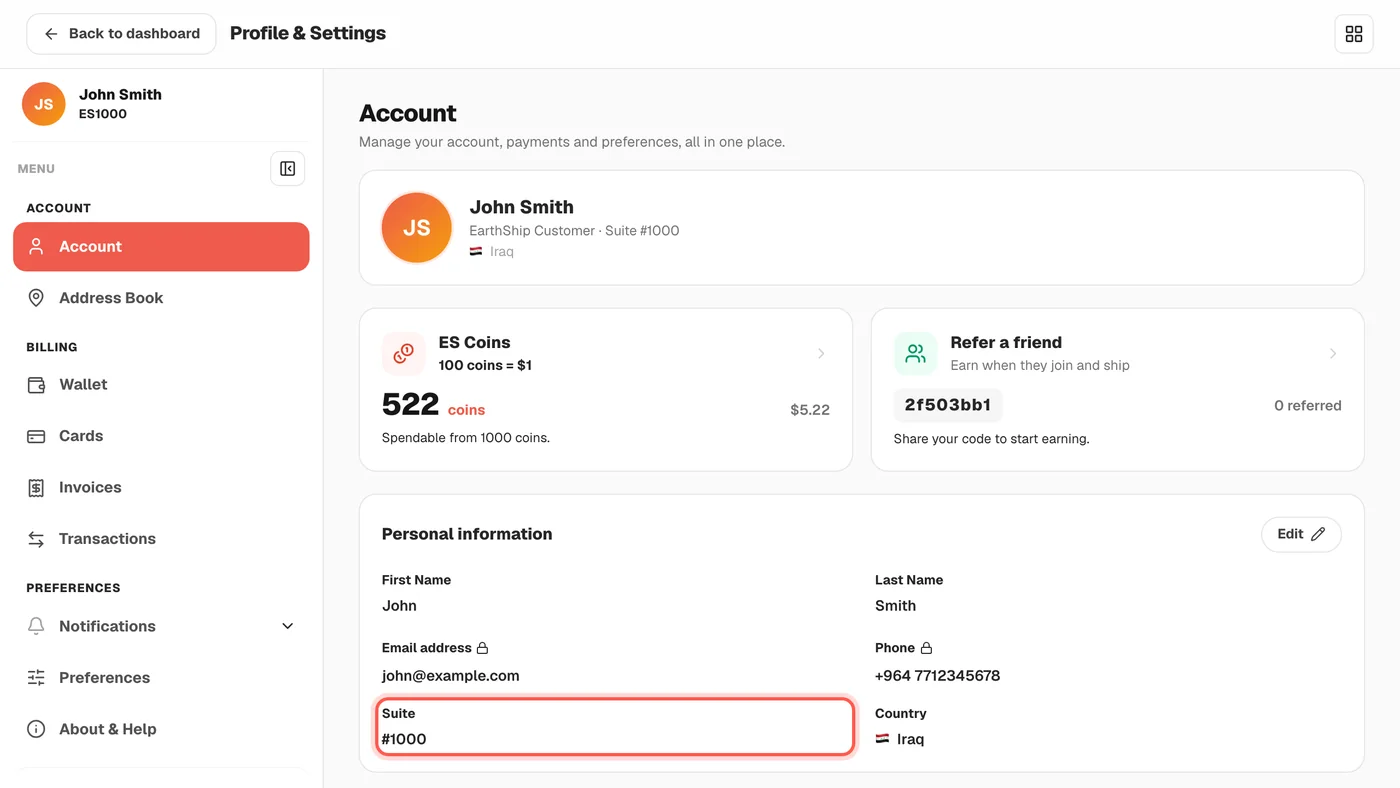
Find your suite number any time in "Profile & Settings", under "Account", in the "Suite" field.
- Write your suite number as the reference when you top up your wallet by Zelle, Zain Cash or wire transfer. When you pay for a shipment, write your order number.
A package without your suite number cannot be matched to your account and may be delayed.
Show my suite numberWhat happens when my package arrives at the warehouse? 5 steps
We weigh it, measure it and take pictures of it. Then it shows on your "Warehouse" page, where you add its value and create a ship request.
-
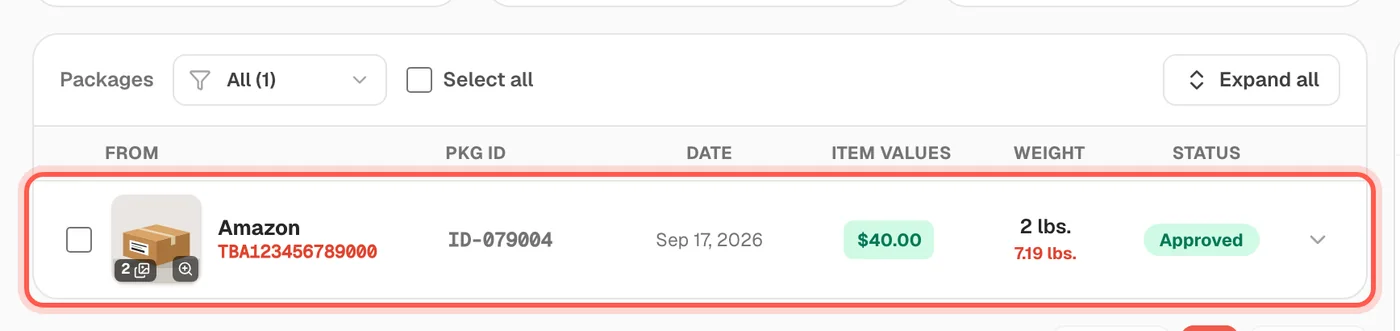
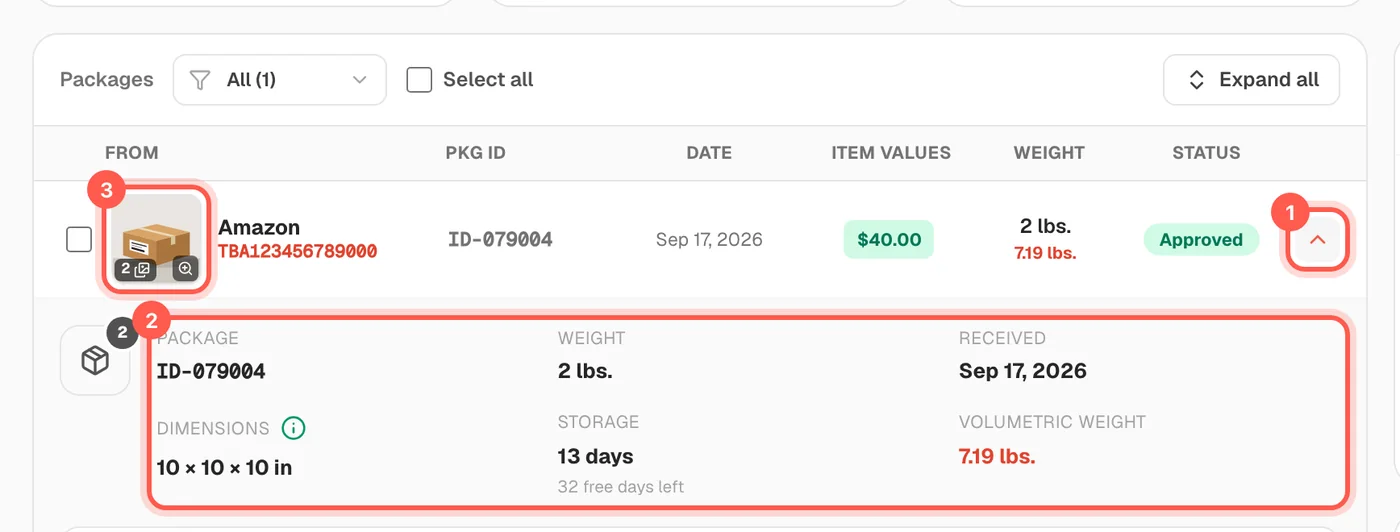
Open the "Warehouse" page. Each package we received is one row, with the sender, "Pkg ID", "Date", "Weight" and "Status".
-
Click the small arrow at the end of the row (1) to see the weight, size and received date (2). Click the small picture (3) for photos.
-
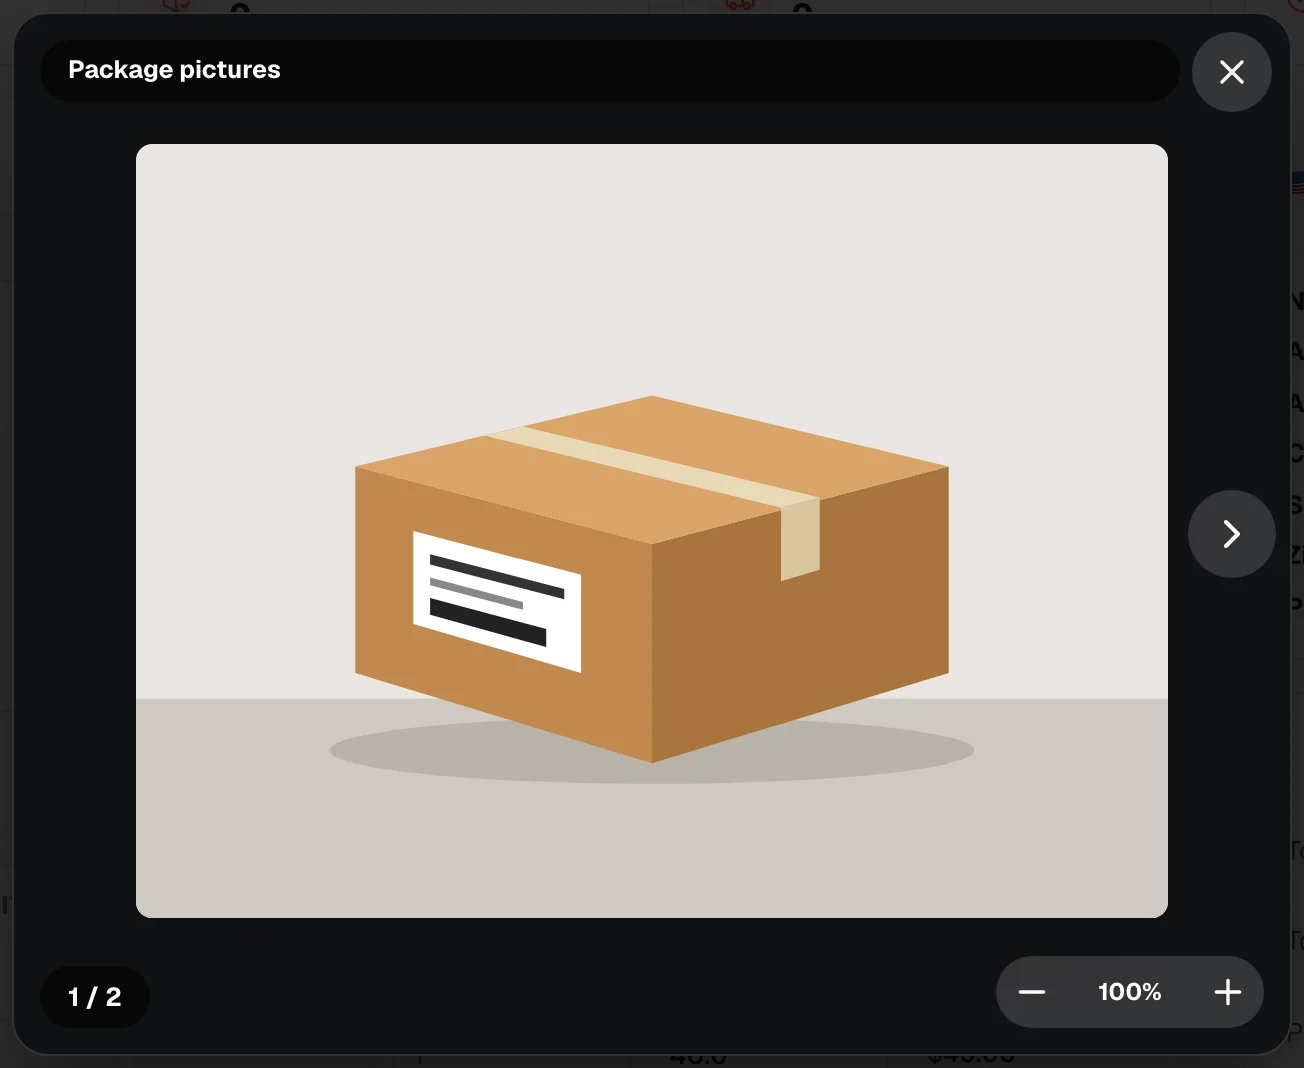
Look at the "Package pictures" we took. Use the arrow to see the next picture and the X to close.
-
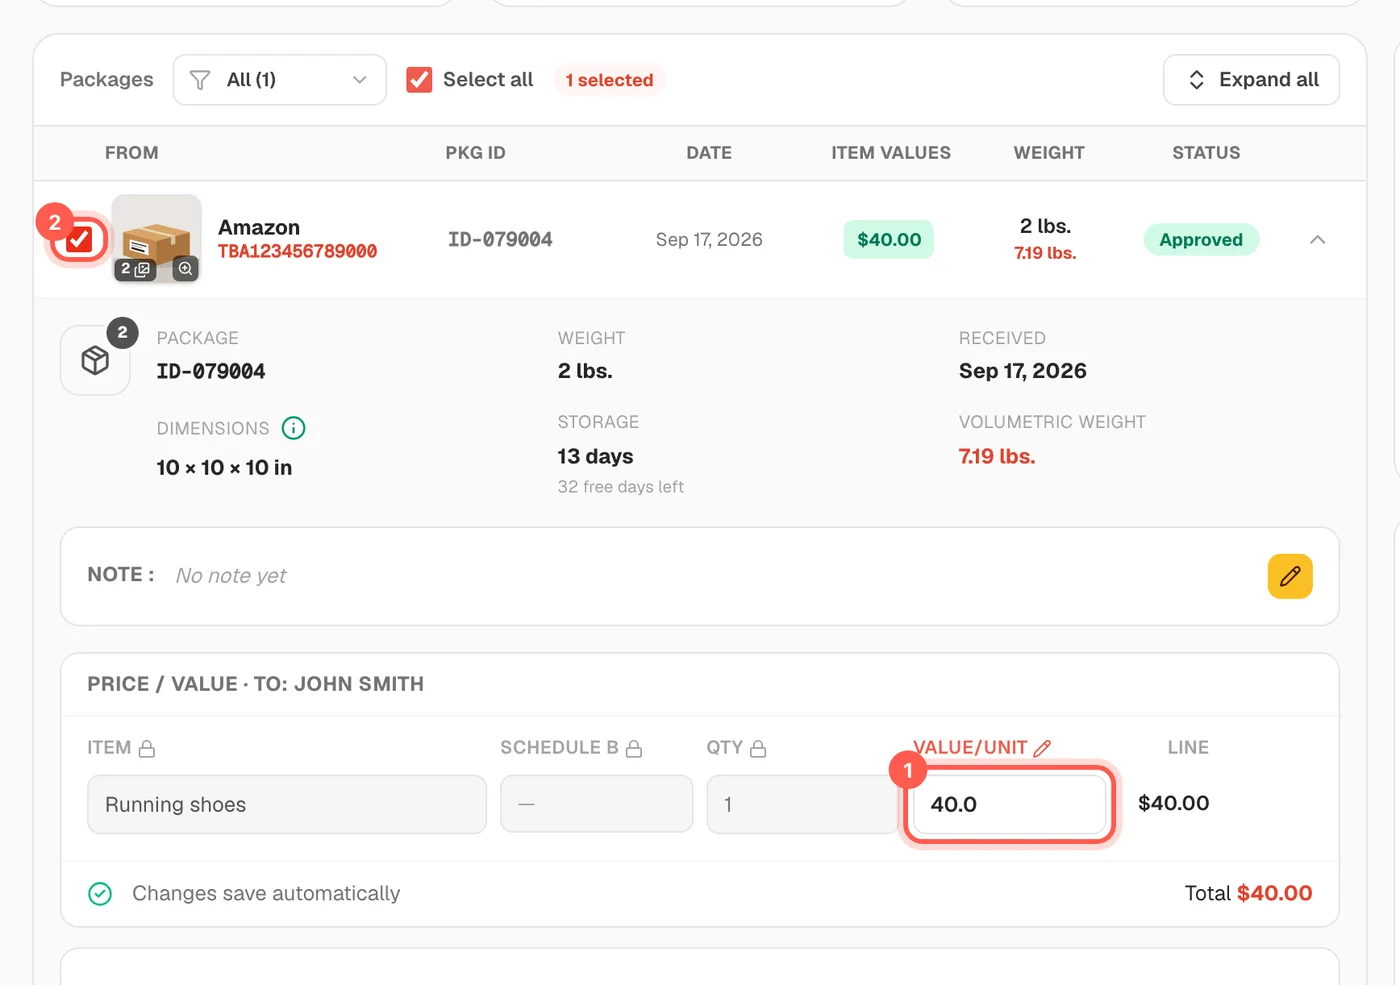
Type the price of your item in "Value/unit" (1). It saves automatically. Then tick the box at the start of the row (2).
-
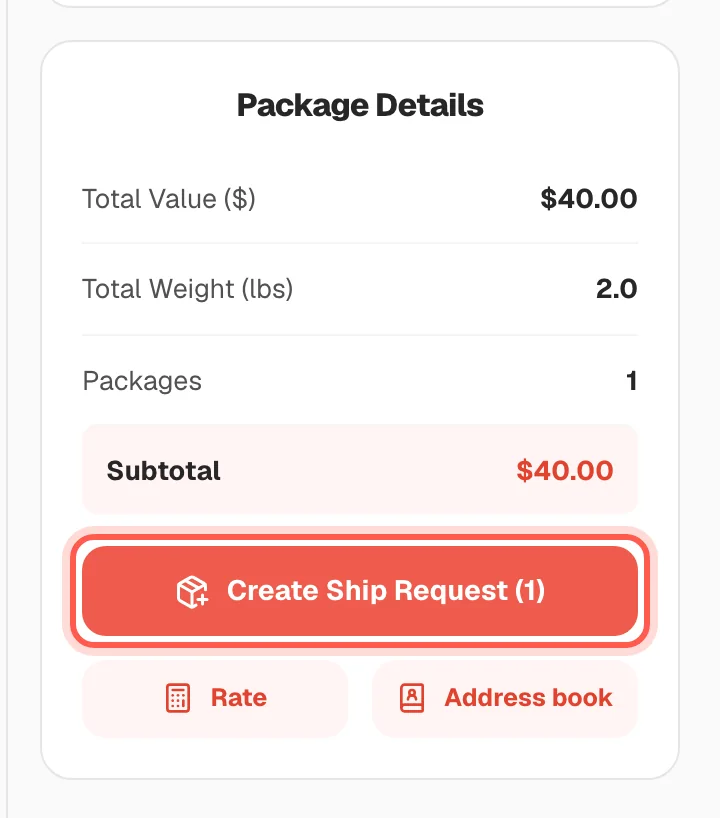
Click "Create Ship Request" in the "Package Details" box. On the next pages you choose the address and courier. You pay after our team approves the request.
You cannot tick a package until it has a value. If the row shows "Add Price", click it and enter the value first.
Open my warehouseHow long can a package stay in my warehouse? 3 steps
A package stays free for 45 days. After that, storage costs $0.08 per pound per day, and it is added to your invoice when you ship the package.
-
Open the "Warehouse" page and click the small arrow at the end of your package row.
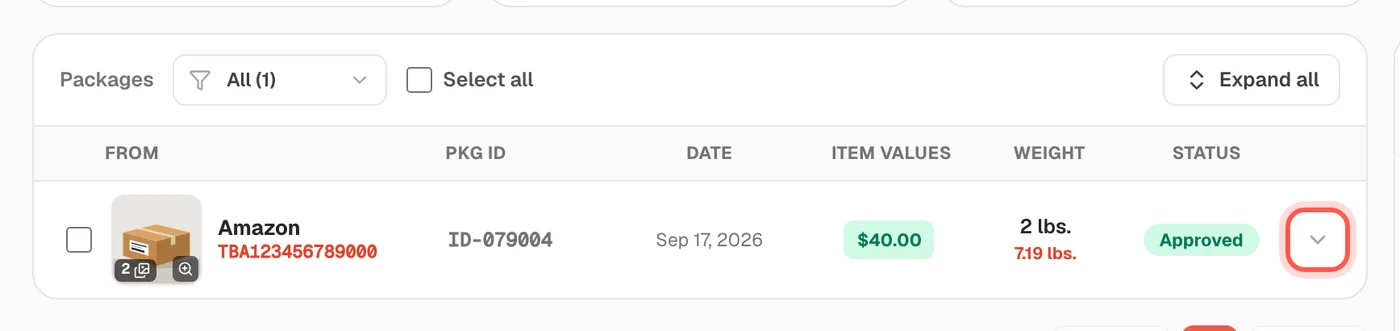
-
Look at "Storage". It shows how many days the package has been here and how many free days are left.
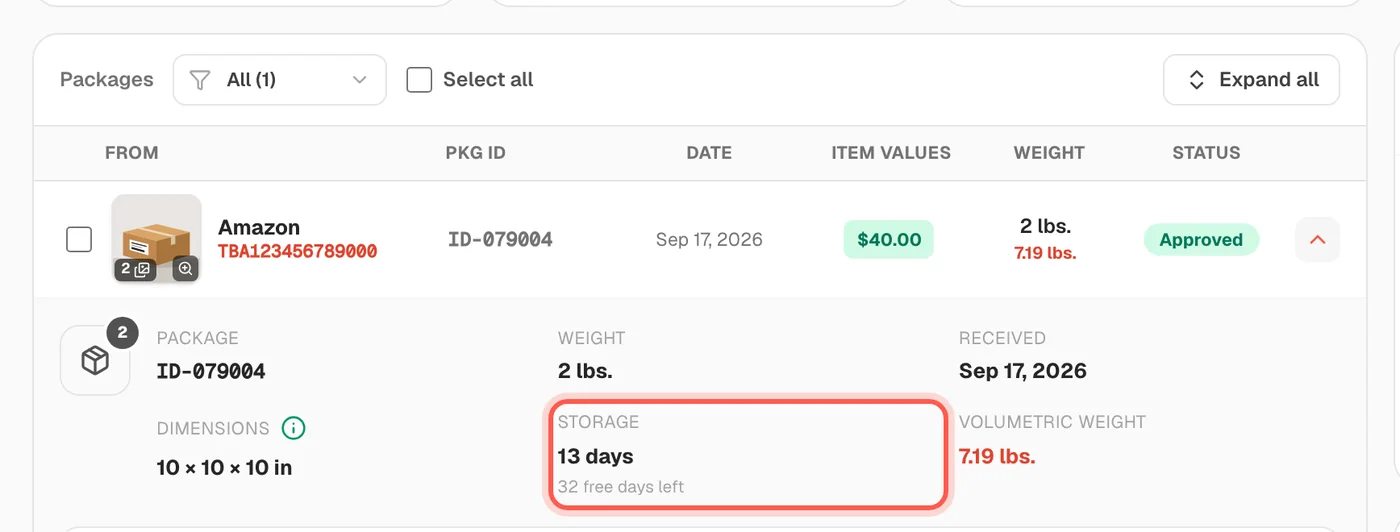
-
After the free days end, "Storage" turns red and shows the amount due. Ship the package to stop the charge growing.
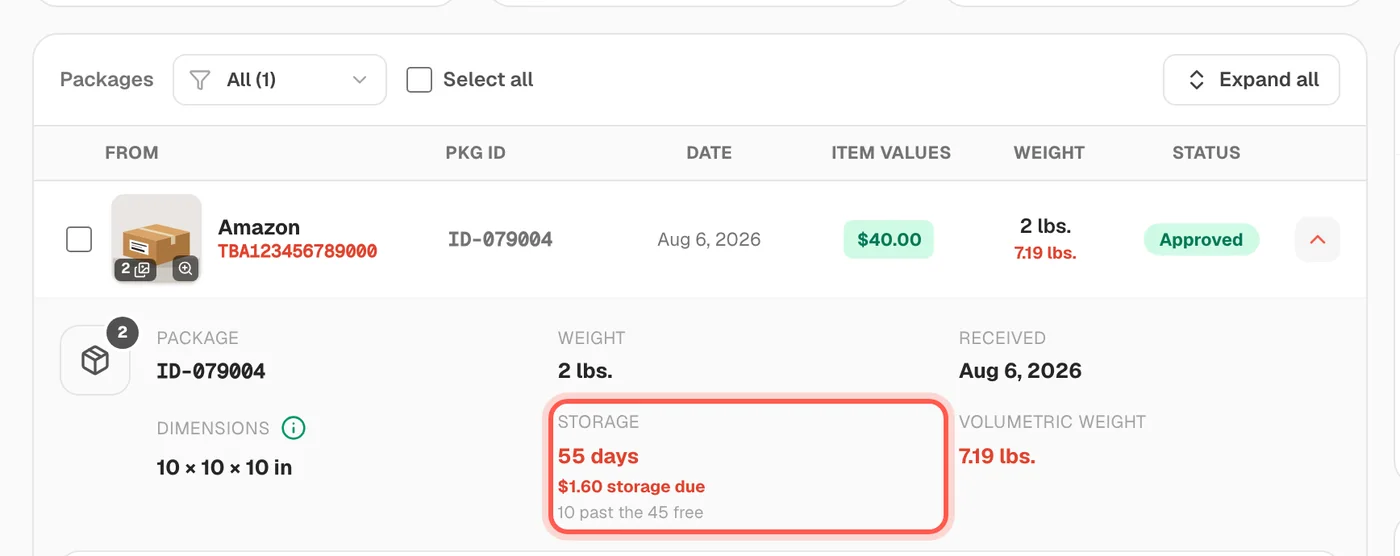
Storage is charged by weight: days past the free period x pounds x $0.08. Example: 10 extra days for a 2 lb package is $1.60.
Check my storage daysWhat happens if my package arrives with a wrong or incomplete address?
If a package arrives with an incorrect or incomplete address (for example a missing suite number, or an unknown or misspelled name), we try to work out which customer it belongs to. If we can find the owner, we add it to the right suite. If we can't find the owner and nobody claims it with its tracking number within 30 days of arrival, the package is disposed of.
Always put your ES suite number on "Address Line 2". You can claim an unidentified package from your dashboard with its tracking number.
Show my suite numberHow do I ship a package that arrived at my warehouse? New 9 steps
Open your Warehouse page, add a value to the package, tick it and press "Create Ship Request". Then choose the delivery address and the carrier, press "Submit for Review", and pay when our team approves it.
-
Open "Warehouse" from the left menu. Click the button under "Item values" on your package (1). It shows "Add Price" until a value is saved.
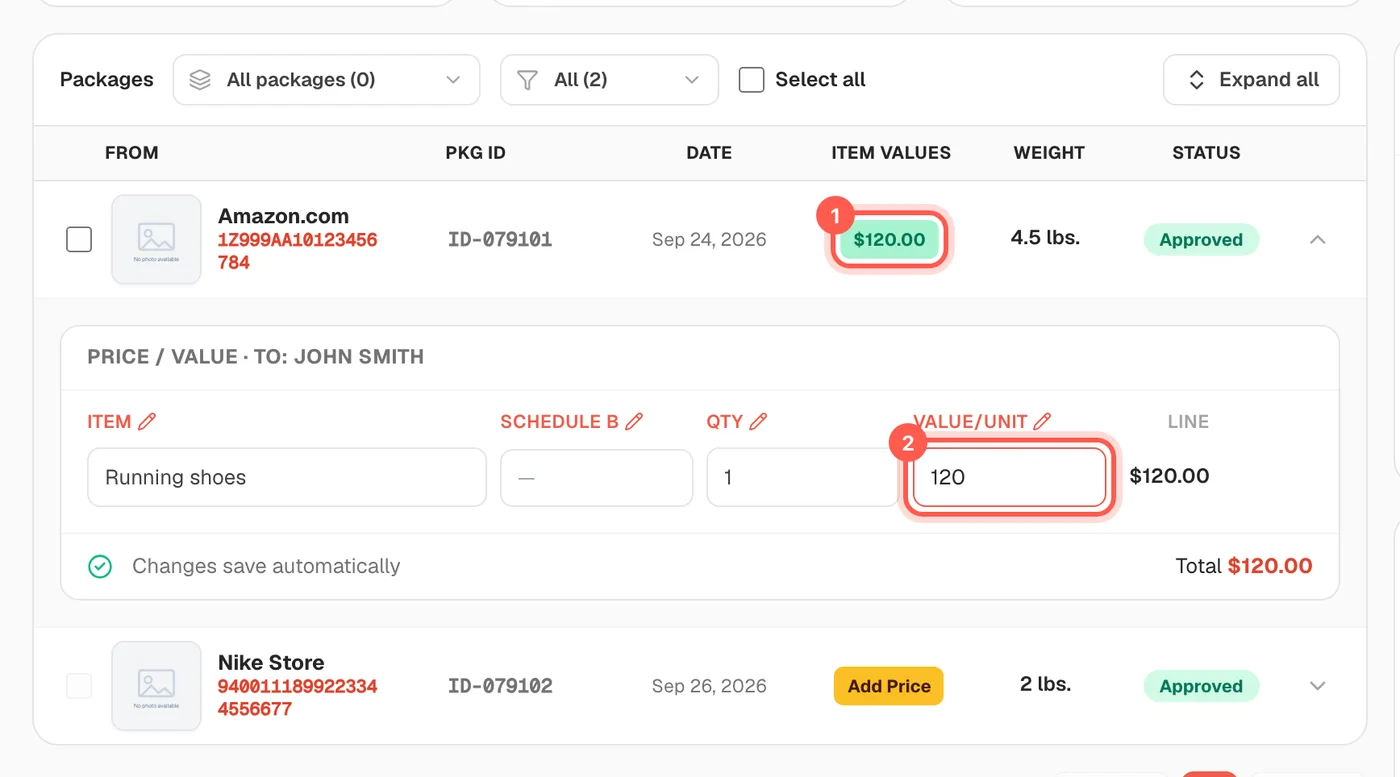
-
Type what the item is worth in US dollars in the "Value/unit" box (2). It saves automatically.
-
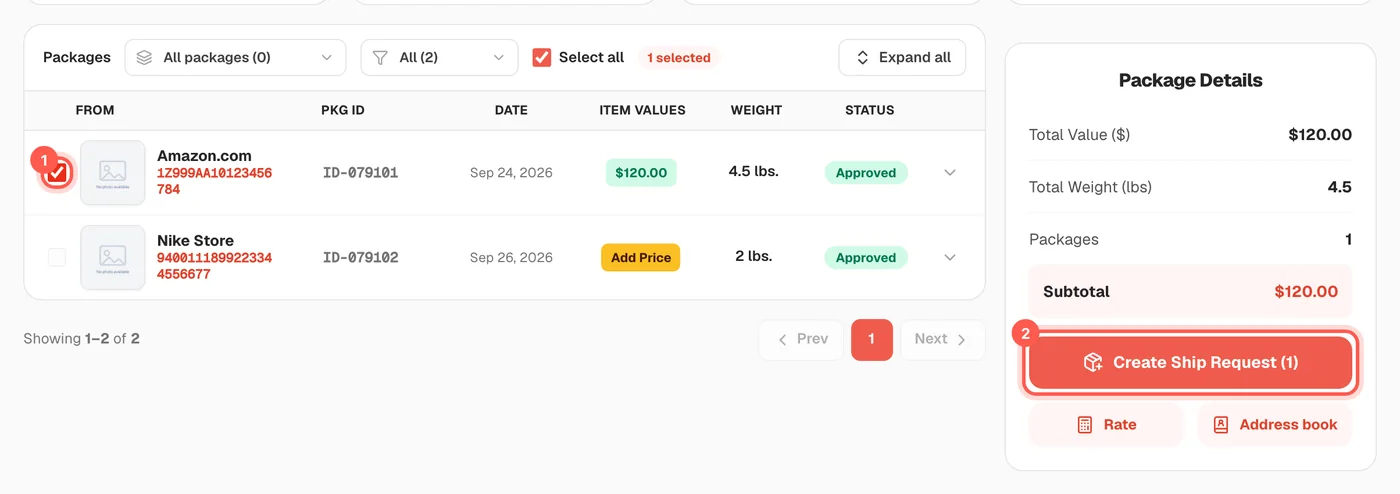
Tick the box at the start of the package row (1). You can tick more than one package to ship them together.
-
Check the totals under "Package Details", then click "Create Ship Request" (2).
-
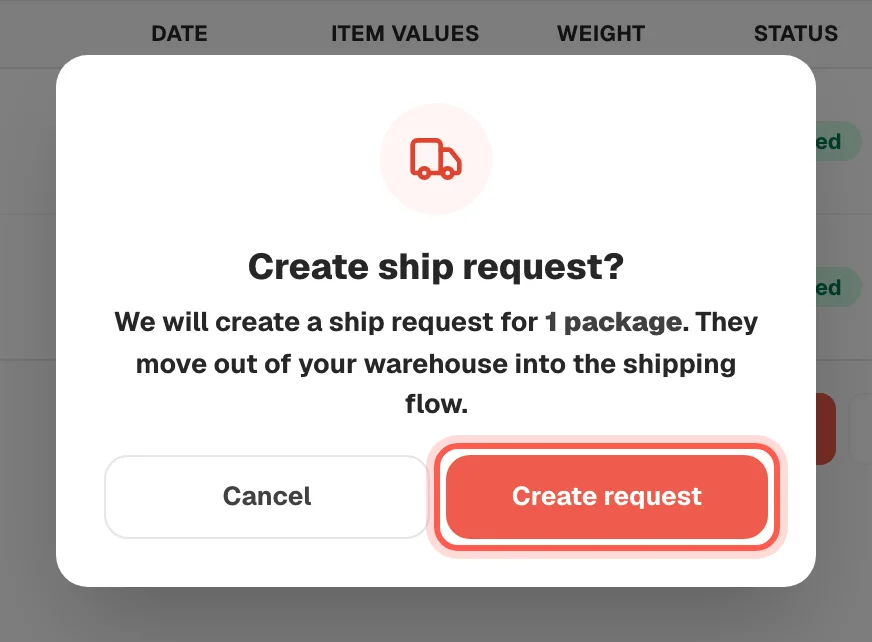
Click "Create request" in the popup to confirm. The package leaves your warehouse list and the order page opens.
-
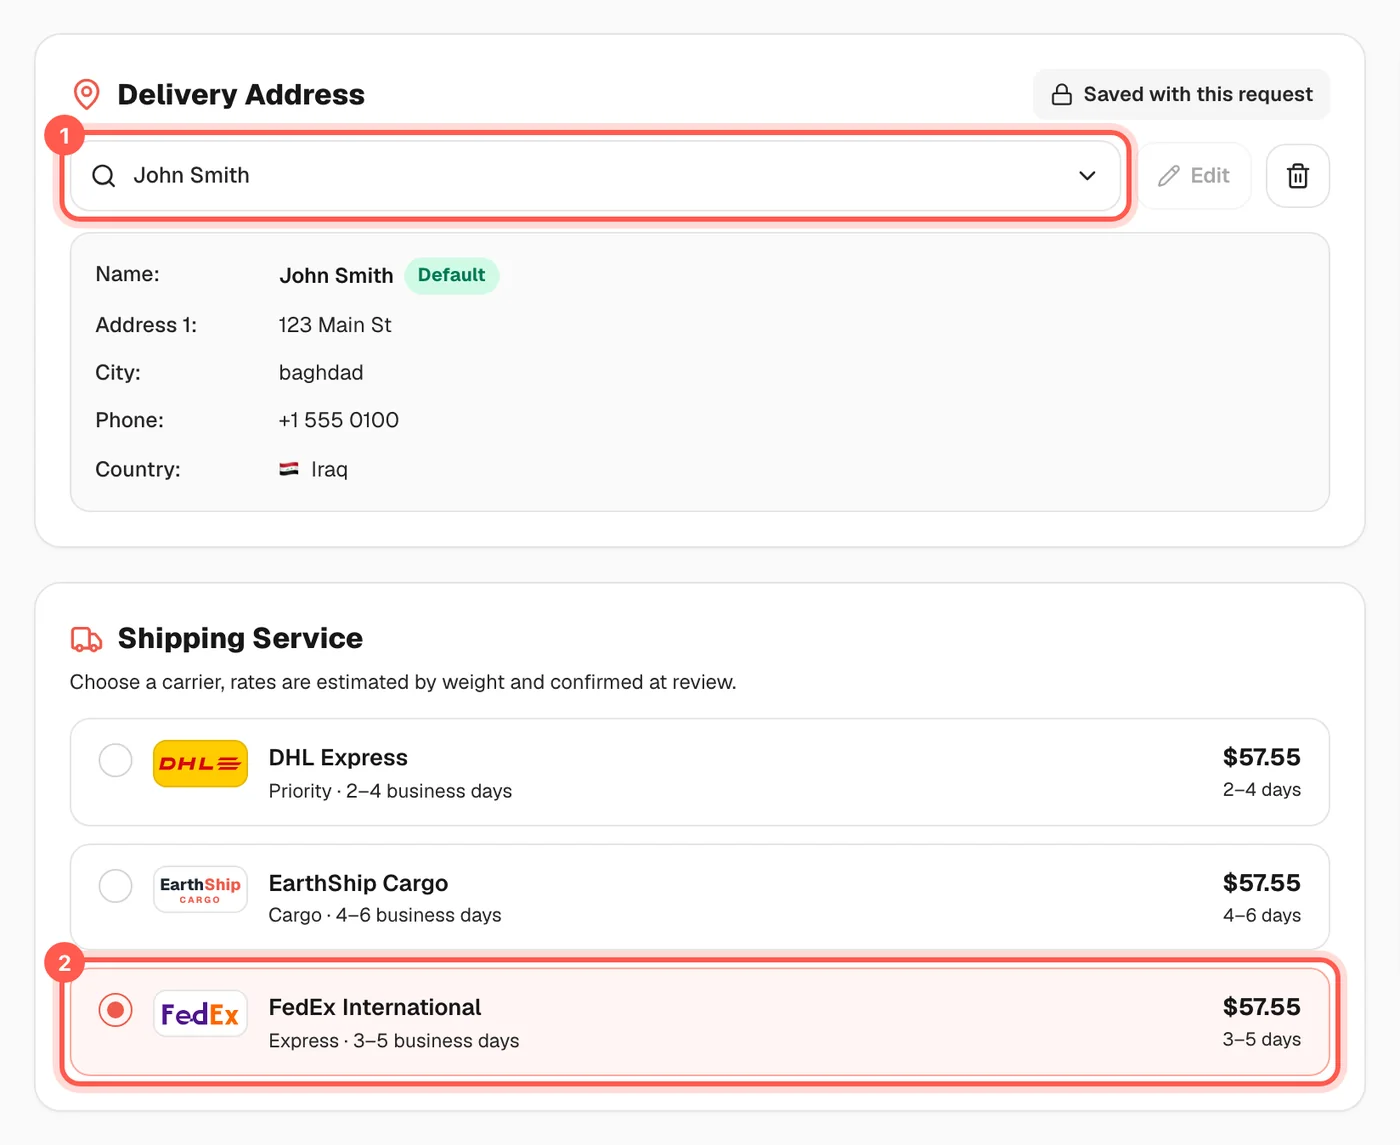
Choose where to send it under "Delivery Address" (1), or click "Add address" to enter a new one.
-
Choose a carrier under "Shipping Service" (2). Each one shows its price and delivery time.
-
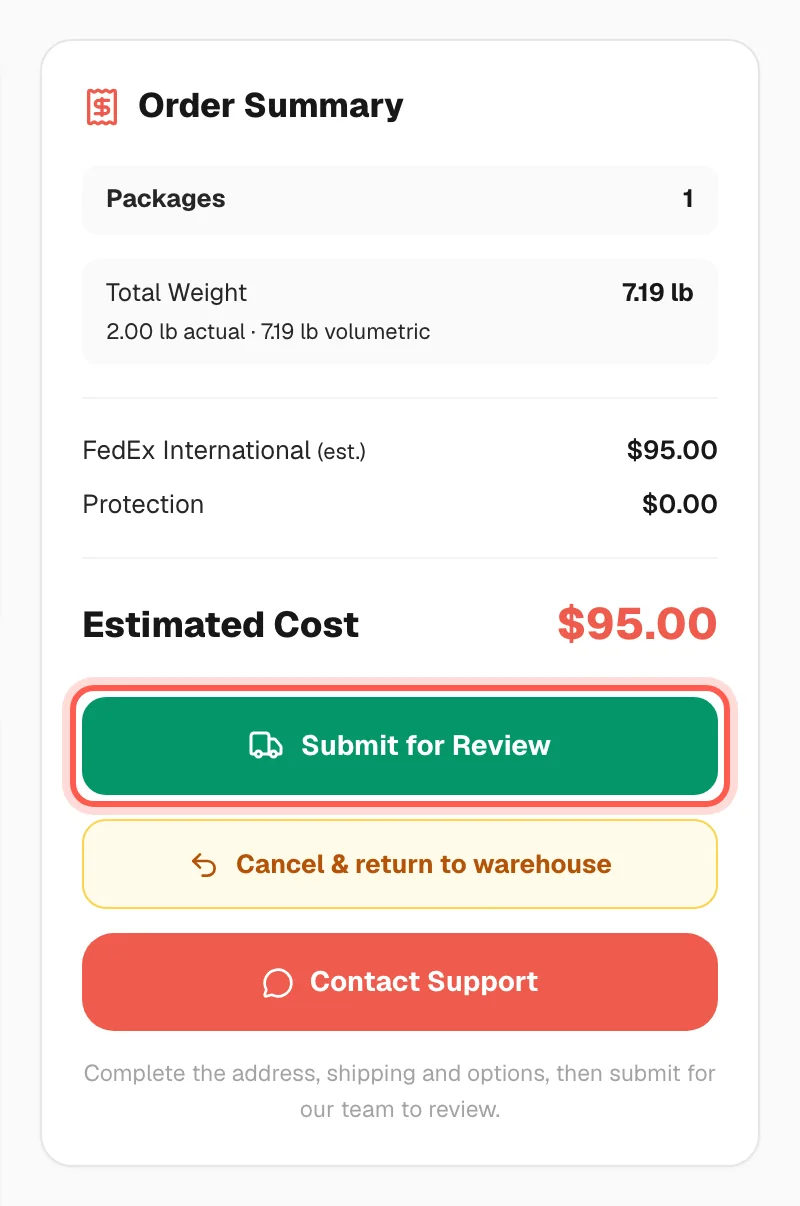
Check the "Estimated Cost" in "Order Summary", then click "Submit for Review" and confirm with "Yes, submit".
- Wait for our team to approve the request. Then open it from "Ready to ship" on the Warehouse page and click "Pay Now".
You cannot tick a package until it has a value. After you press "Submit for Review" the details are locked, so check the address and carrier first.
Open my WarehouseHow do I request a service for a package in my warehouse (photos, return, and more)? New 5 steps
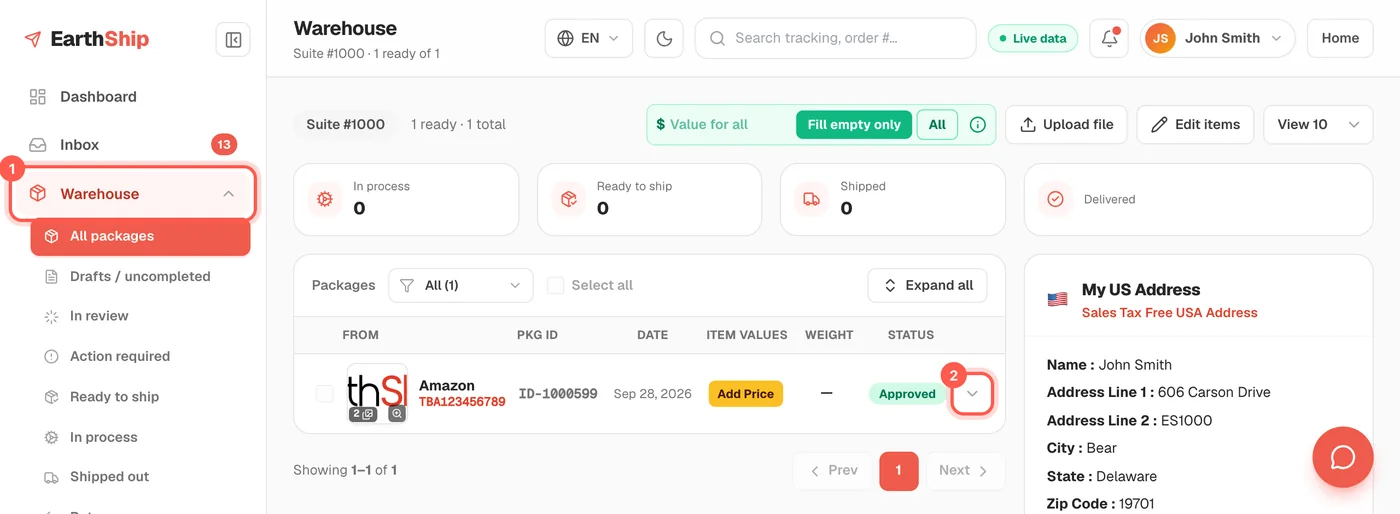
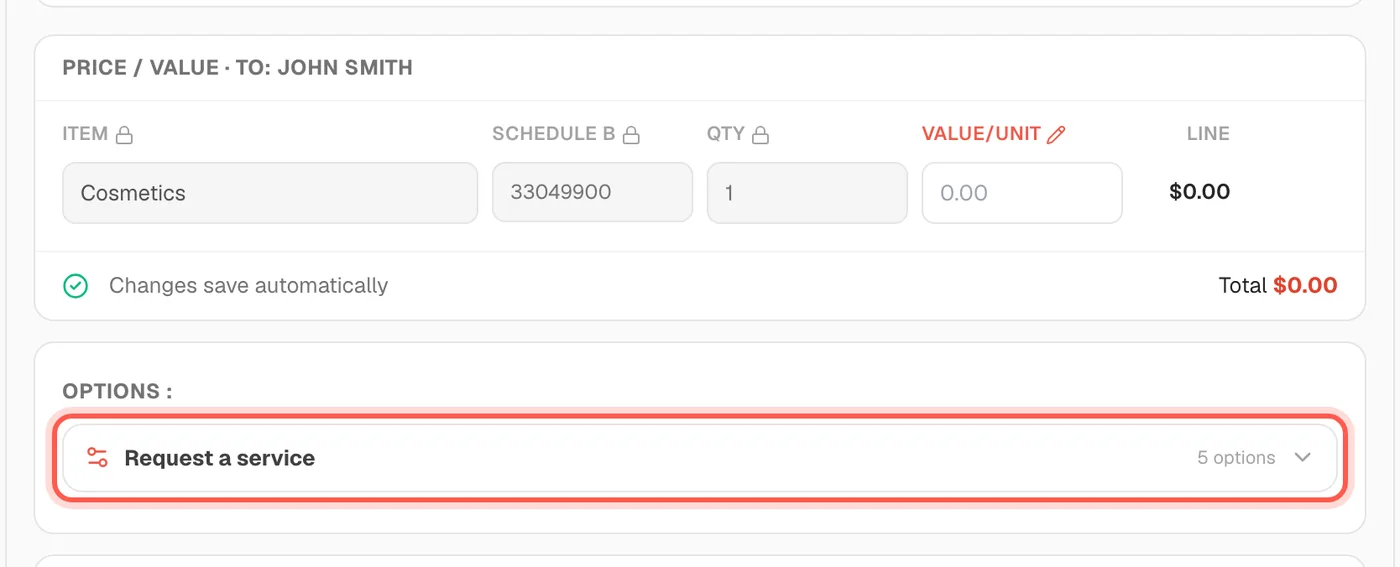
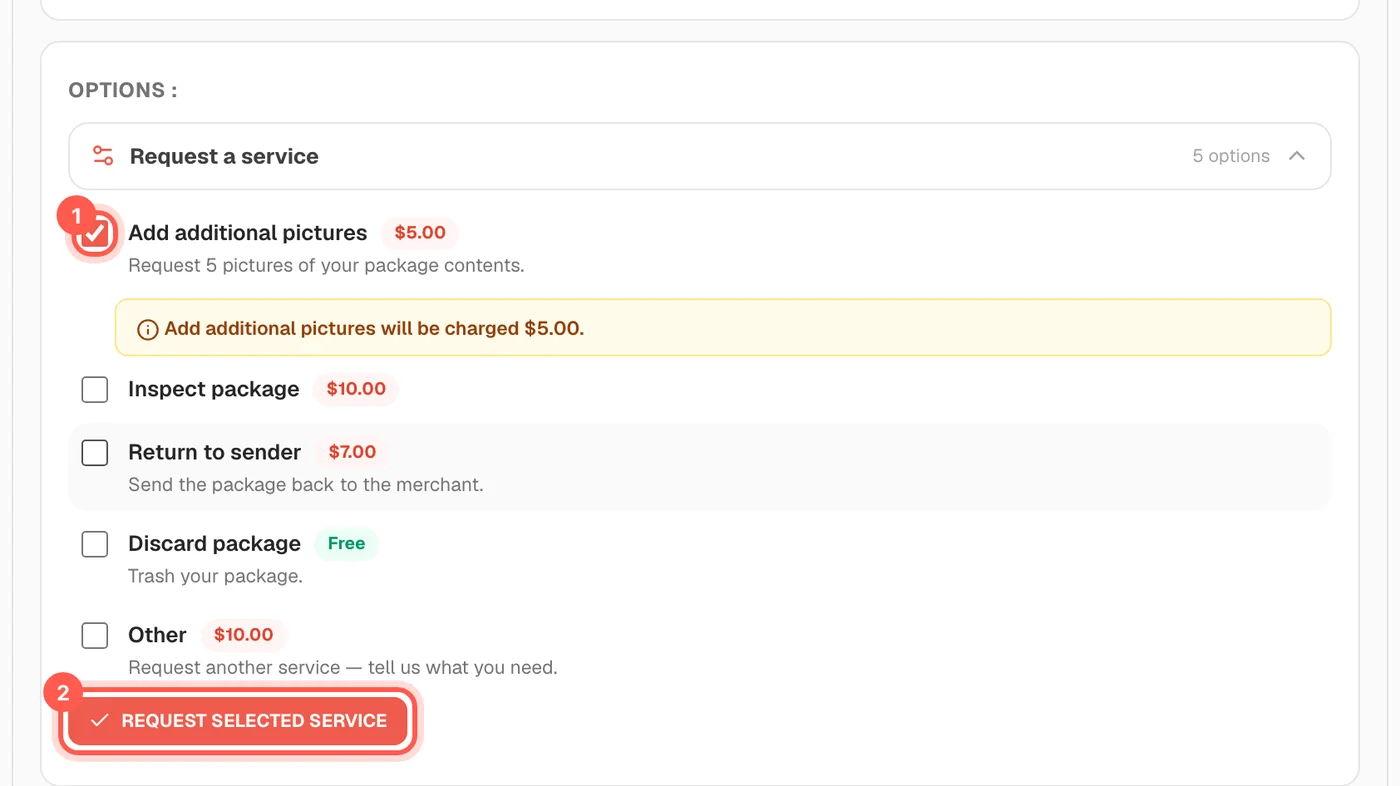
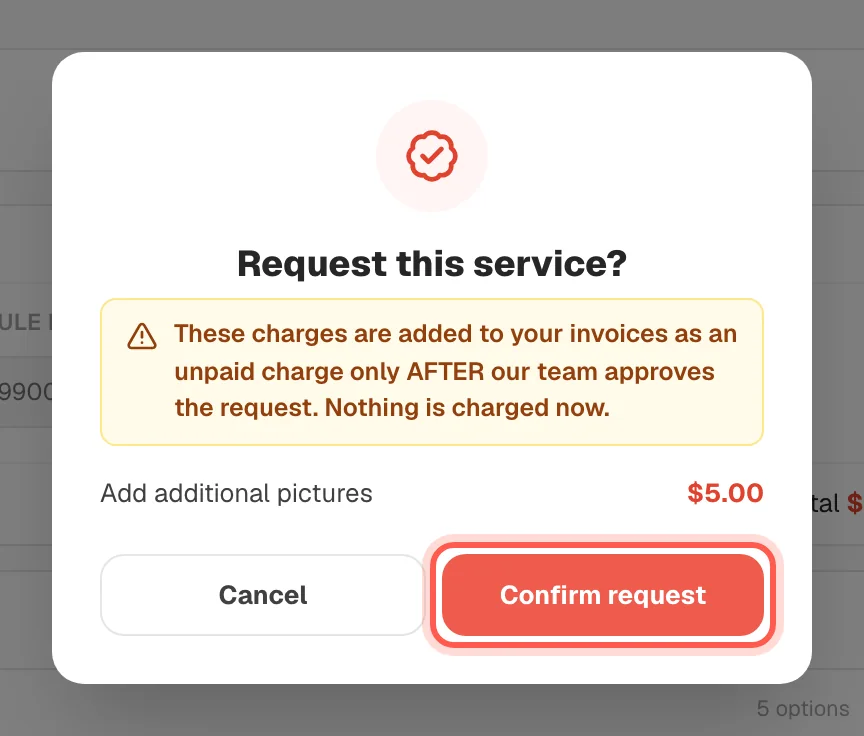
Open the package on your Warehouse page and use "Request a service" under "Options". You can ask for extra pictures, an inspection, a return to the sender, to discard the package, or something else. Paid services are charged only after our team approves the request.
-
Open "Warehouse" in the left menu, then click the small arrow at the end of the package row to open it.
-
Scroll down to "Options" and click "Request a service" to see the list of services and prices.
-
Tick the service you want, for example "Additional photo request", then click "Request selected service".
-
Check the service and price in the popup, then click "Confirm request". Nothing is charged until our team approves it.
-
To return a package, tick "Return to sender", attach a photo or PDF of the item, then click "Send return".
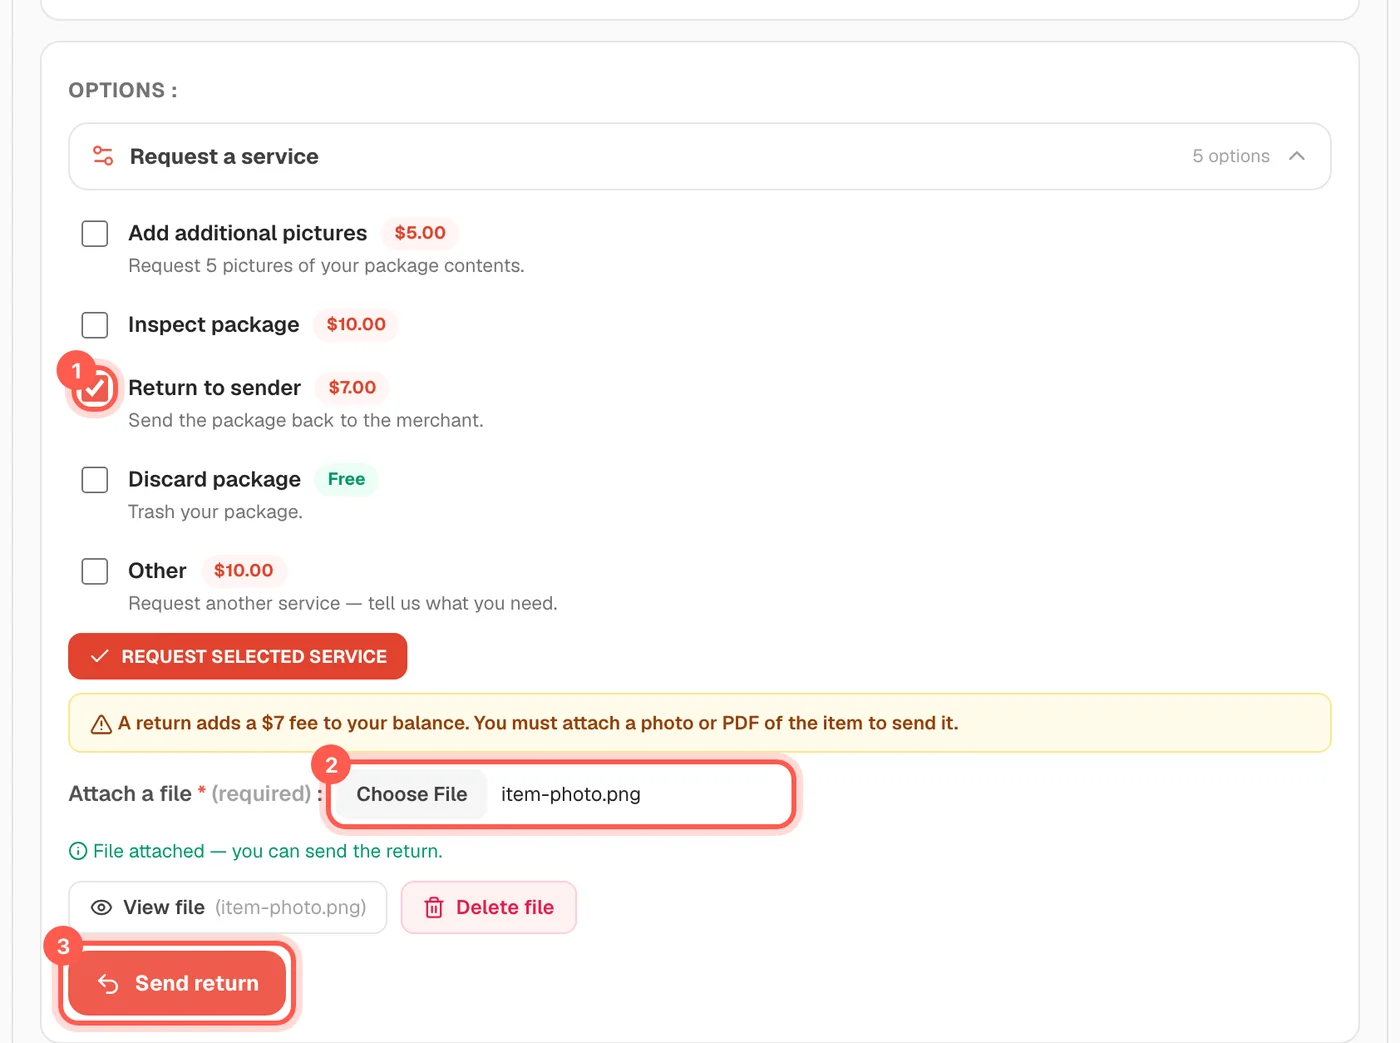
For "Inspect package" and "Other" you must write what you need in the box that appears. While a request shows "Pending approval" you can still click "Cancel request".
Open my WarehouseCan I combine several packages into one shipment? 4 steps
Yes. Tick the packages you want in your warehouse and click "Create Ship Request". They travel together as one shipment, which usually lowers the cost.
-
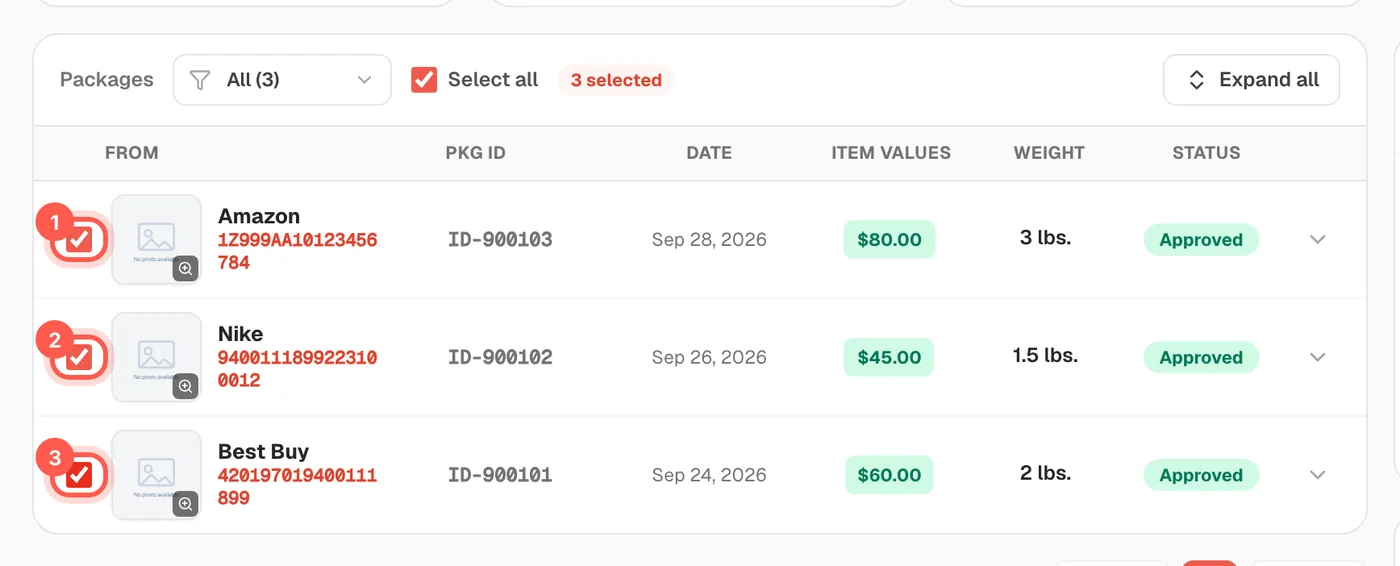
Open "Warehouse" from the left menu. Tick the box beside each package you want to send together.
-
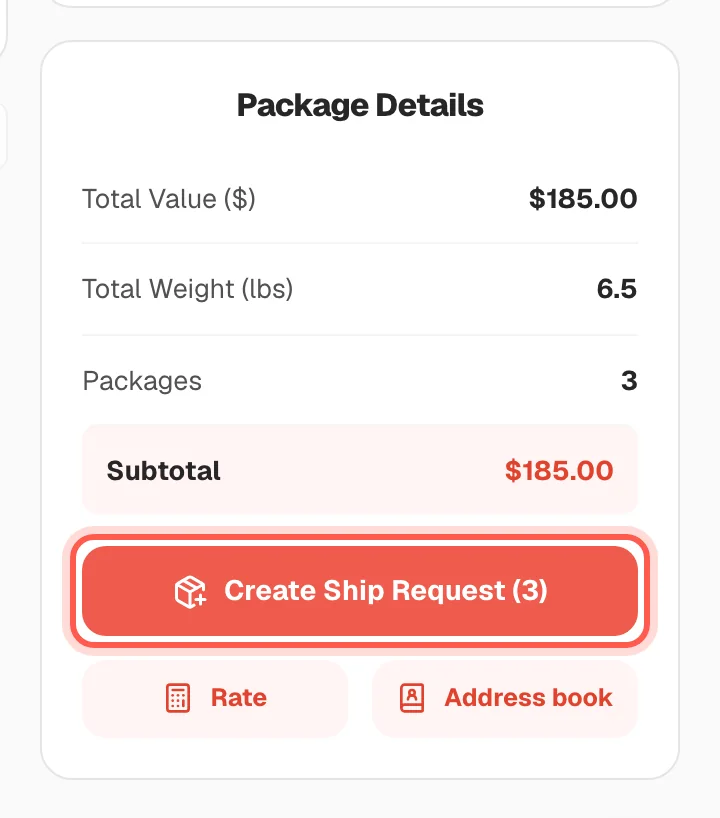
Look at "Package Details" on the right. Check the total value, weight and number of packages, then click "Create Ship Request".
-
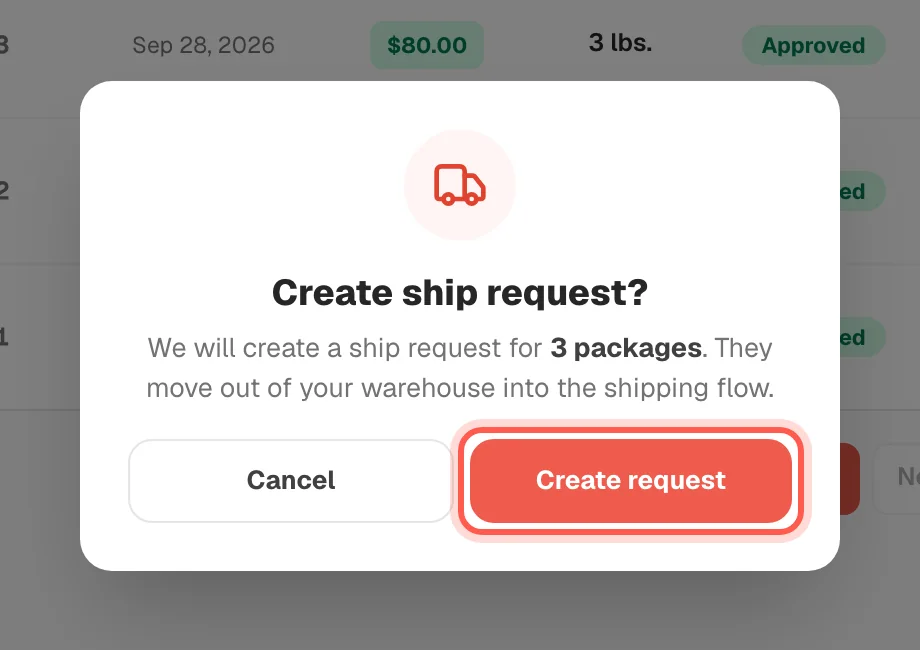
Click "Create request" in the popup to confirm. Click "Cancel" if you want to change your packages first.
- Finish the checkout page that opens next: choose your address and courier, then click "Submit for Review". You pay after our team approves it.
A package can be ticked only after it has a value. If the box is grey, click "Add Price" on that package first. Use "Select all" to tick every package at once.
Open my warehouseHow do I create a shipment? New 7 steps
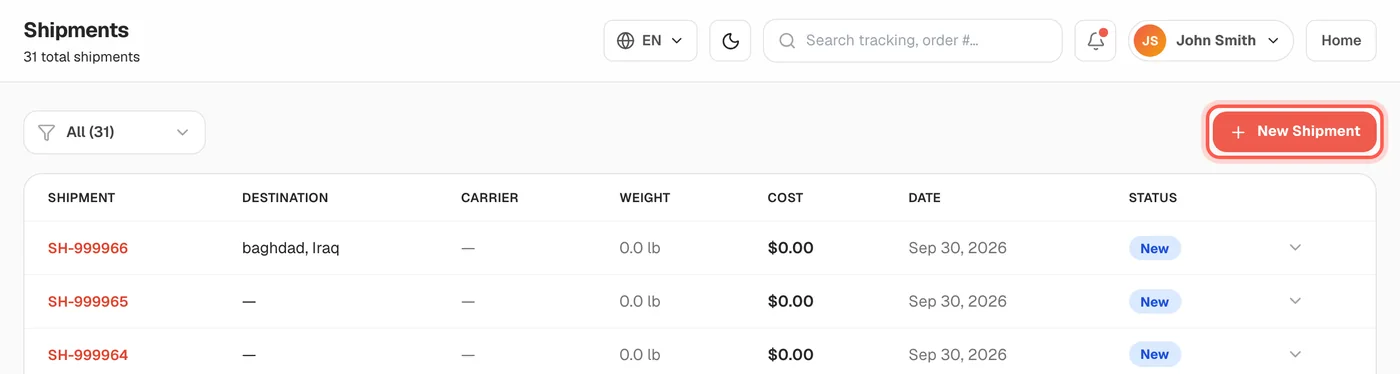
Open "Shipments" and click "New Shipment". Fill in the addresses, your items, the box size and weight, choose a courier, then click "Continue to payment".
-
Open "Shipments" in the left menu, then click the red "New Shipment" button.
-
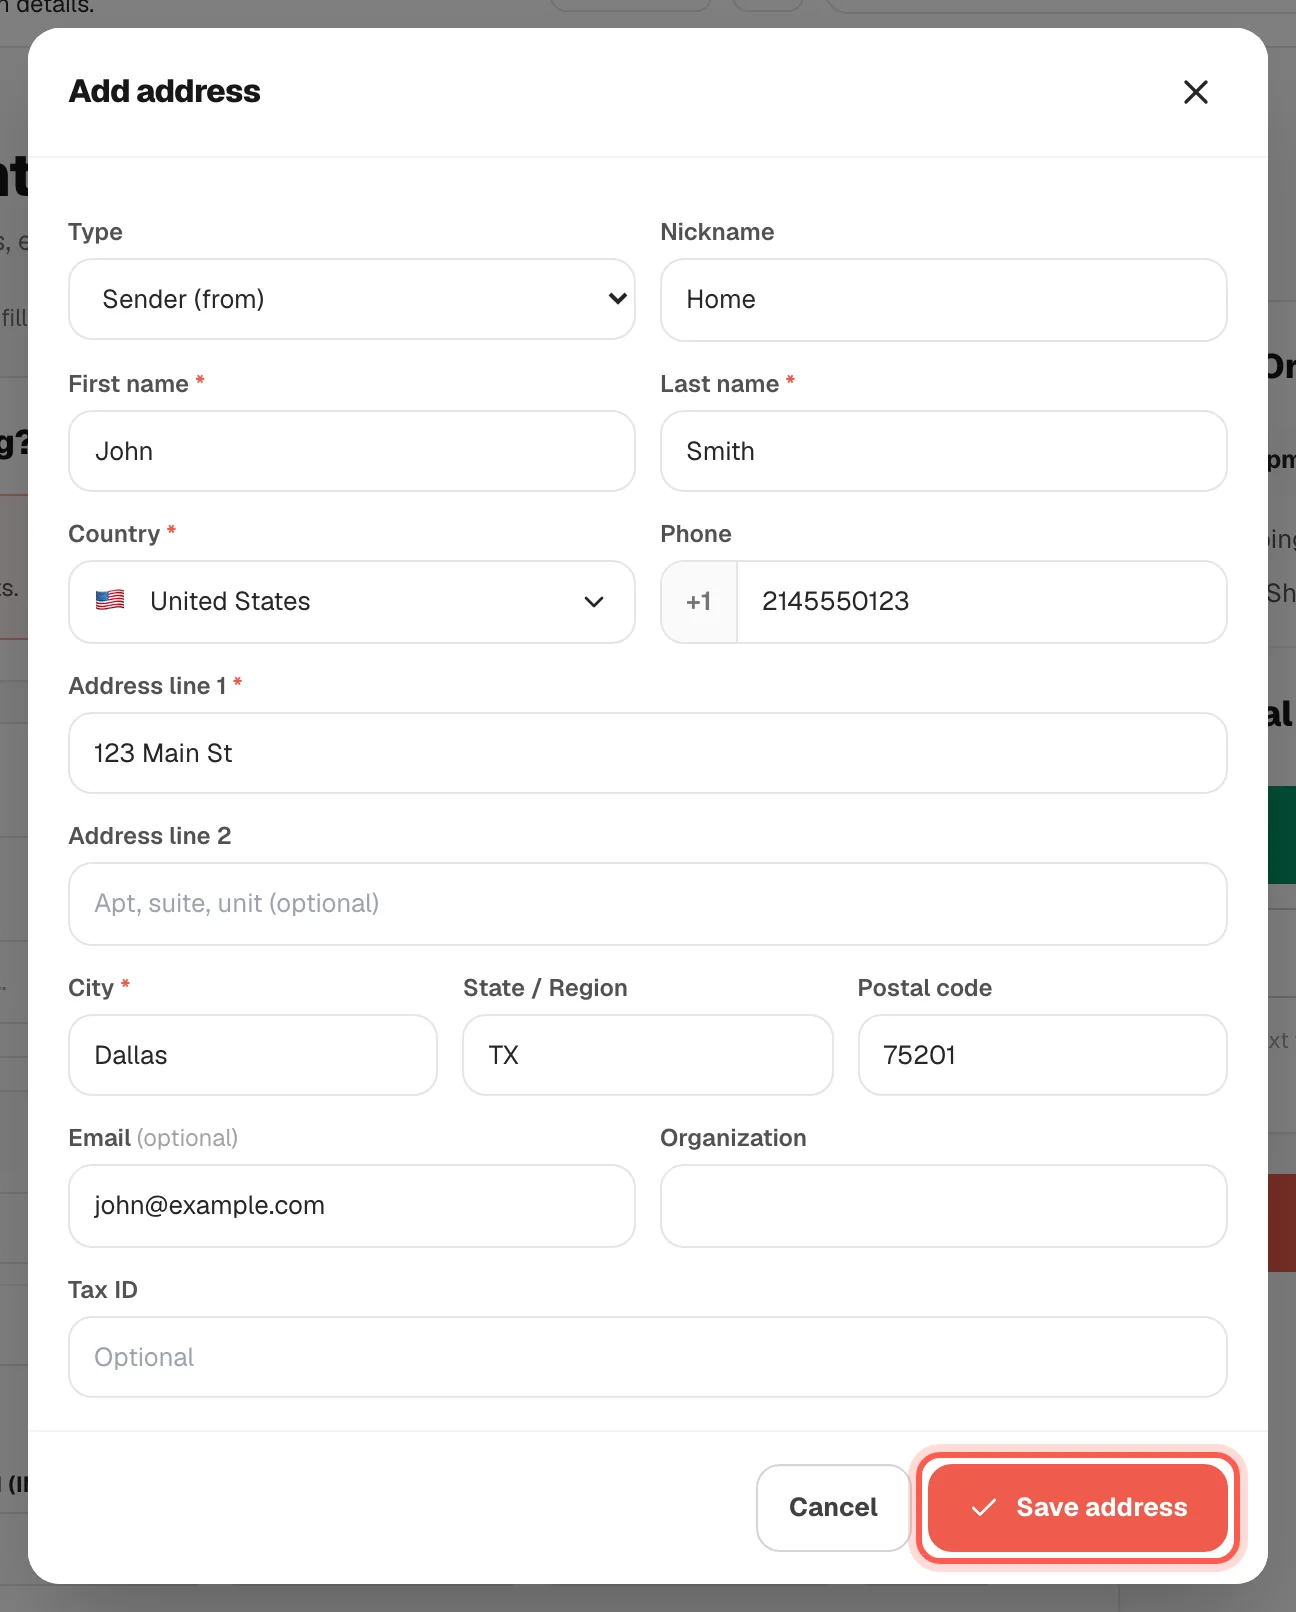
Click "New" next to "From address". Fill in the sender name, country, street and city, then click "Save address".
-
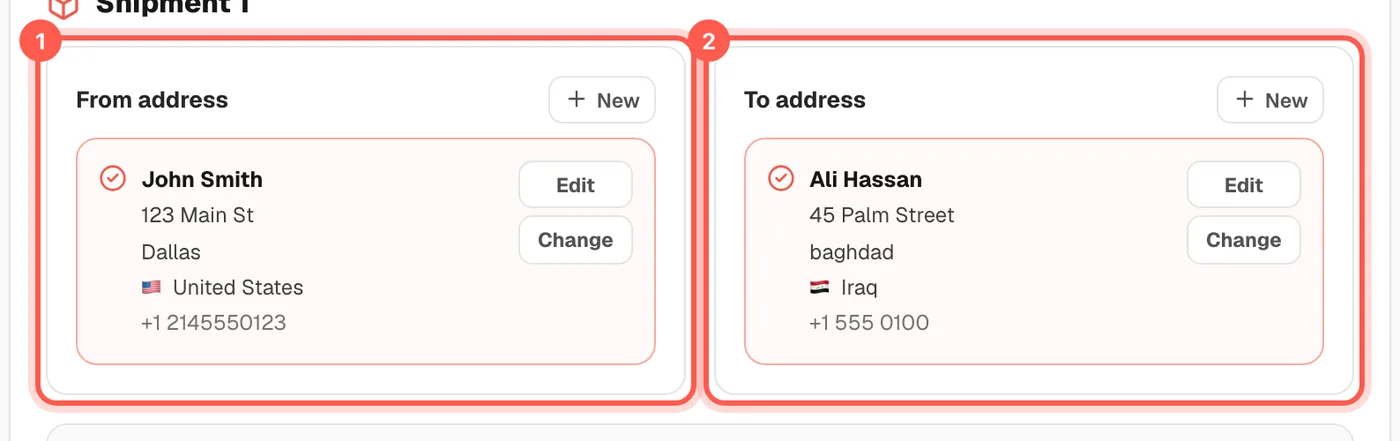
Choose the "From address" (1) and the "To address" (2). Click "Search saved addresses..." to pick one you saved before.
-
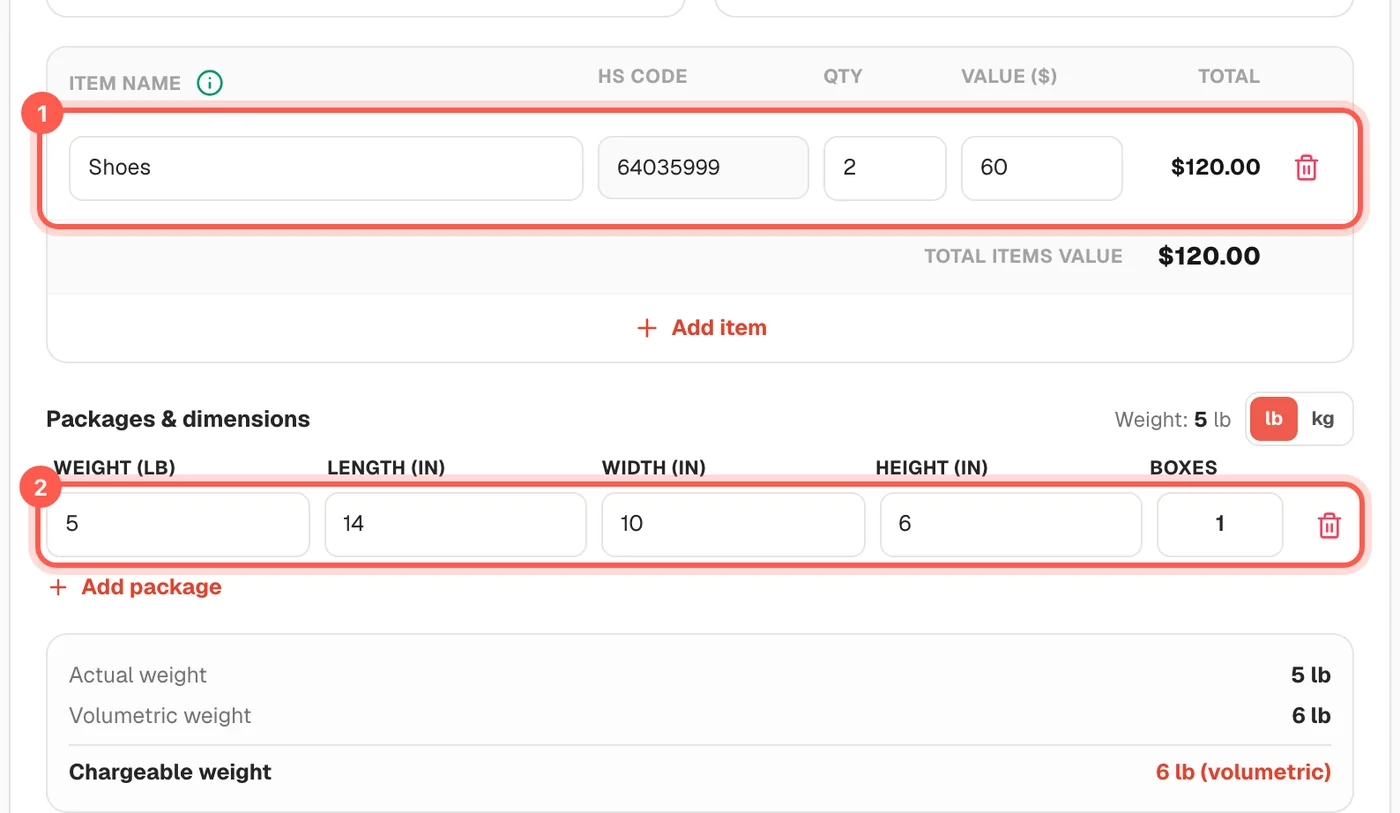
Type each item name, quantity and value in dollars (1). Then enter the box weight, length, width and height (2).
-
Click "Get shipping rate". Then click the courier you want. The price is shown on the right of each courier.
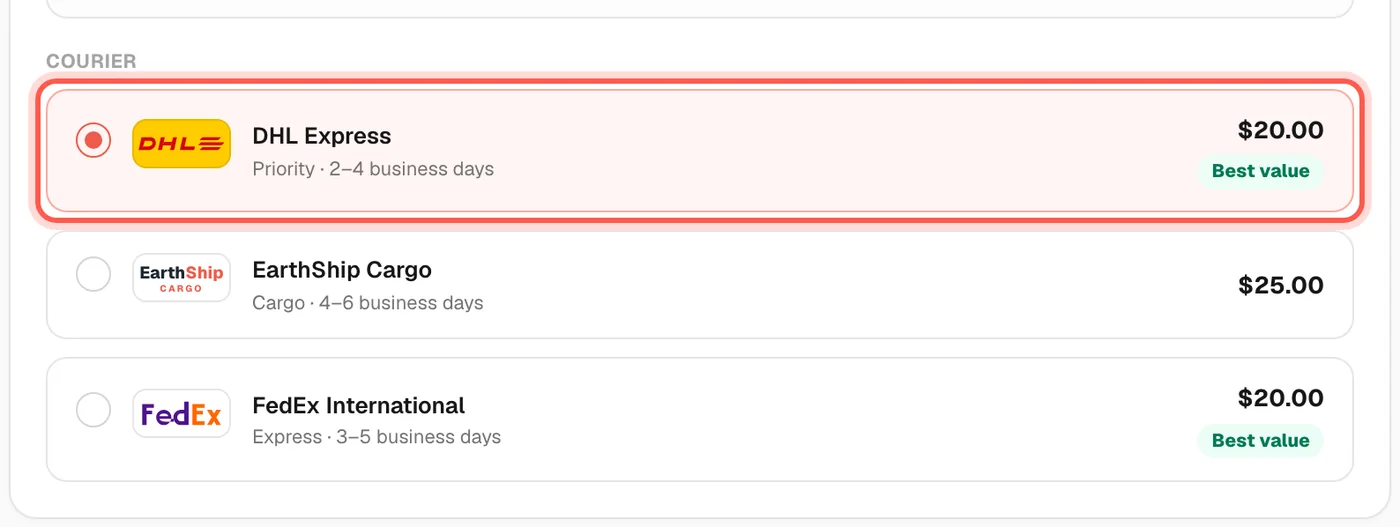
-
Choose the "Reason of the shipment" (1), for example "It is a gift". Then choose a "Shipping Protection" option (2).
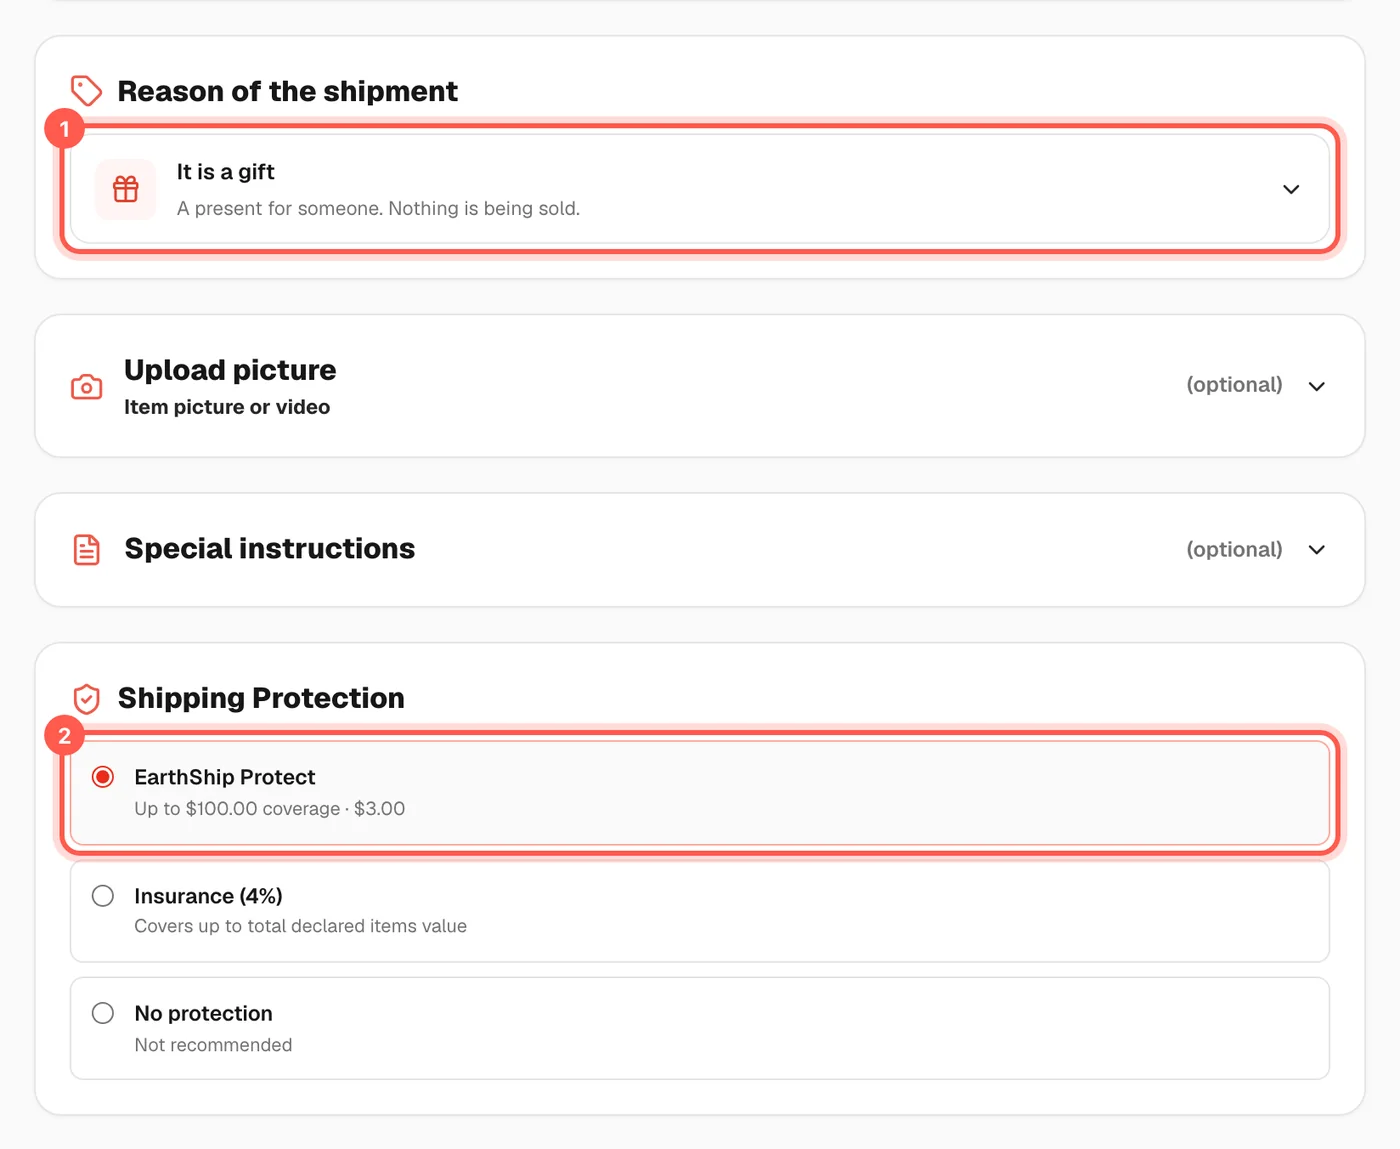
-
Check the "Total" in "Order Summary", then click "Continue to payment" to choose how to pay.
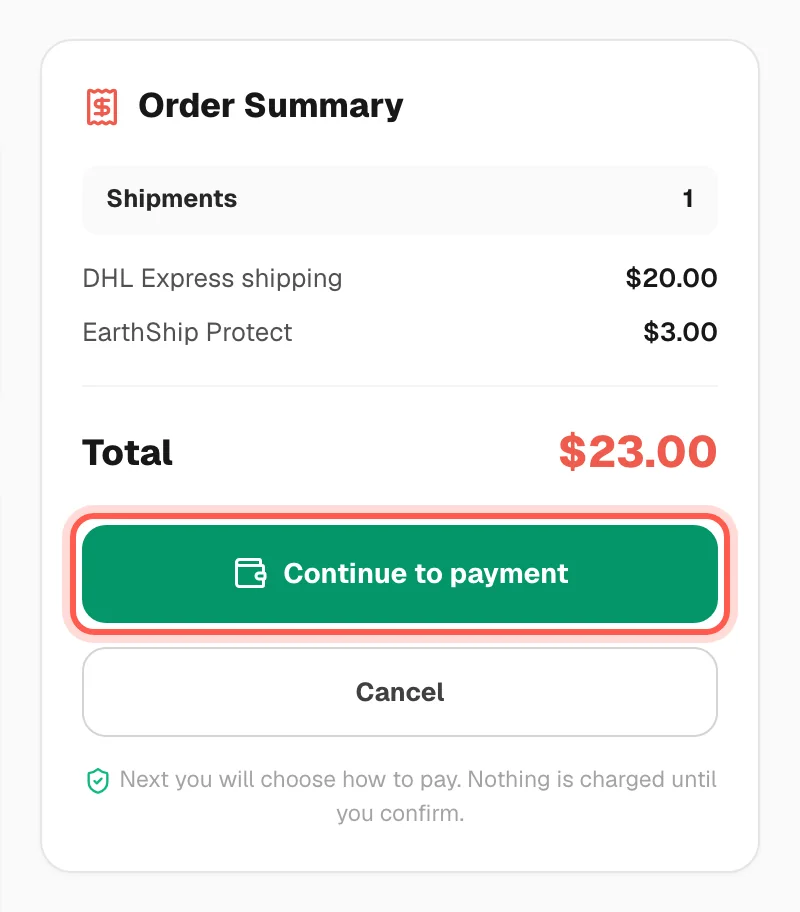
Nothing is charged until you confirm on the payment page. Use "Add item" or "Add package" if you have more than one item or box.
Create a shipmentHow long does an international shipment take? 4 steps
It depends on the courier you choose and on customs in the destination country. For Iraq the site shows about 2-6 business days. You see the estimate for each courier before you pay.
- Open "Calculator" in the left menu.
-
Type the weight and size of your box, then choose the country under "Destination".
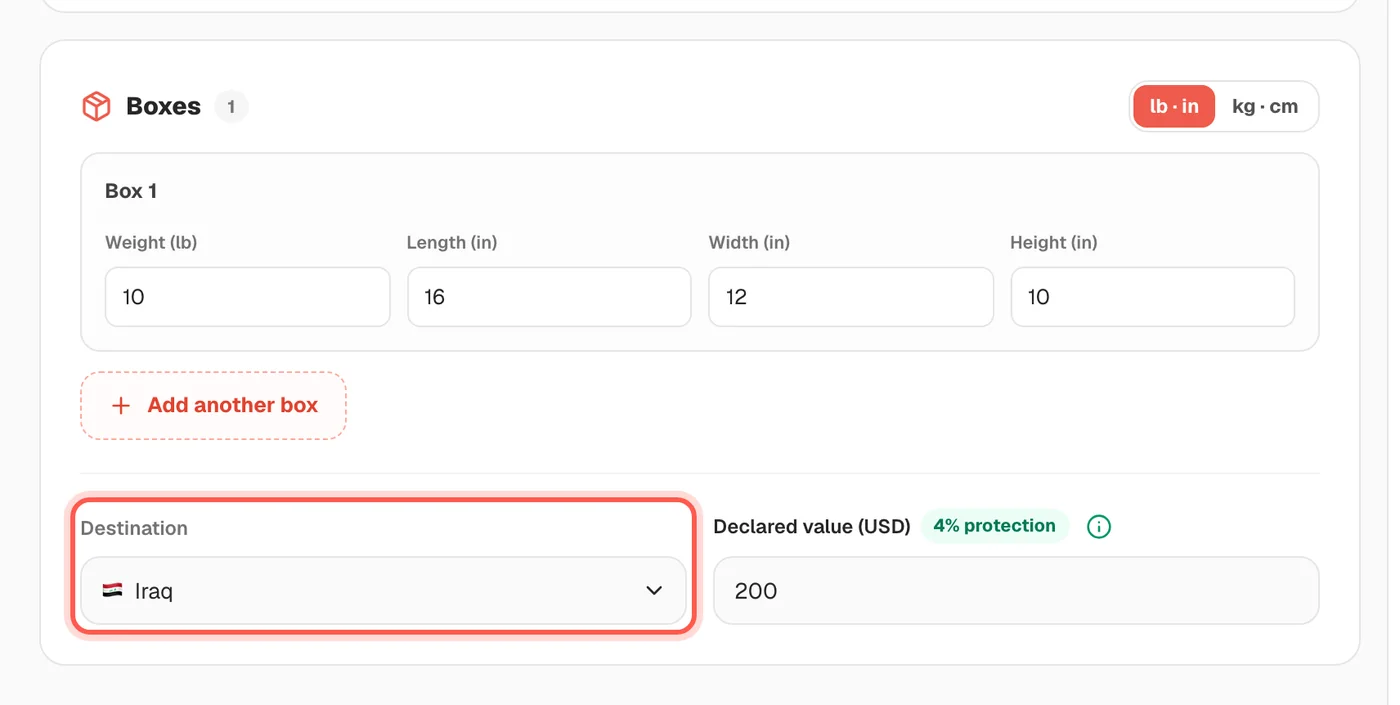
-
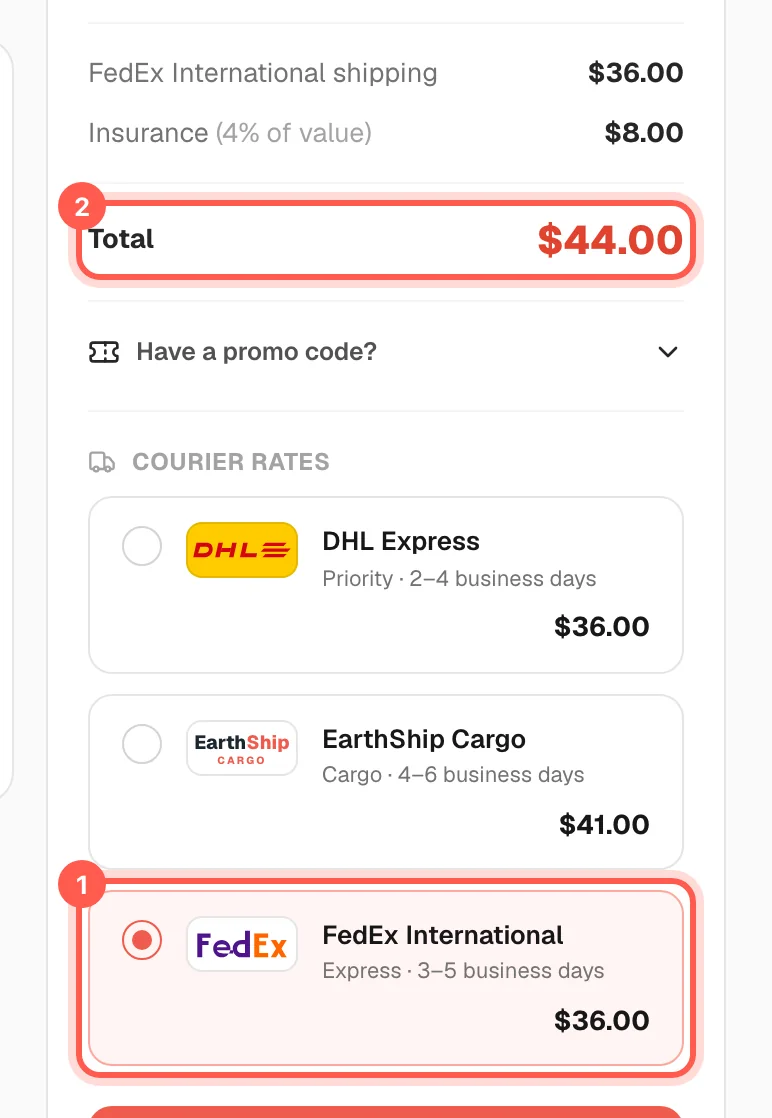
Look under "Courier rates". Each courier shows its delivery time, for example "2-4 business days", next to its price.
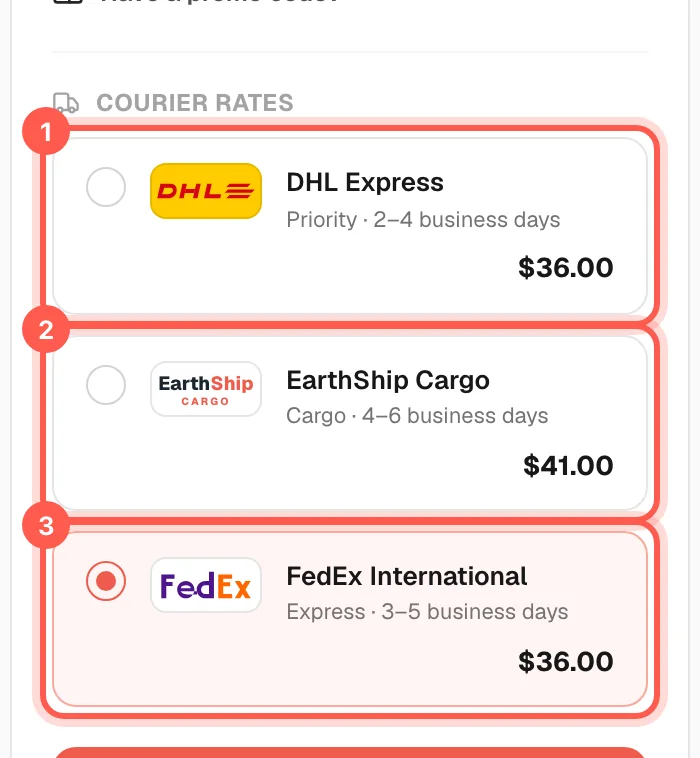
- Click the courier you want. A faster courier is not always the most expensive, so compare all of them.
The days are an estimate and count from when the shipment leaves. Customs checks can add extra time.
Open the CalculatorWhich couriers do you use? 3 steps
We ship with DHL Express, FedEx International and our own EarthShip Cargo service. The couriers offered depend on the destination country. You choose the courier yourself and see its price and delivery time first.
-
Open "Calculator", enter your box and destination. The couriers for that country appear under "Courier rates" with a price each.
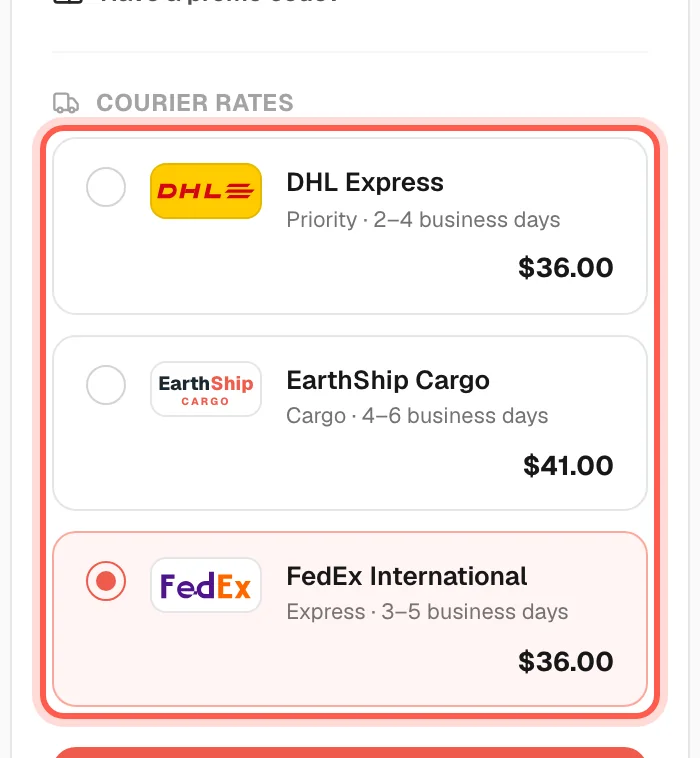
-
When you create a shipment, fill in the addresses and package size, then click "Get shipping rate" under "Courier".

-
Click the courier you want. The cheapest one is marked "Best value" and is selected for you first.
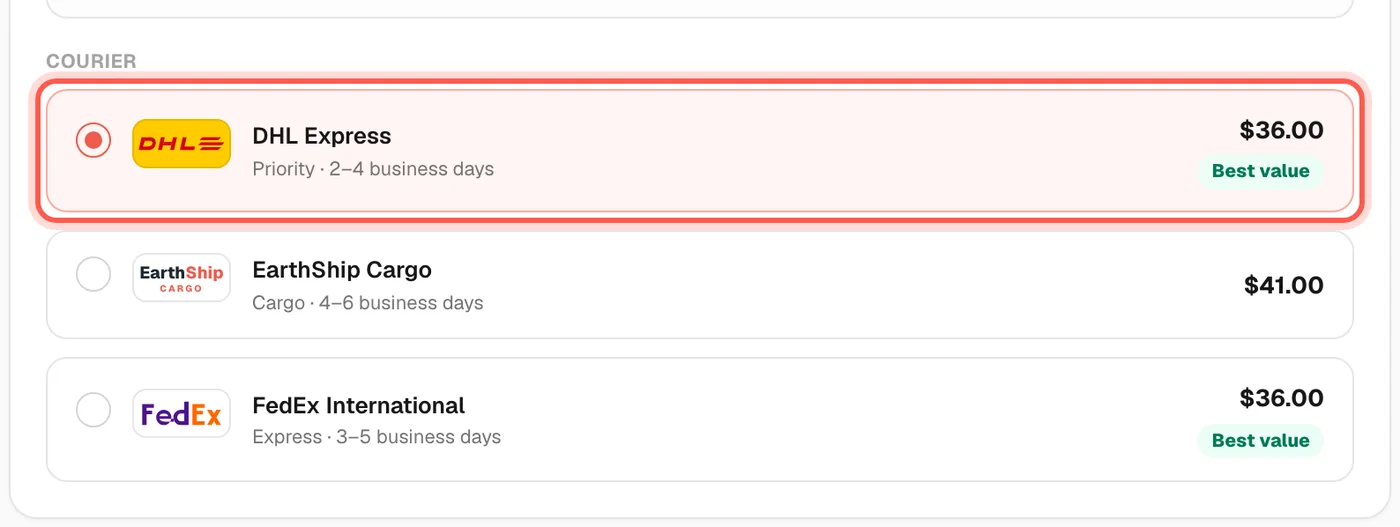
If a courier is missing from the list, it does not deliver that box to that country.
Create a shipmentHow is the shipping cost calculated? 4 steps
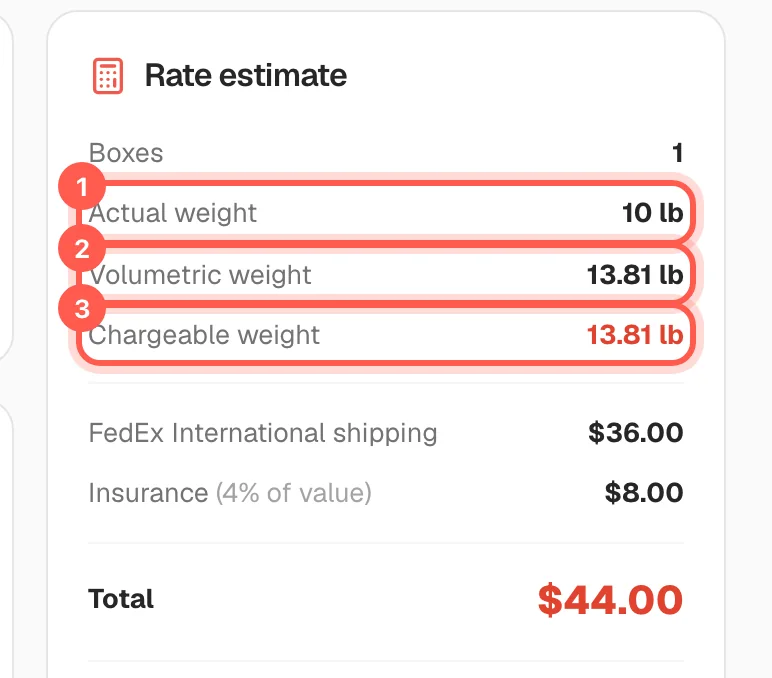
The price uses the chargeable weight: the bigger of the actual weight and the volumetric weight (size of the box). That weight, the courier and the destination country give the shipping price. The Calculator shows all of it.
-
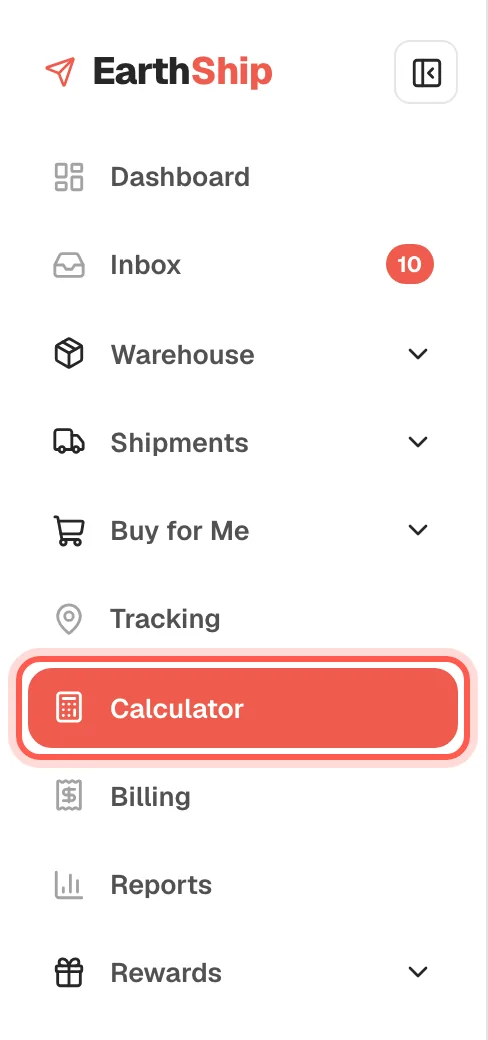
Click "Calculator" in the left menu.
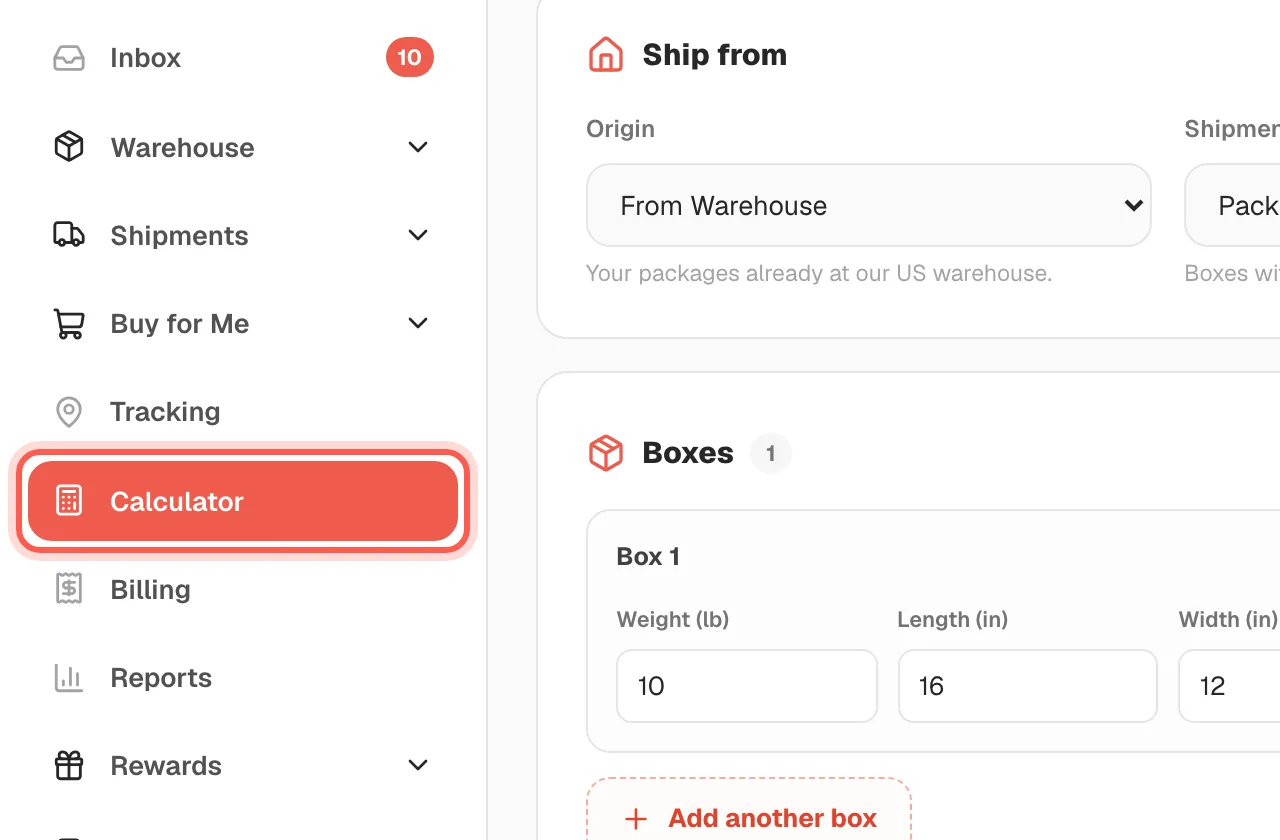
-
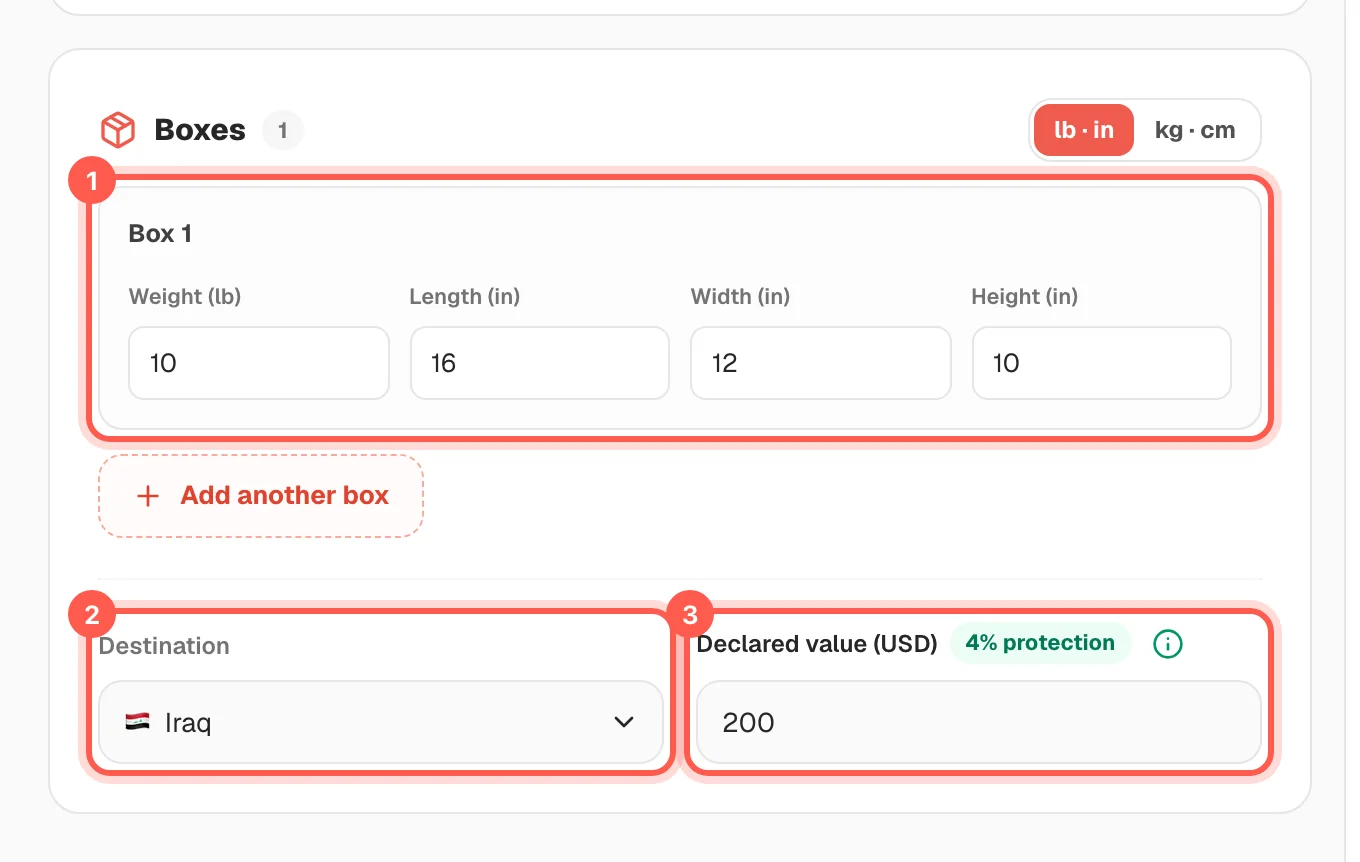
Enter (1) the box weight and size, (2) the "Destination" country, (3) the "Declared value (USD)" of your goods.
-
Read "Rate estimate": (1) "Actual weight", (2) "Volumetric weight" from the box size, (3) "Chargeable weight" - the bigger one. You pay for this weight.
-
Click (1) a courier under "Courier rates" to see its price. (2) "Total" is shipping plus insurance.
A big, light box can cost more than a small, heavy one. Volumetric weight is Length x Width x Height / 139 in inches (pounds), or / 5000 in centimetres (kilograms).
Open the CalculatorCan I get a rate estimate before shipping? 6 steps
Yes. Open the Calculator from the sidebar, enter your box weight, size and destination country, and you will see a live price from each courier. It is only an estimate - nothing is booked and nothing is charged.
-
Click "Calculator" in the menu on the left side of your dashboard.
-
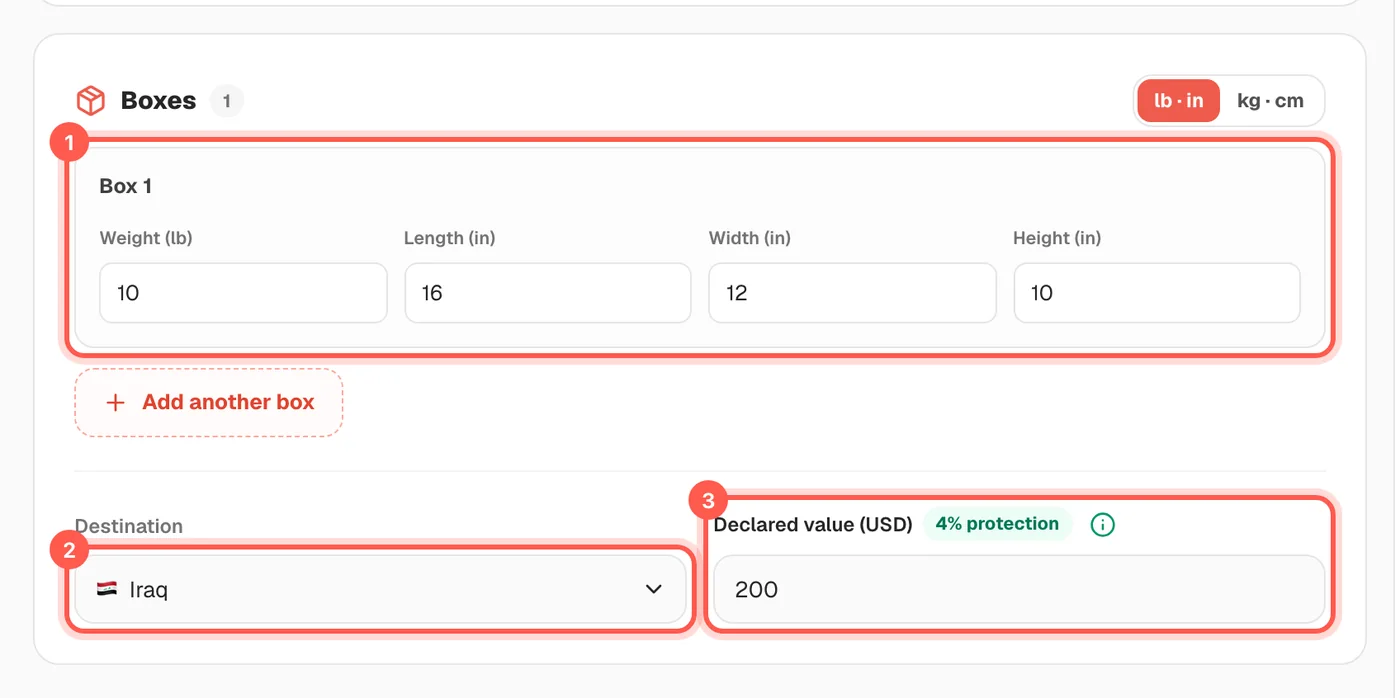
Type the weight, length, width and height of your box under "Box 1" (1).
-
Choose your country under "Destination" (2). If you want protection, type the value of your goods under "Declared value (USD)" (3).
-
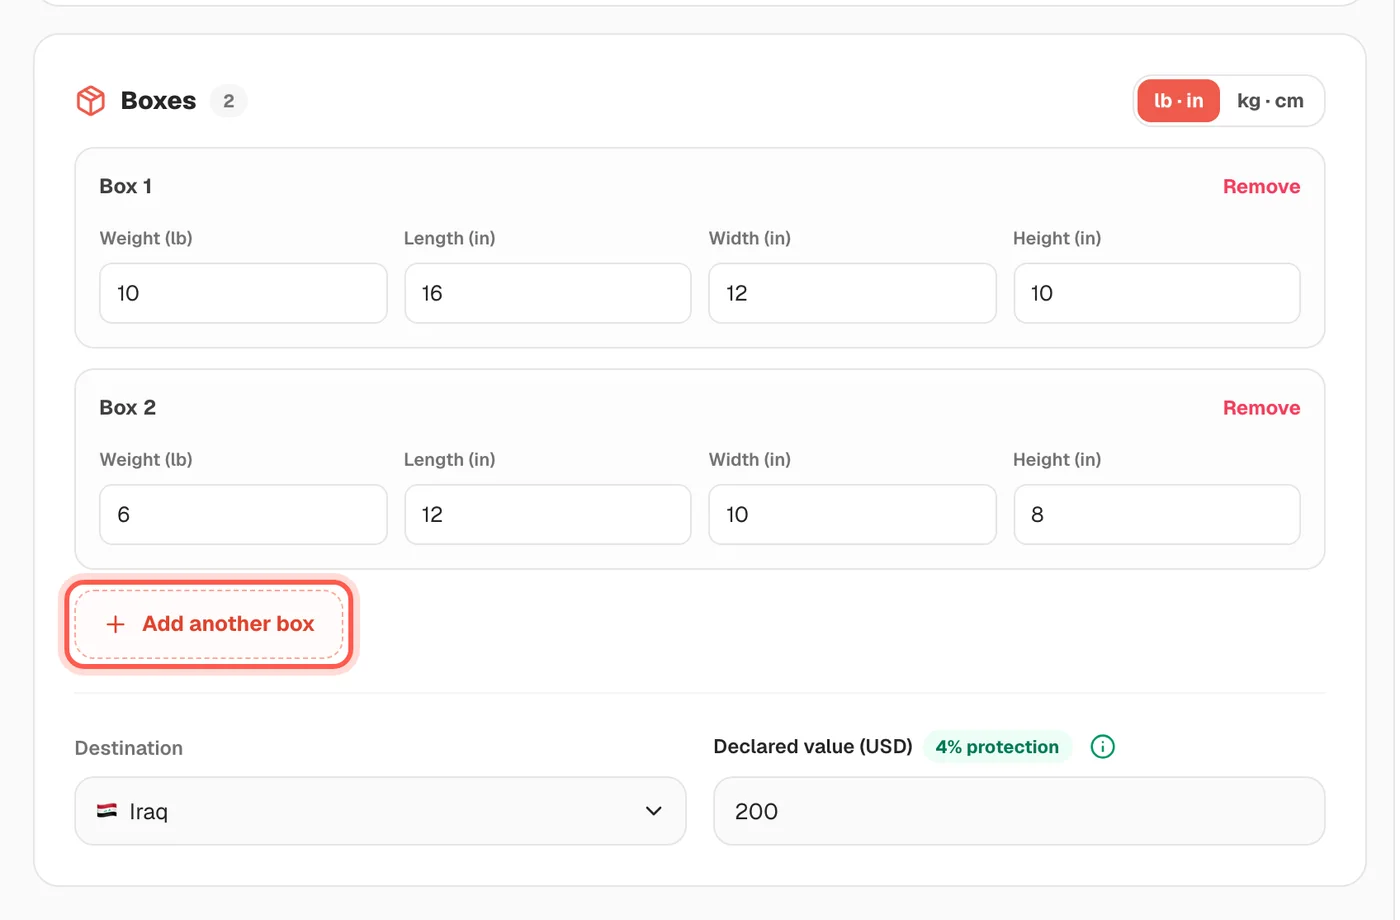
Click "Add another box" if you are sending more than one box, then fill in its weight and size.
-
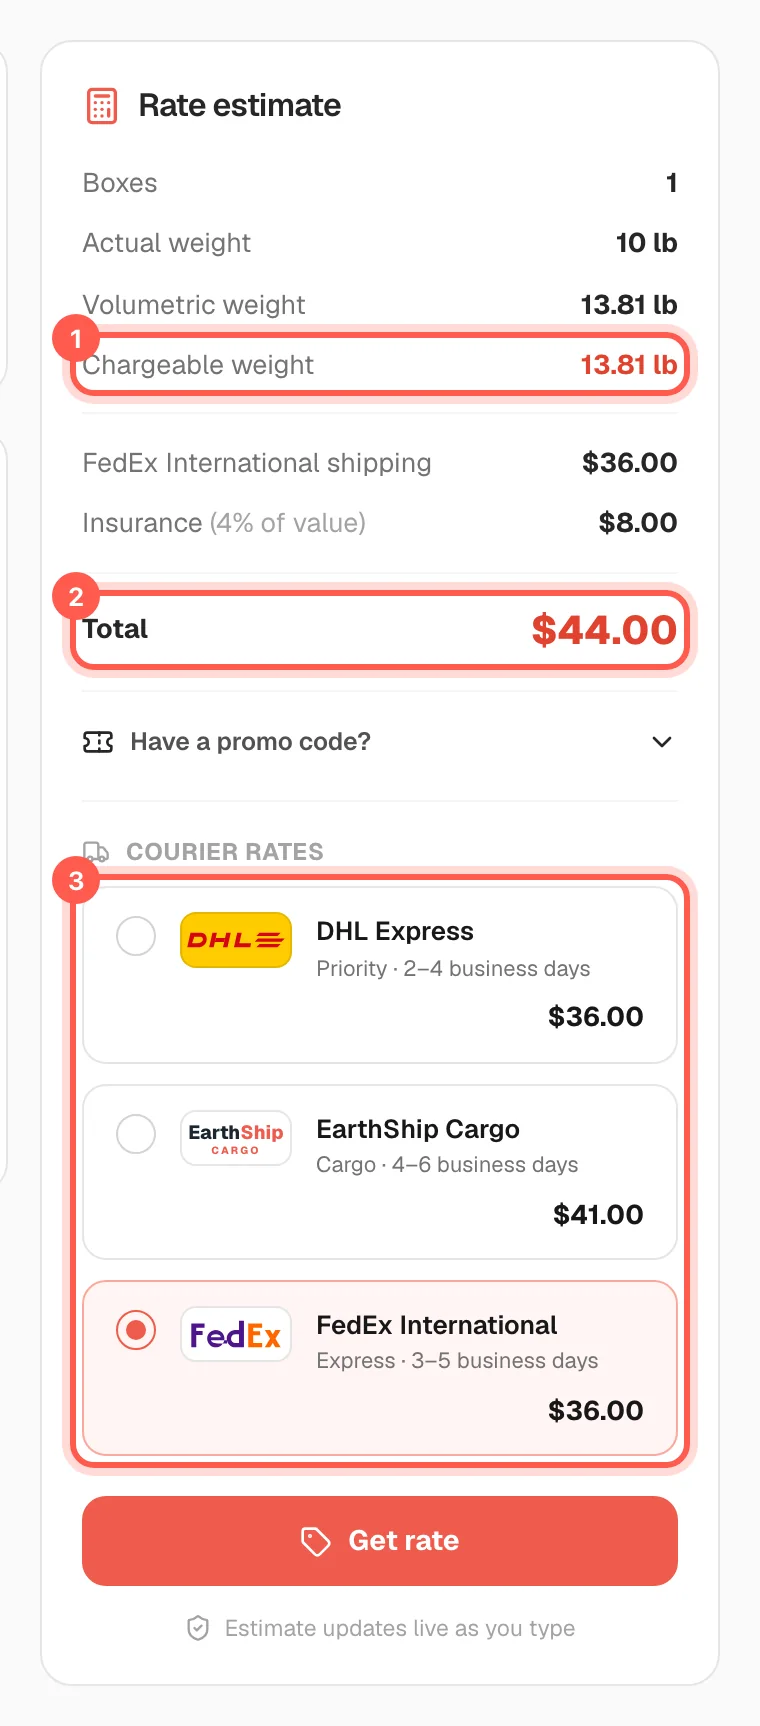
Read your quote under "Rate estimate": "Chargeable weight" (1) is the weight you pay for, and "Total" (2) is the price.
-
Click a courier under "Courier rates" (3) to compare prices and delivery times. The "Total" changes to match.
You can switch between "lb · in" and "kg · cm" at the top of the "Boxes" card. Big, light boxes are charged by size ("Volumetric weight"), not only by real weight.
Open the CalculatorHow does Buy for Me work? New 5 steps
If a US store does not accept your card or your address, we buy the item for you. You tell us what to buy; we order it, receive it and ship it to you.
-
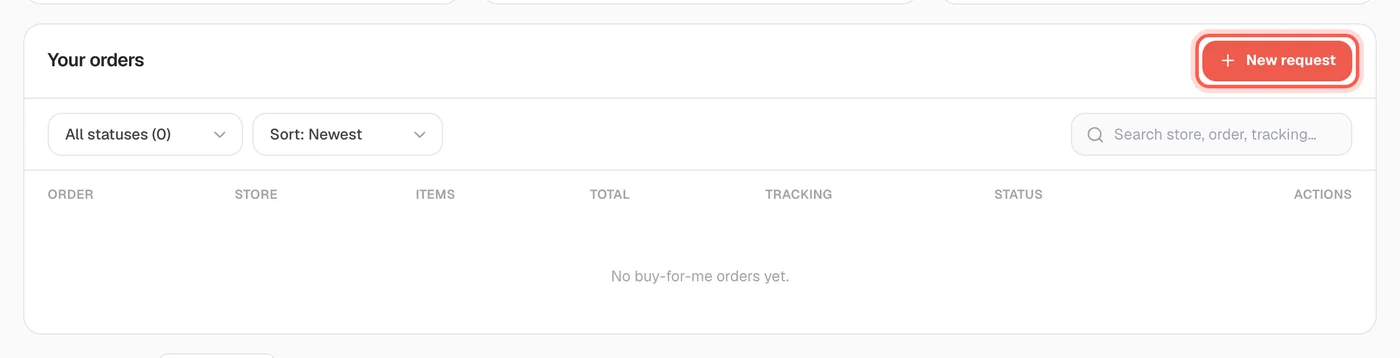
Open "Buy for Me" from the menu and click "New request".
-
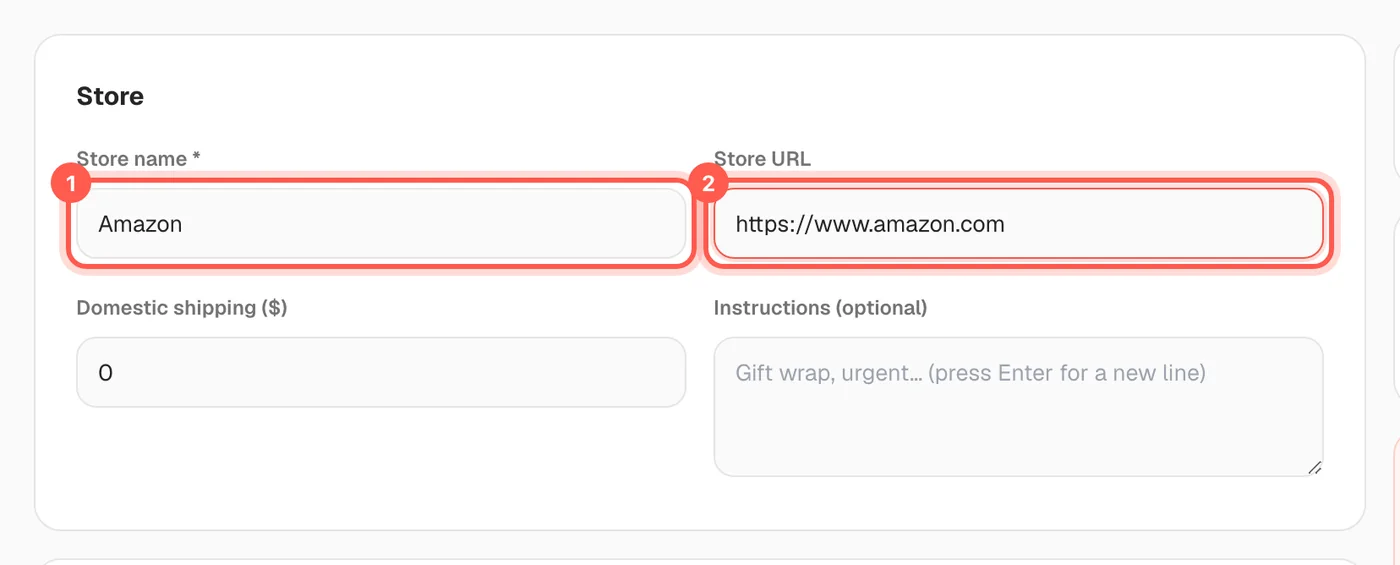
Type the store name (1) and the store website (2).
-
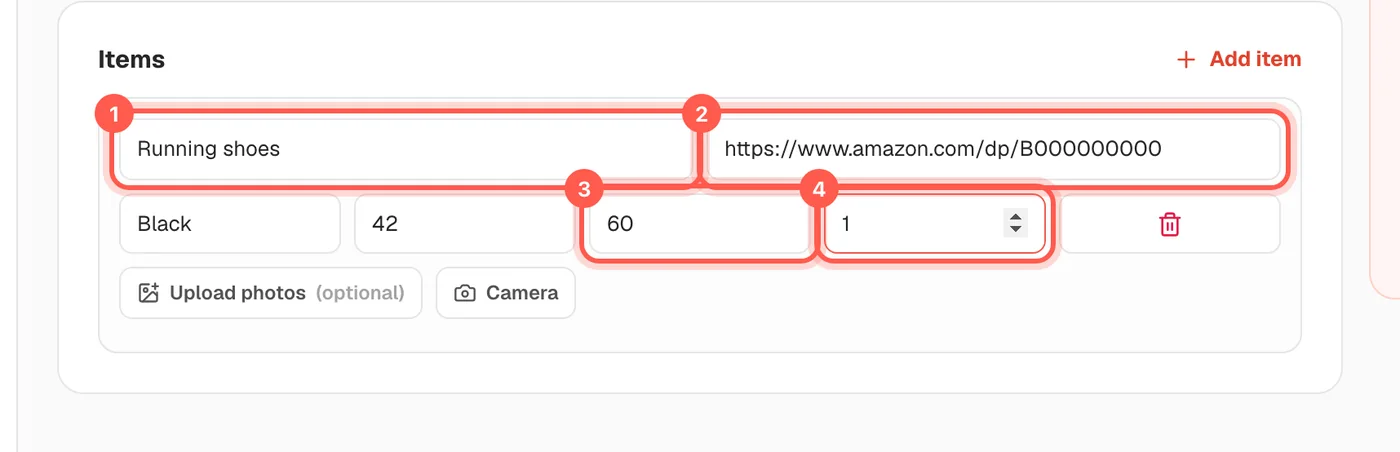
For each item, type its name (1), paste its link (2), and add the price (3) and quantity (4). Add color and size if needed.
-
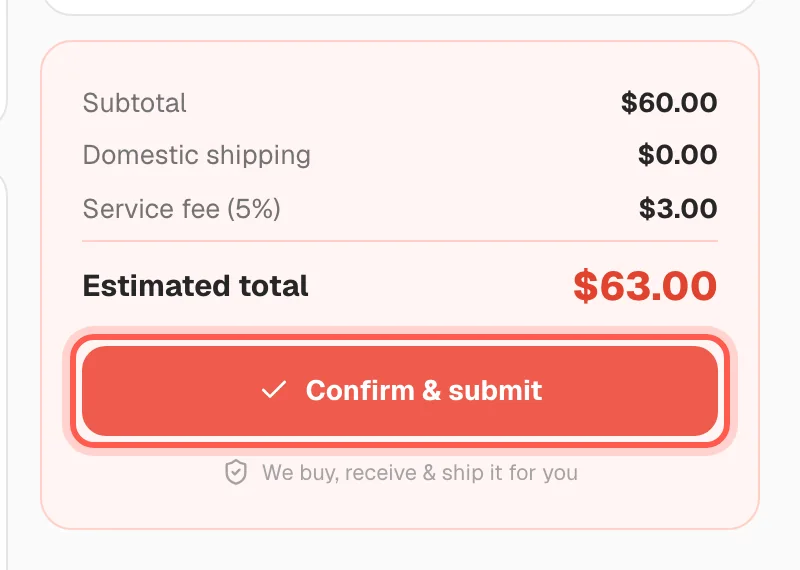
Check the estimated total, then click "Confirm & submit".
- We check the prices and send you a quote. Approve it and pay, and we place the order with the store.
The estimated total includes our service fee. The final price is confirmed in the quote before you pay.
Start a Buy for Me requestDo I have to pay customs duties? 3 steps
Possibly. Import duties and taxes are set by the customs office of the destination country, and the recipient pays them on delivery. They are not part of your EarthShip shipping price.
-
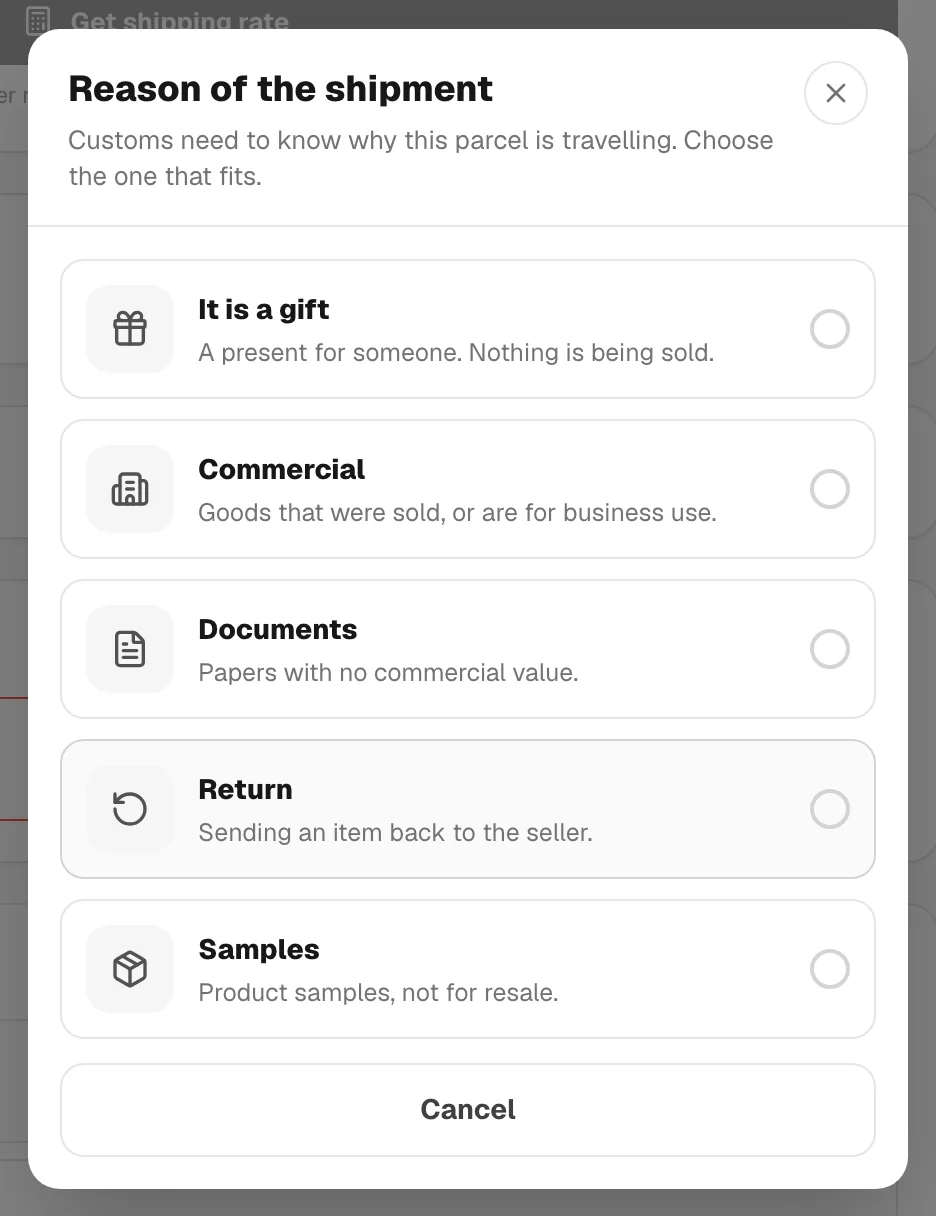
Choose the "Reason of the shipment" when you create a shipment. Customs use it to decide what duty applies.
-
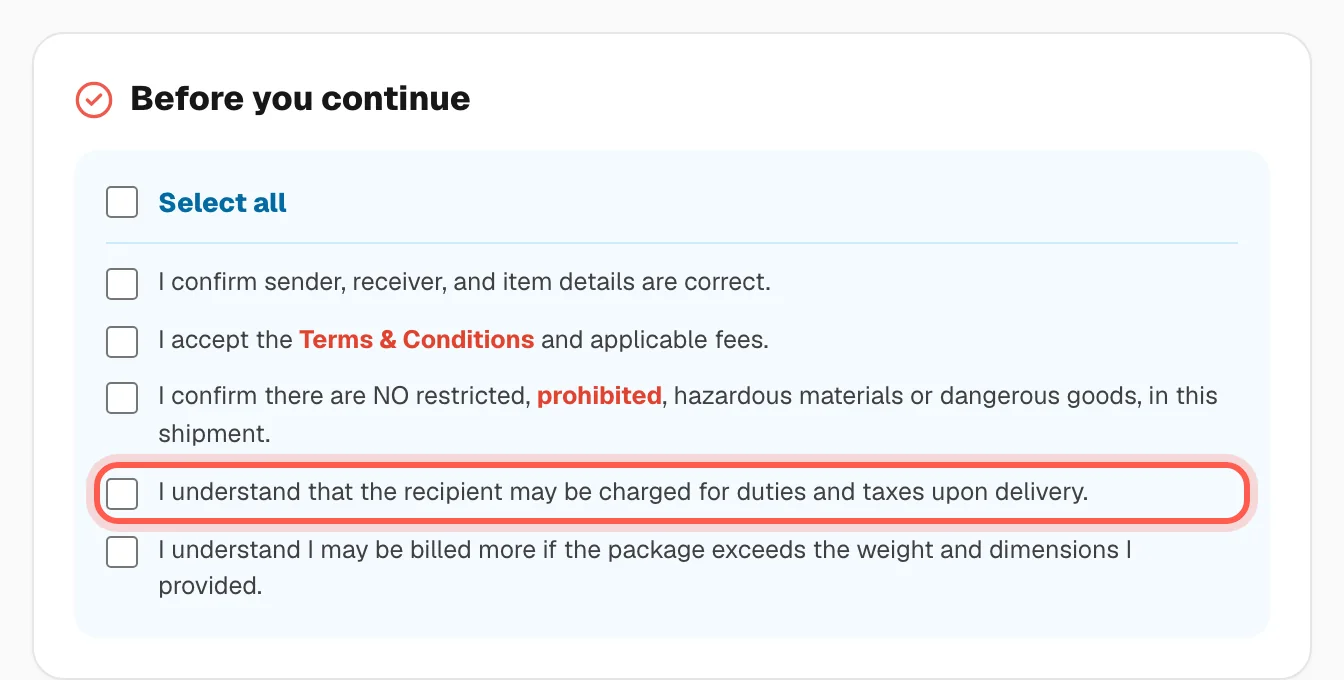
Read the line "I understand that the recipient may be charged for duties and taxes upon delivery." on the "Payment" page, then tick it.
-
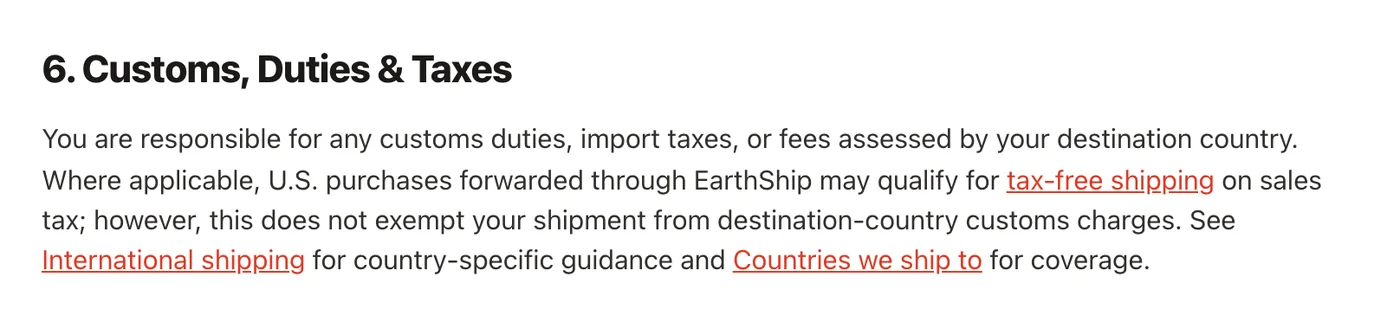
Read "6. Customs, Duties & Taxes" in the Terms & Conditions to see the full rule.
EarthShip does not collect duties. Ask your local customs office or the courier how much your country charges.
Read the customs termsWhy do I need to declare the value of my items? 4 steps
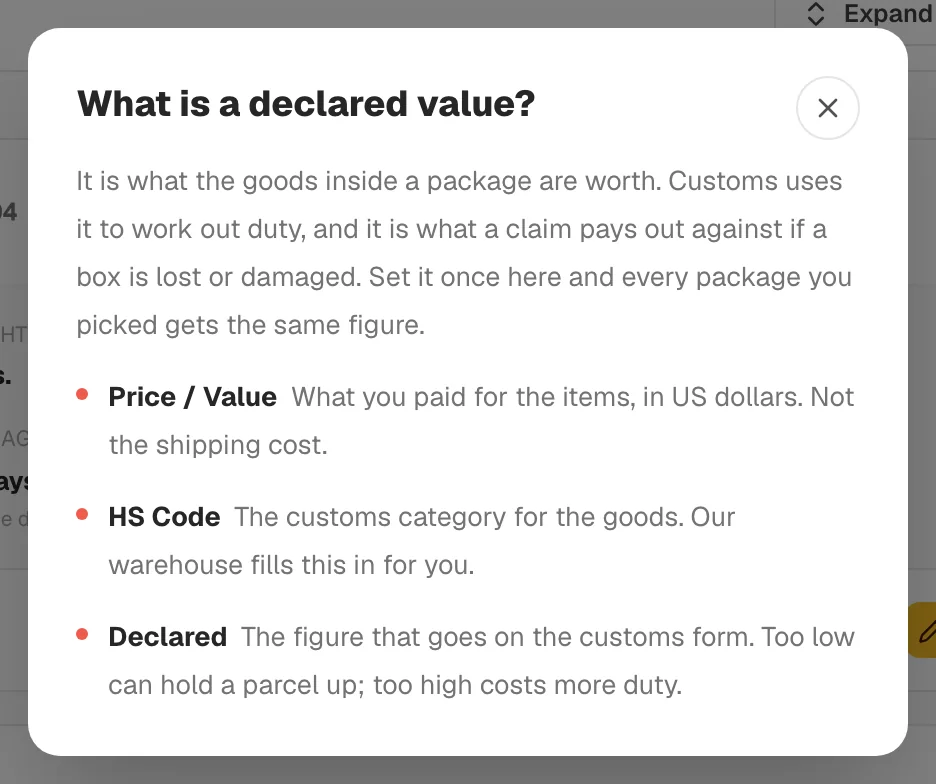
Customs uses the declared value to work out duty, and a claim is paid against it if a box is lost or damaged. A value that is too low can hold your parcel up. You enter it on each warehouse package, or on each item when you create a shipment.
-
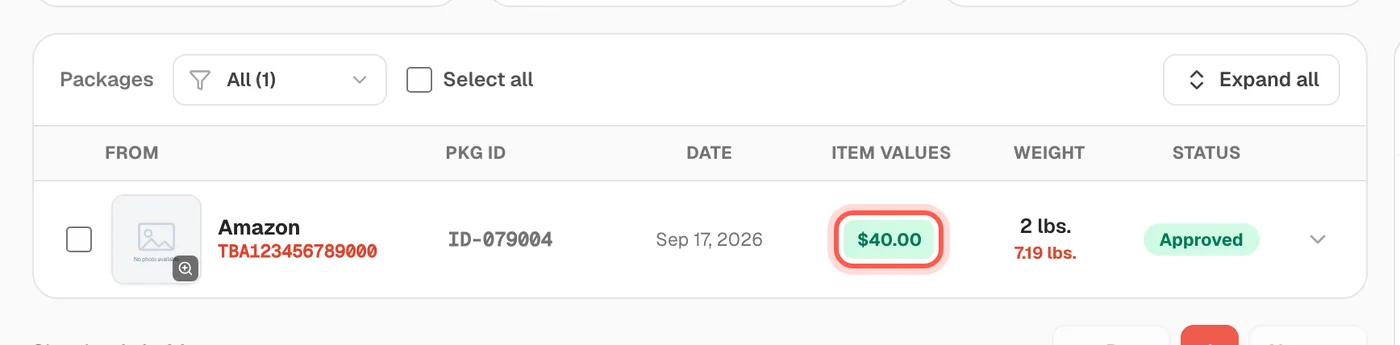
Open "Warehouse" and click the button under "Item values" on your package. It shows "Add Price" or the saved amount.
-
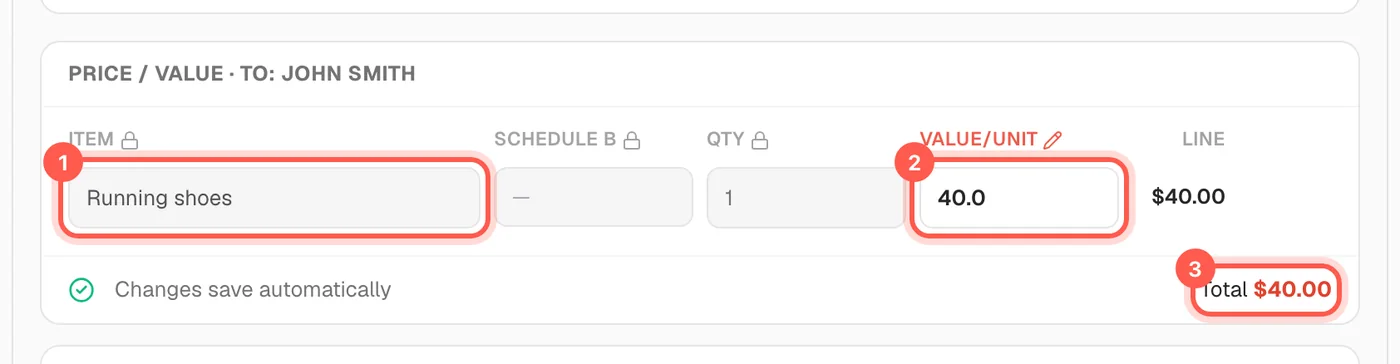
Check the item name (1), type what you paid per item in "Value/unit" (2), and check the "Total" (3).
-
Click the small "i" button next to "Value for all" to read "What is a declared value?".
-
In a new shipment, type the "Item name" (1) and the "Value ($)" of one unit (2) for every item.
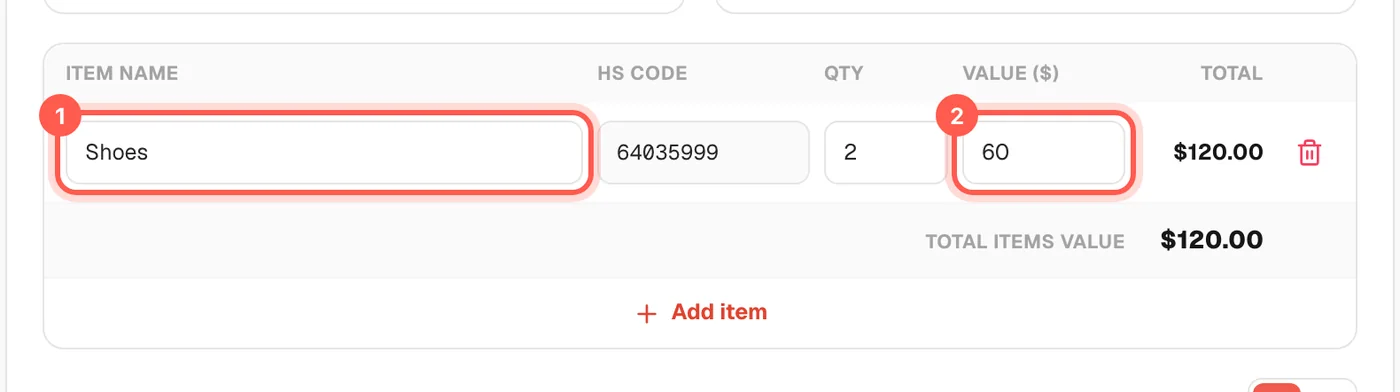
Enter the price you paid for the goods in US dollars, not the shipping cost. The value saves automatically.
Open My WarehouseIs there a limit on how much I can declare for high-value items?
Many high-value or specialty items have a limited maximum declared value. Fine art, high-end jewelry, precious metals and many collector's items are limited in the value that can be declared. Please email customer service before you ship any of these items.
Not sure if your item is affected? Ask us before you buy or ship it.
Contact customer serviceAre there items I cannot ship? 4 steps
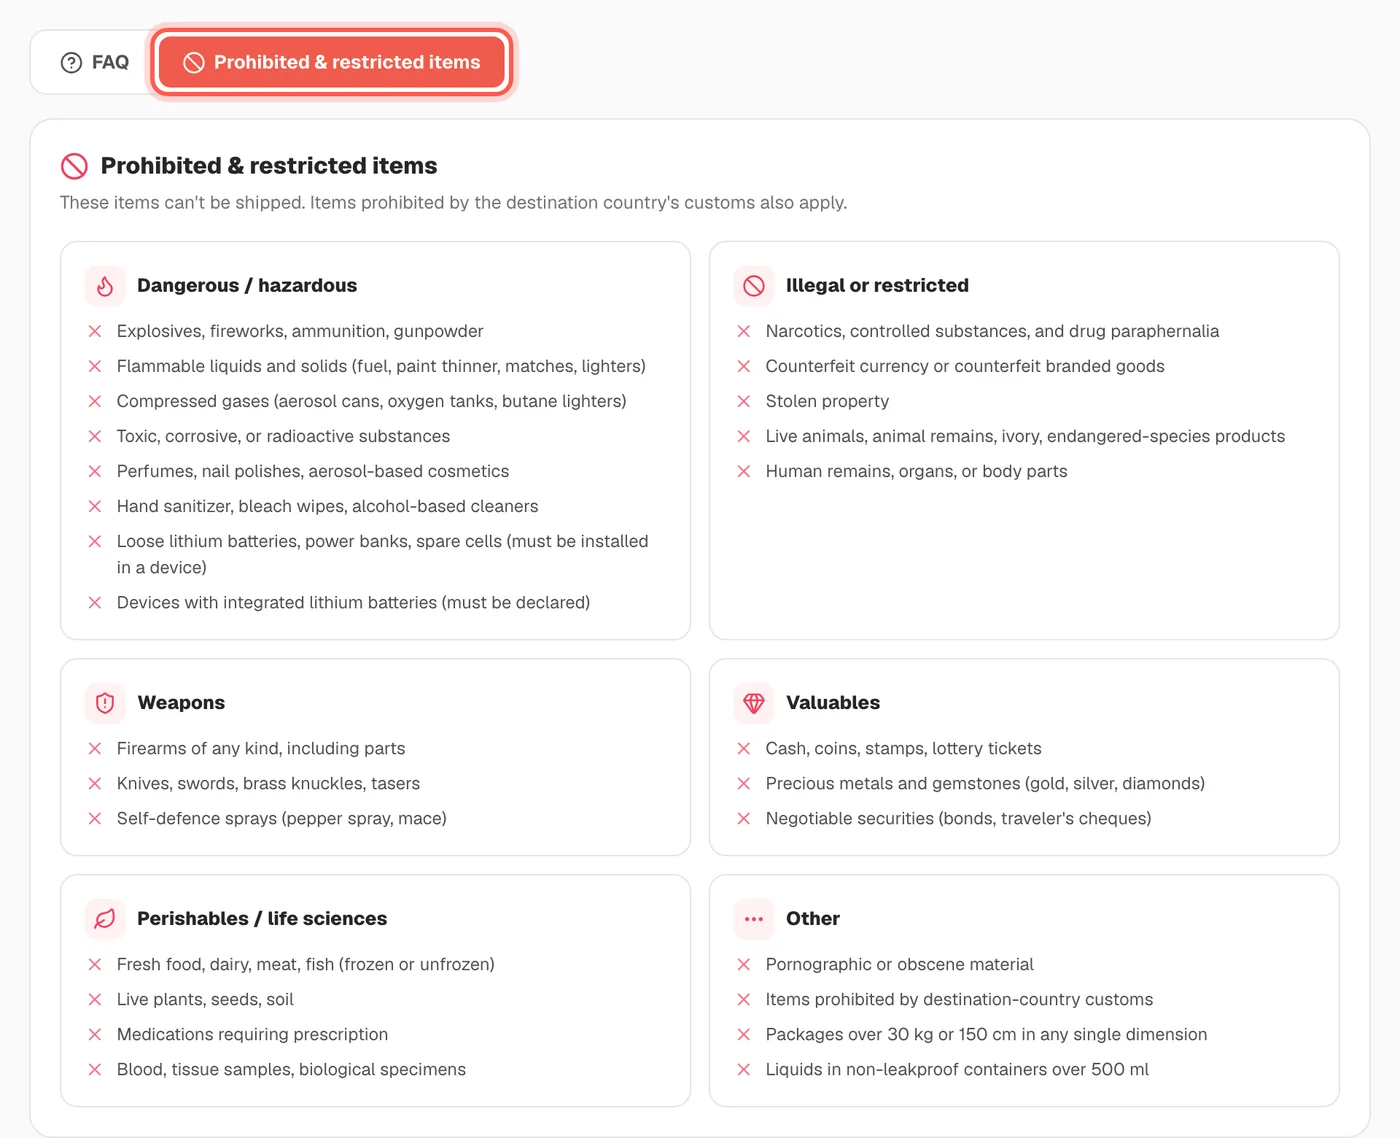
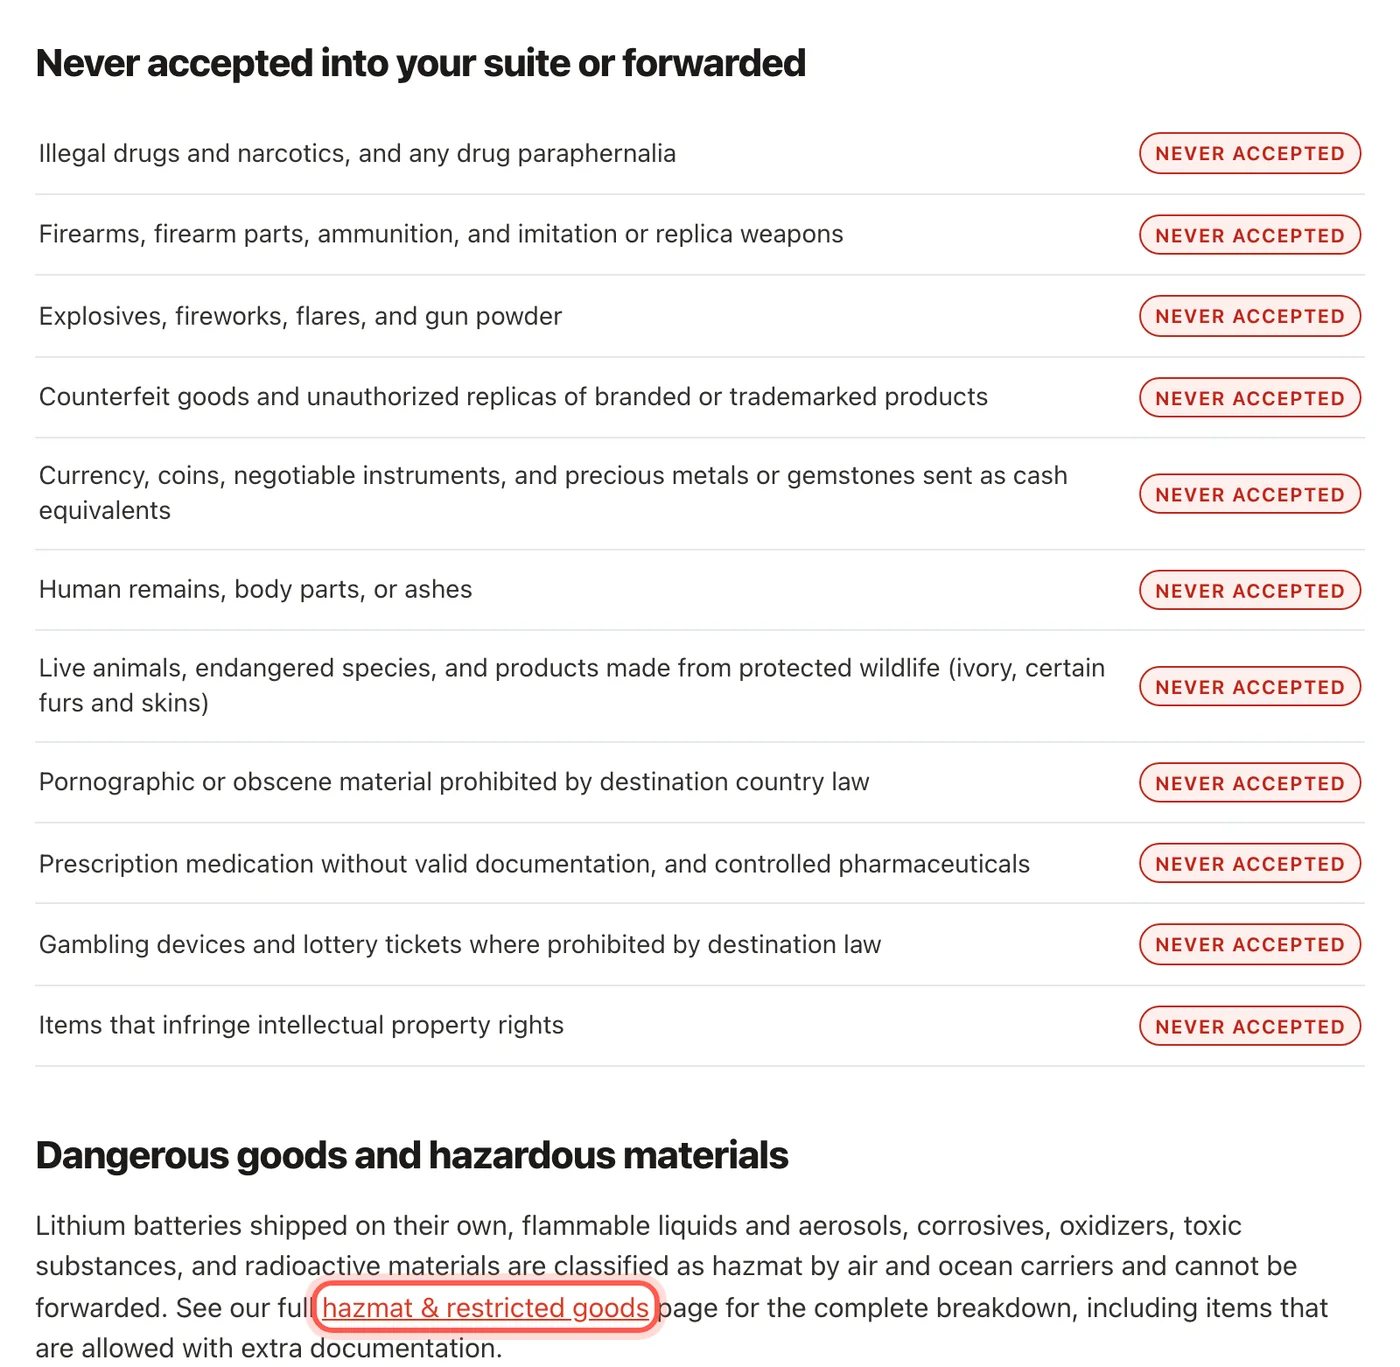
Yes. Dangerous goods, weapons, illegal drugs, cash and valuables, fresh food, live plants and animals, and loose lithium batteries cannot be shipped. Your destination country may also ban other items, so check the full list before you buy.
-
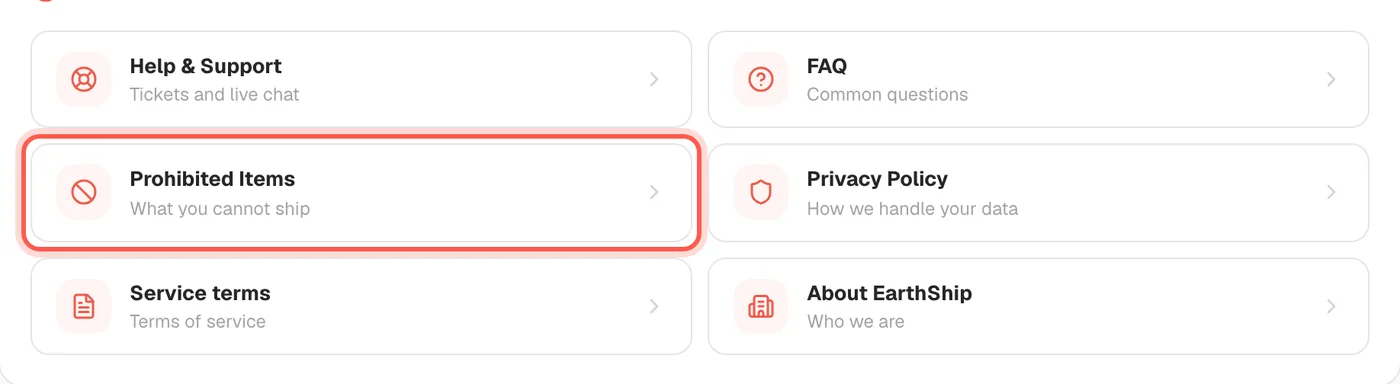
Open "Settings", then "About & Help". Click "Prohibited Items" (What you cannot ship).
-
Read the list under "Prohibited & restricted items". It has six groups, such as "Dangerous / hazardous", "Weapons" and "Valuables".
-
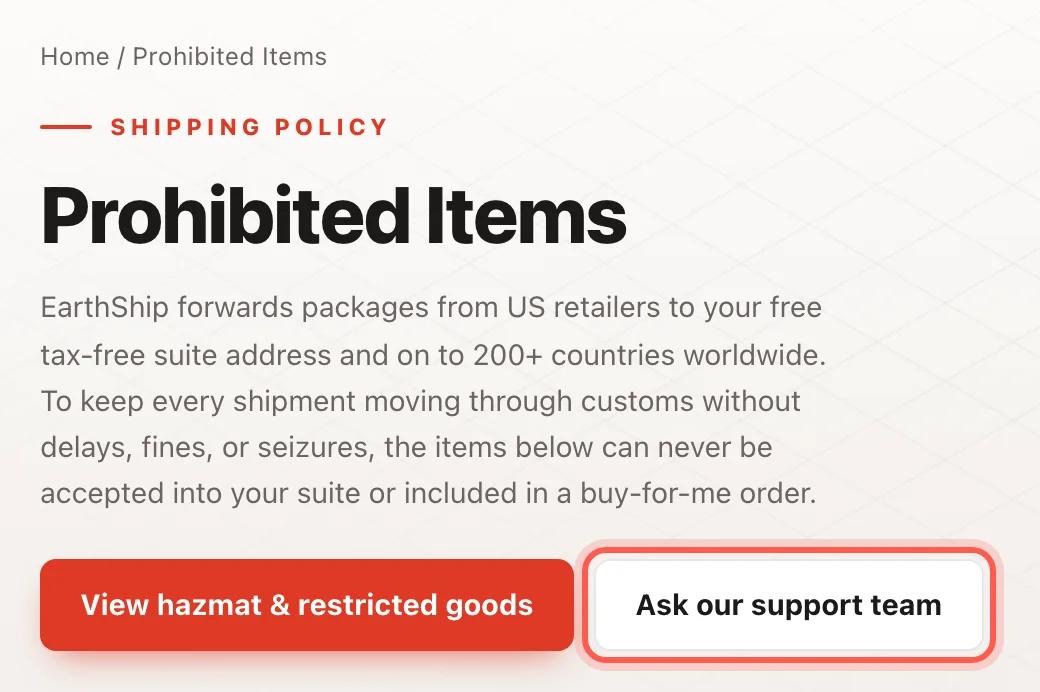
Open the public "Prohibited Items" page for more detail. Click "hazmat & restricted goods" to read the rules for batteries, liquids and sprays.
-
Click "Ask our support team" if you are not sure about an item. Ask before you buy it.
Before you pay for a shipment, you must tick a box to confirm it has no restricted, prohibited or hazardous items.
Open the prohibited items listWhat payment methods do you accept? 4 steps
On the "Payment" page you can pay from your Wallet, by Credit card, Zelle, Zain Cash or Bank wire. Wallet is instant; Zelle and Zain Cash are checked within 24 hours, and a bank wire takes about 4 business days. Shipments going to Iraq can also be paid by QiCard.
-
Open the "Payment" page of your shipment. Under "Payment method" you see every way to pay: "Wallet", "Credit card", "Zelle", "Zain Cash" and "Bank wire".
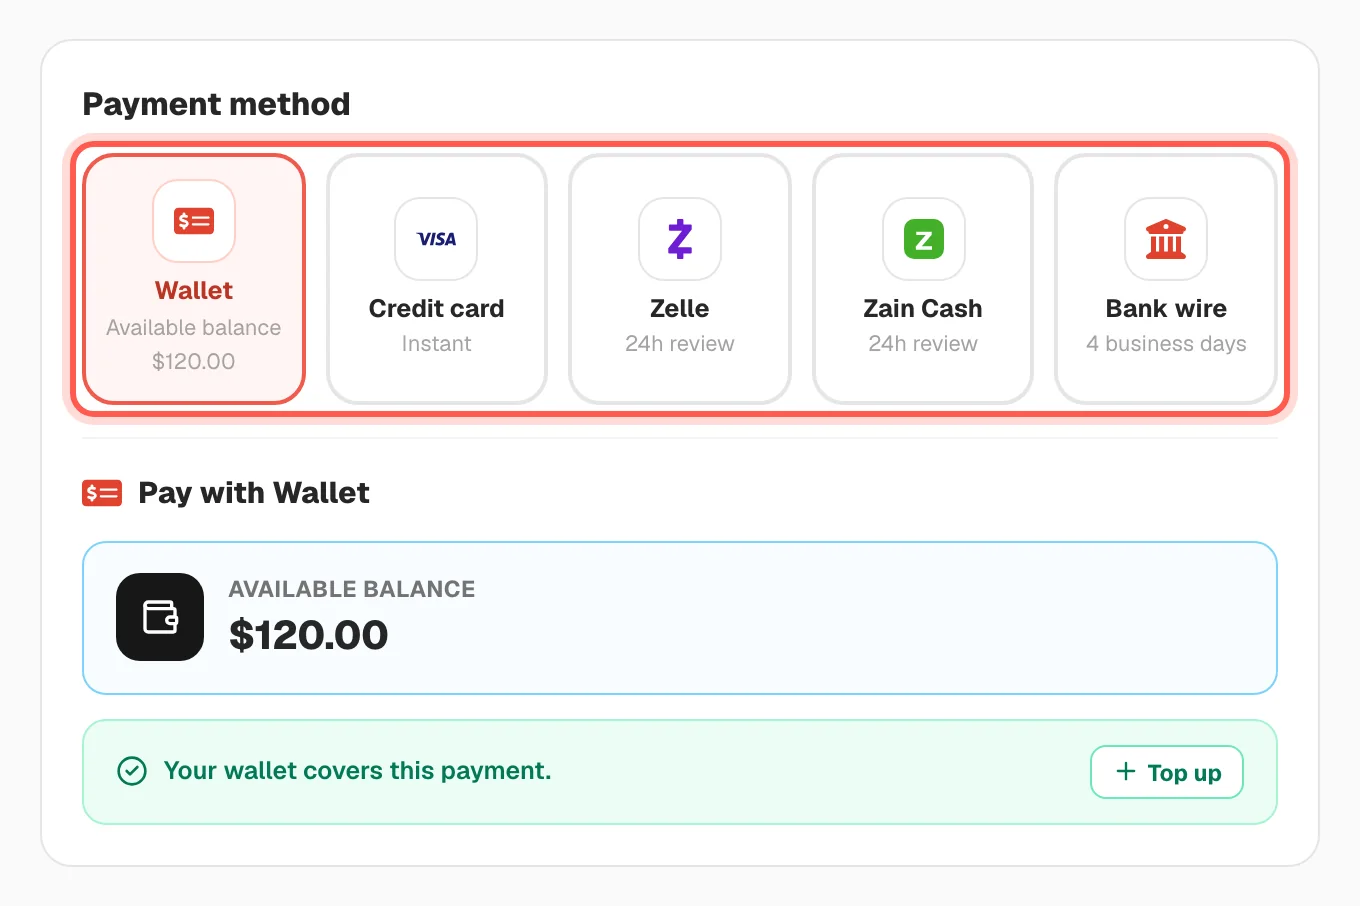
- Click the method you want. The box below changes to show what to do for that method.
-
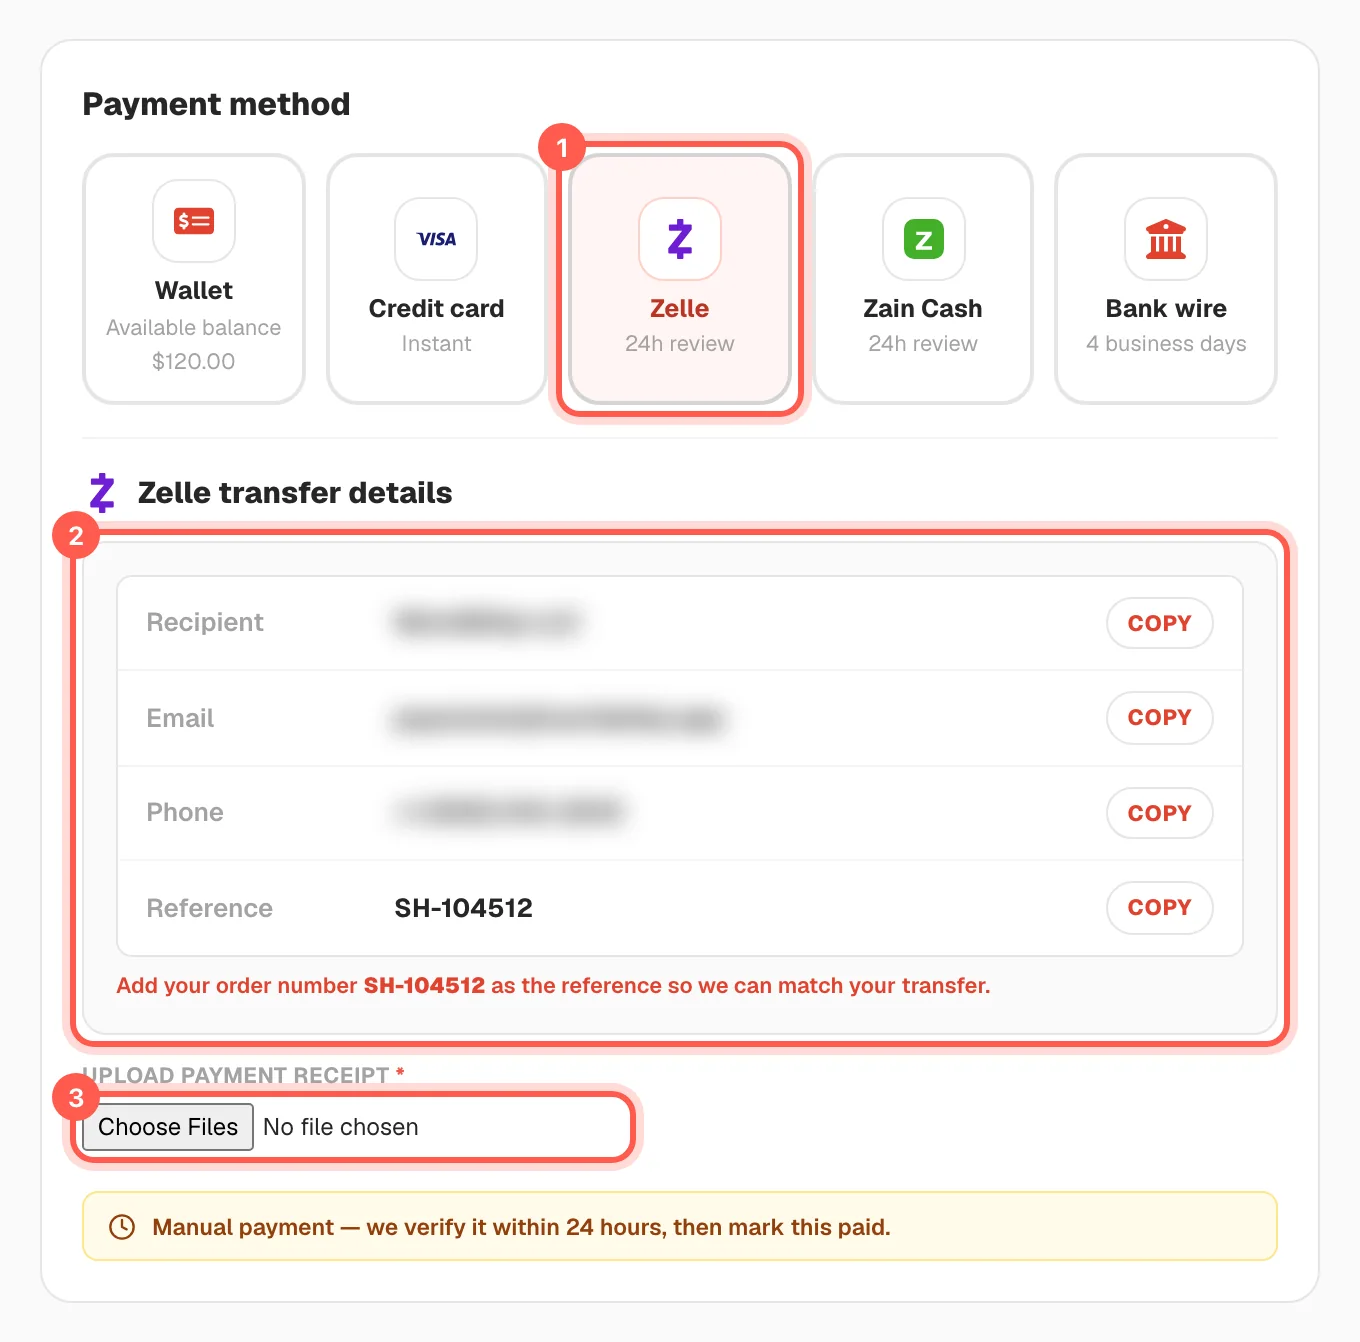
For Zelle, Zain Cash or Bank wire: click the method (1), send the money to the details shown on your screen (2), then upload your receipt (3).
-
To pay an open invoice later, open Settings, then "Invoices". Find the row marked "Unpaid" (1) and click "Pay" (2).
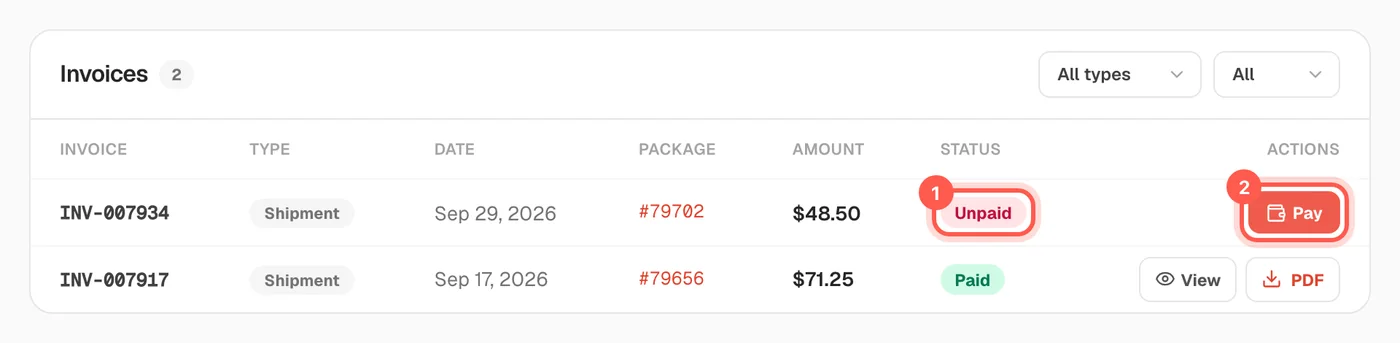
Always write your order number as the "Reference" in your transfer, so our team can match your payment.
Open my invoicesCan I pay cash on delivery? 5 steps
Yes, for shipments to Iraq or Lebanon sent by EarthShip Cargo. Nothing is charged online: you pay the courier in cash when your parcel is delivered.
- When you create your shipment, choose Iraq (or Lebanon) as the delivery country and "EarthShip Cargo" as the courier.
-
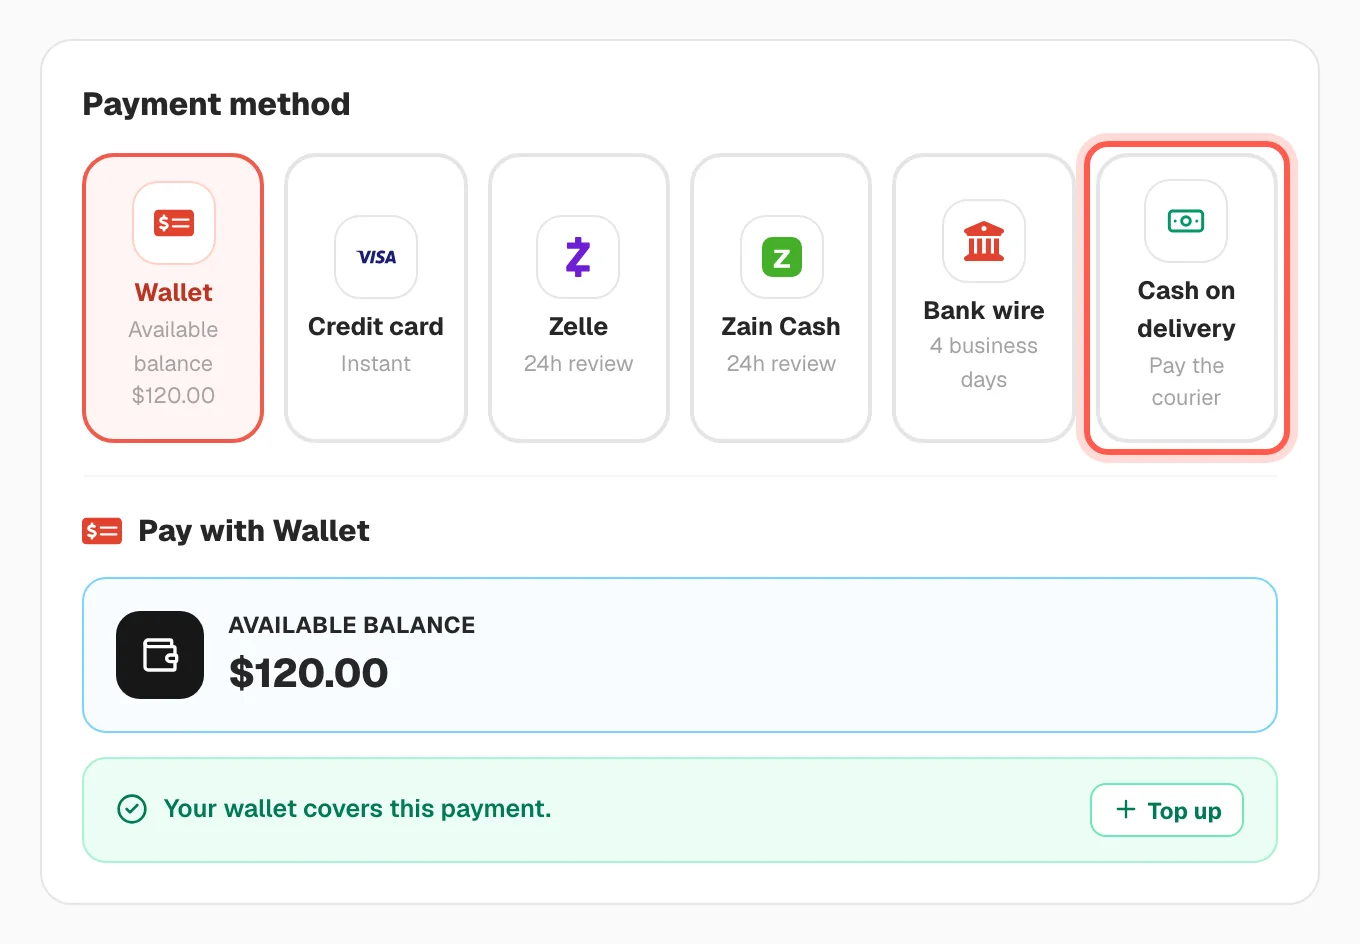
On the "Payment" page, under "Payment method", click "Cash on delivery".
-
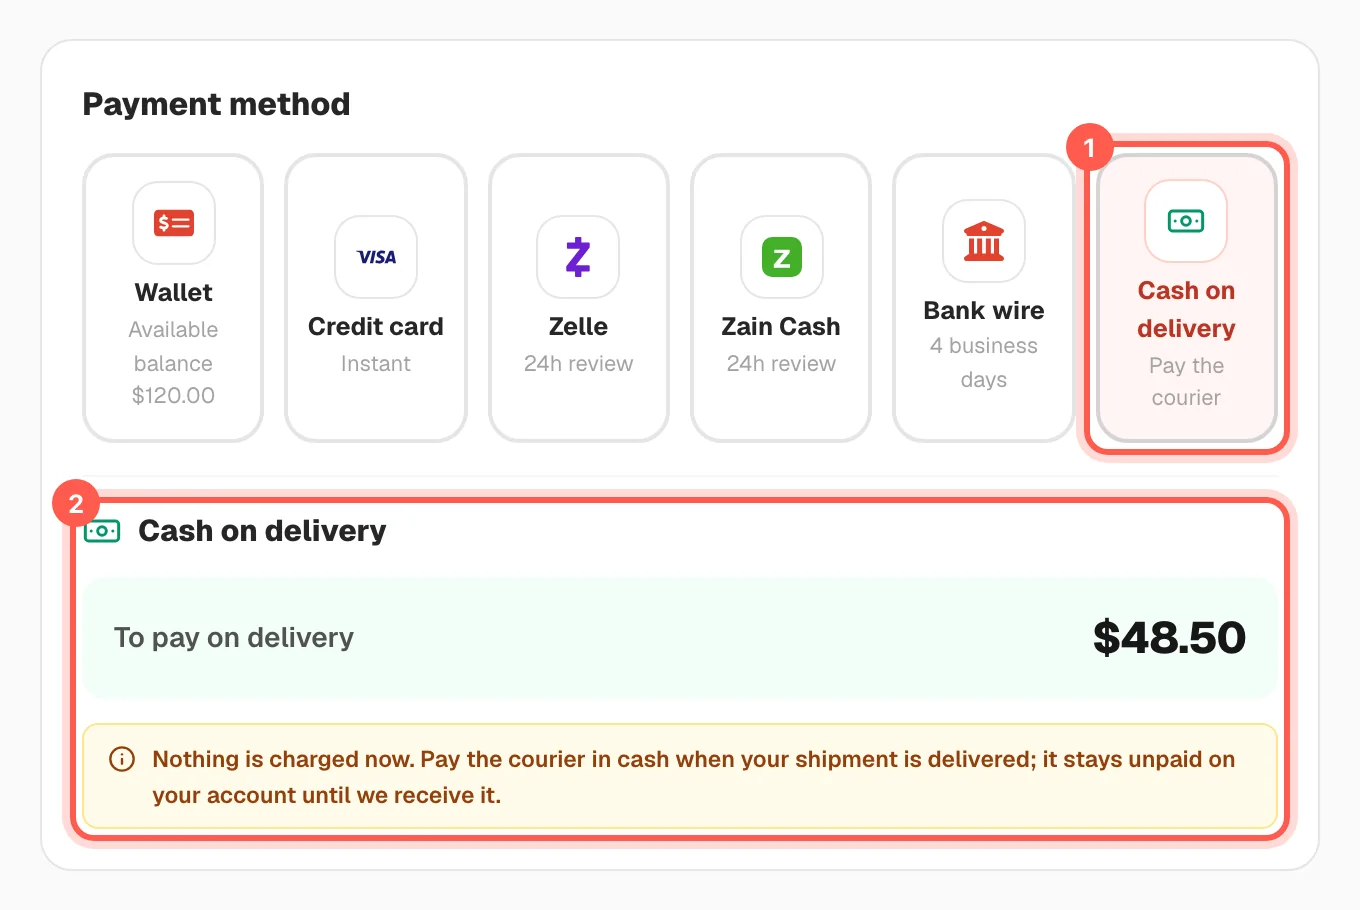
The box below shows the amount to pay on delivery (1). Nothing is charged now (2).
-
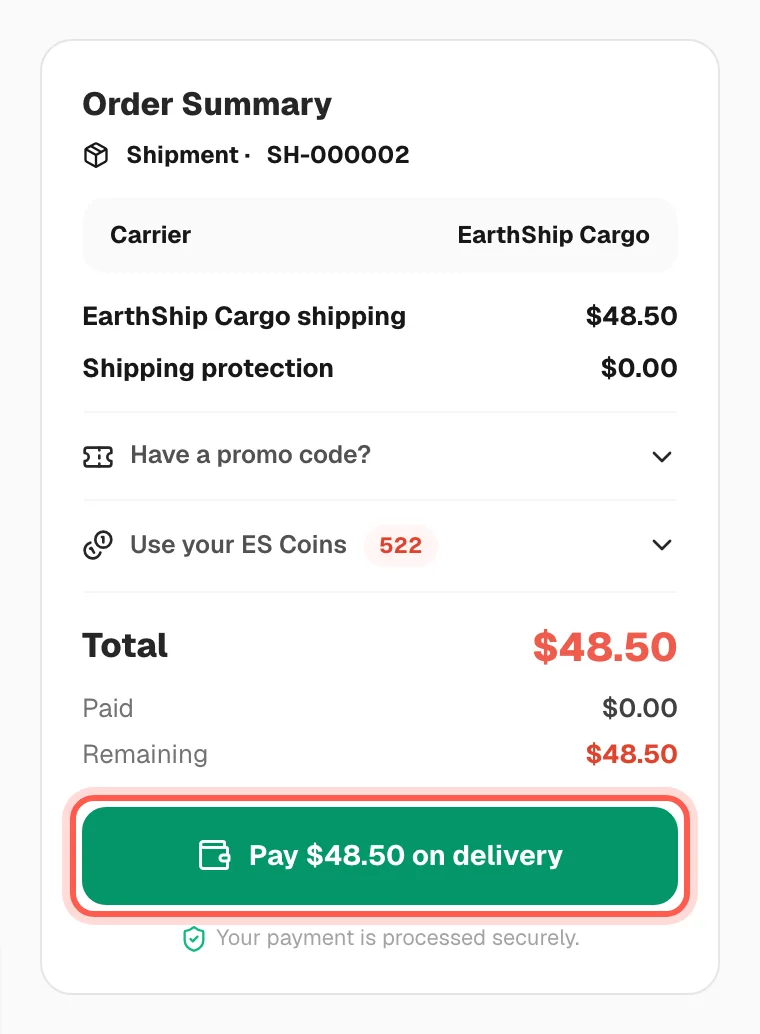
Check the "Order Summary" and click "Pay … on delivery".
-
You see the confirmation. Our team confirms the order, and you pay the courier in cash when the parcel arrives. Your invoice shows as paid once the cash is received.
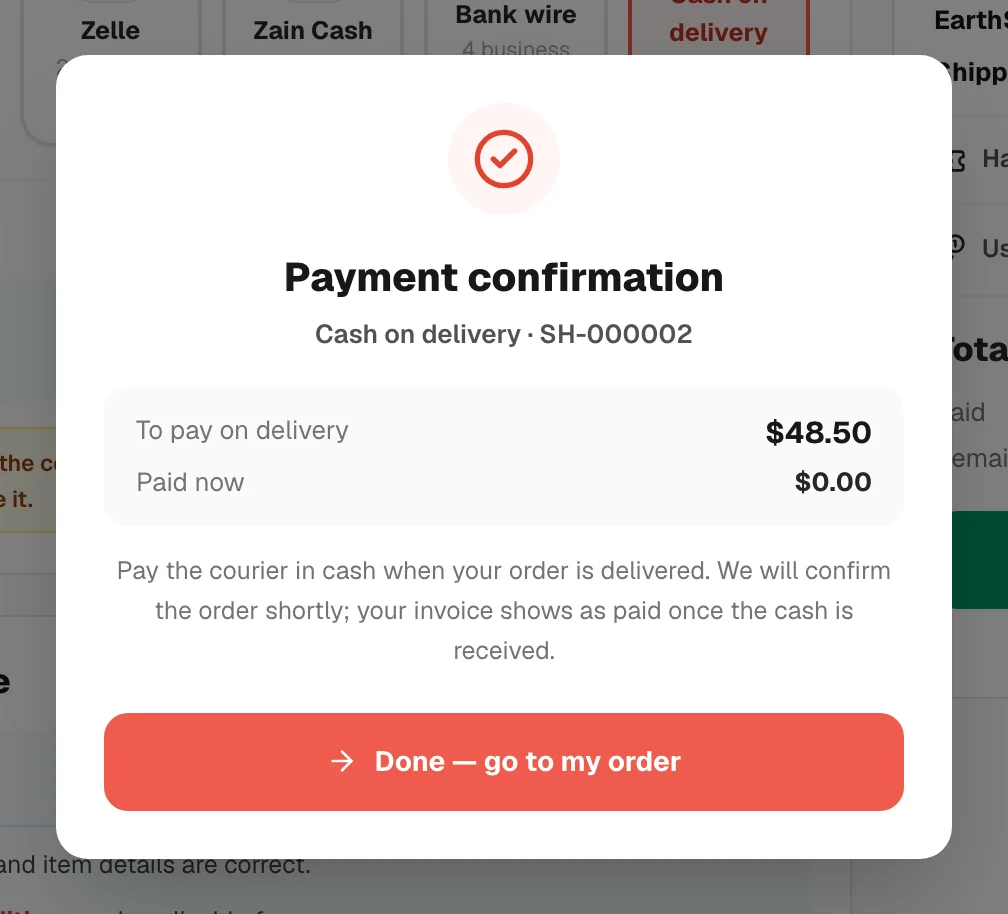
Cash on delivery only appears when the country is Iraq or Lebanon and the courier is EarthShip Cargo. With DHL or FedEx, pick another payment method.
Create a shipmentCan I pay with QiCard? New 3 steps
Yes, for shipments going to Iraq. Choose "QiCard" on the "Payment" page, send the total to our QiCard account shown there, then upload your receipt. Our team checks it within 24 hours.
- Open the "Payment" page of a shipment going to Iraq. Under "Payment method", click "QiCard".
- Send the total to the QiCard account number shown on your screen. Use your order number as the reference.
- Upload a picture of your receipt and submit the payment. Our team checks it within 24 hours and marks your shipment paid.
QiCard appears only when your shipment is going to Iraq. Write your order number as the reference.
How does the wallet work? 5 steps
Your wallet holds money on your account. You add money (a top-up), our team checks the payment, and then you can pay from your balance.
-
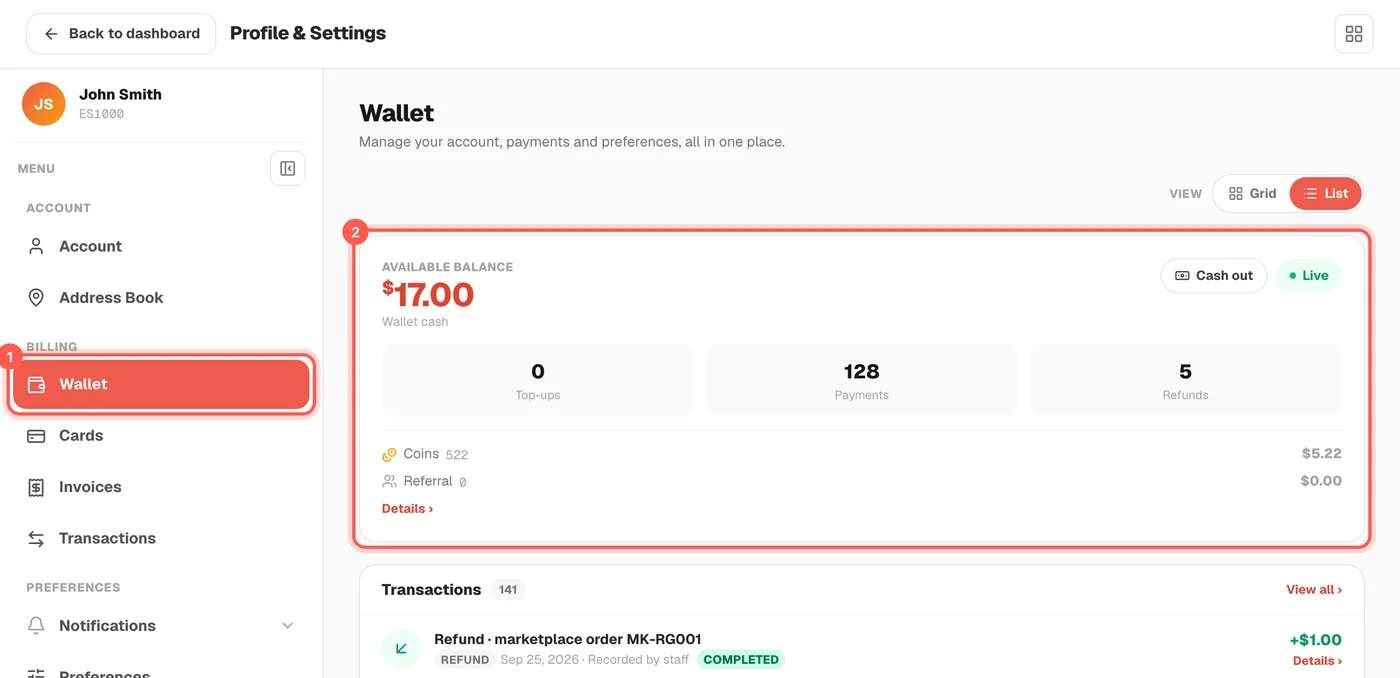
Open "Profile & Settings" and click "Wallet" in the menu (1). Your money is under "Available balance" (2).
-
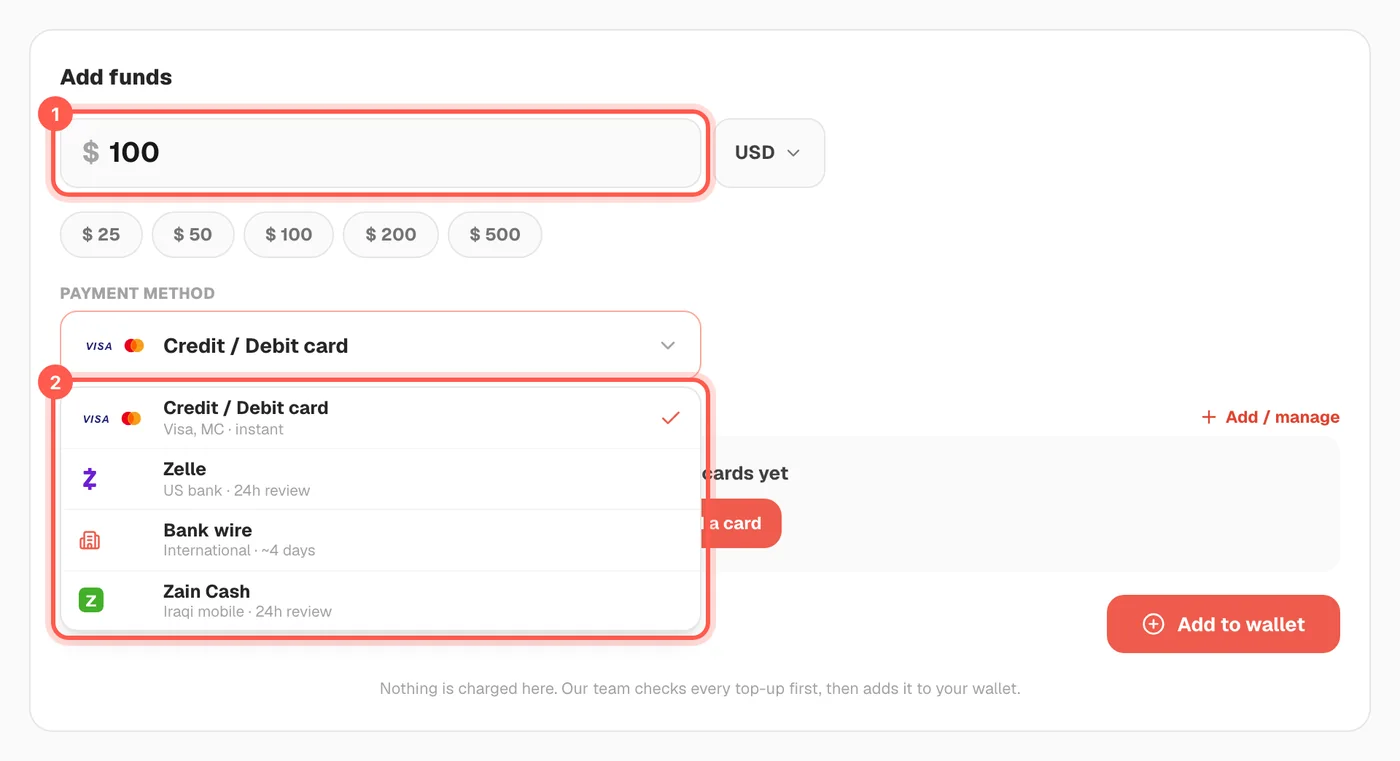
Scroll down to "Add funds". Type the amount (1), then open "Payment method" and choose how you will pay (2).
-
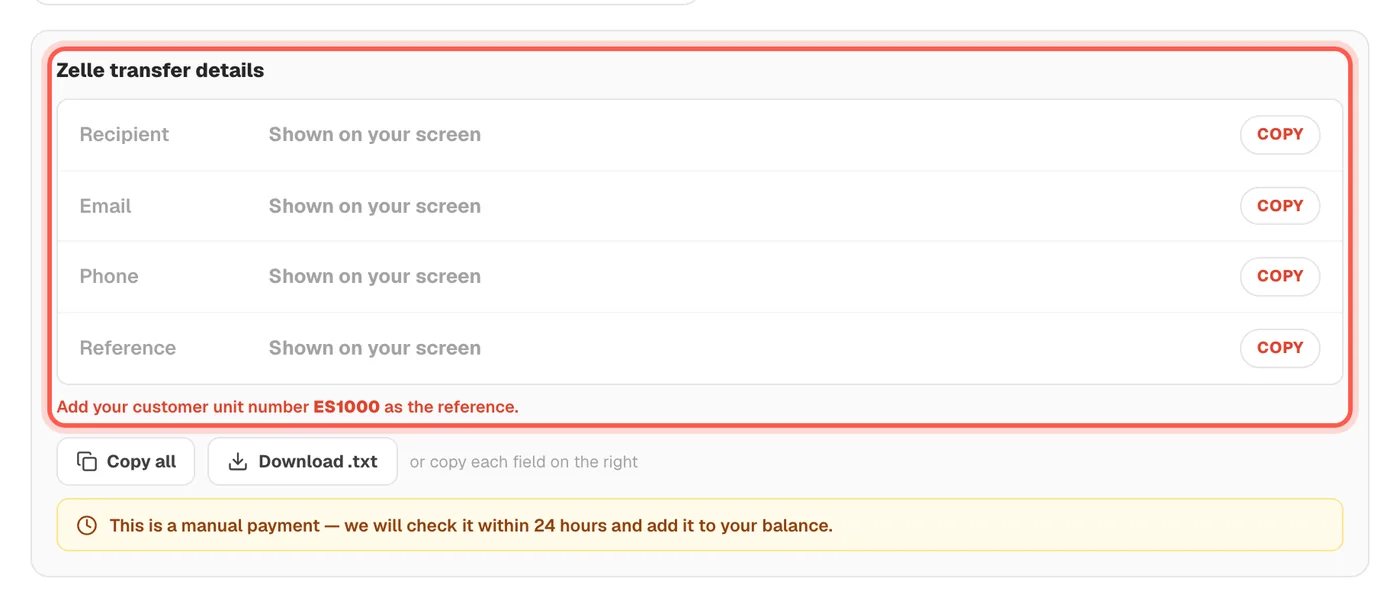
For Zelle, Bank wire or Zain Cash, send the money to the details shown. Use your suite number as the reference.
-
Add a note if you want (1), upload a picture of your payment receipt (2), then click "Add to wallet" (3).
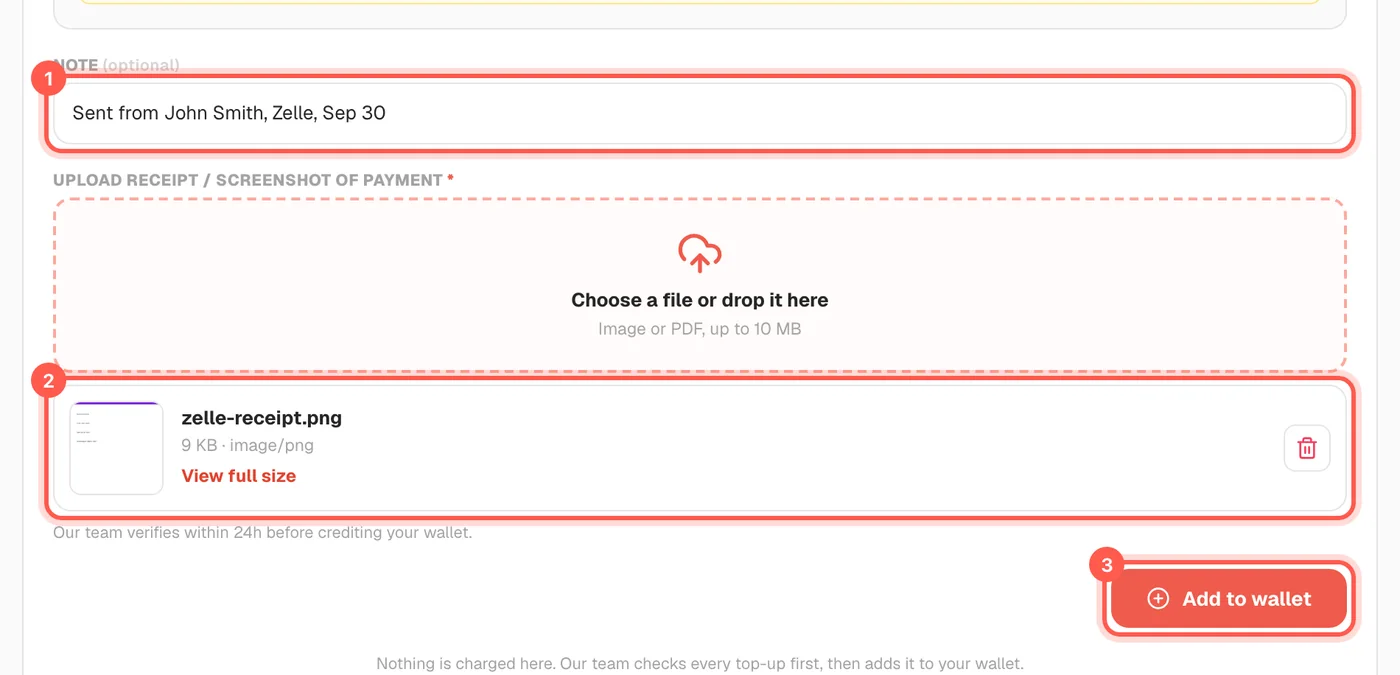
- Wait for our team to check the payment. After approval, the money shows in "Available balance".
A receipt is required for Zelle, Bank wire and Zain Cash. Without it, the top-up cannot be sent.
Open my walletWhy is my Zelle / wire / Zain top-up showing as Pending? 4 steps
Our team must check your receipt against your transfer before adding the money. The top-up shows as "PENDING" in Transactions, then "COMPLETED" once approved - usually within 24 hours (bank wire about 4 business days).
-
Open "Profile & Settings" and click "Transactions". Under "History", find the row "Wallet top-up". It shows "PENDING" while we check it.
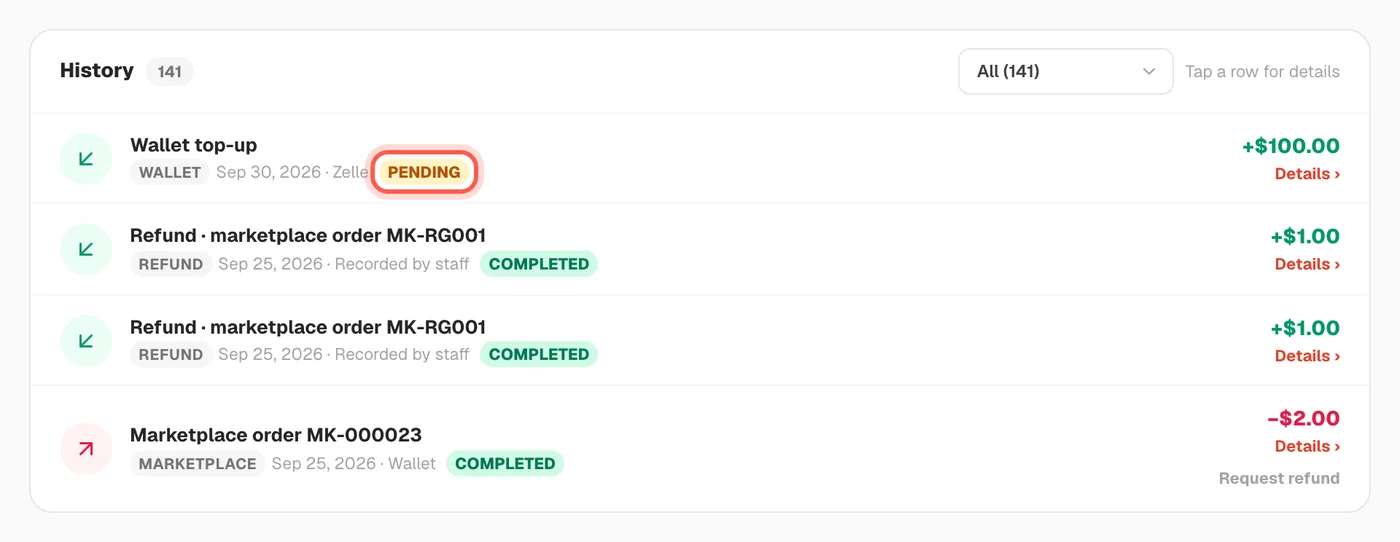
-
Click the row to see the details: amount, method, reference and date. You can give the reference to our support team.
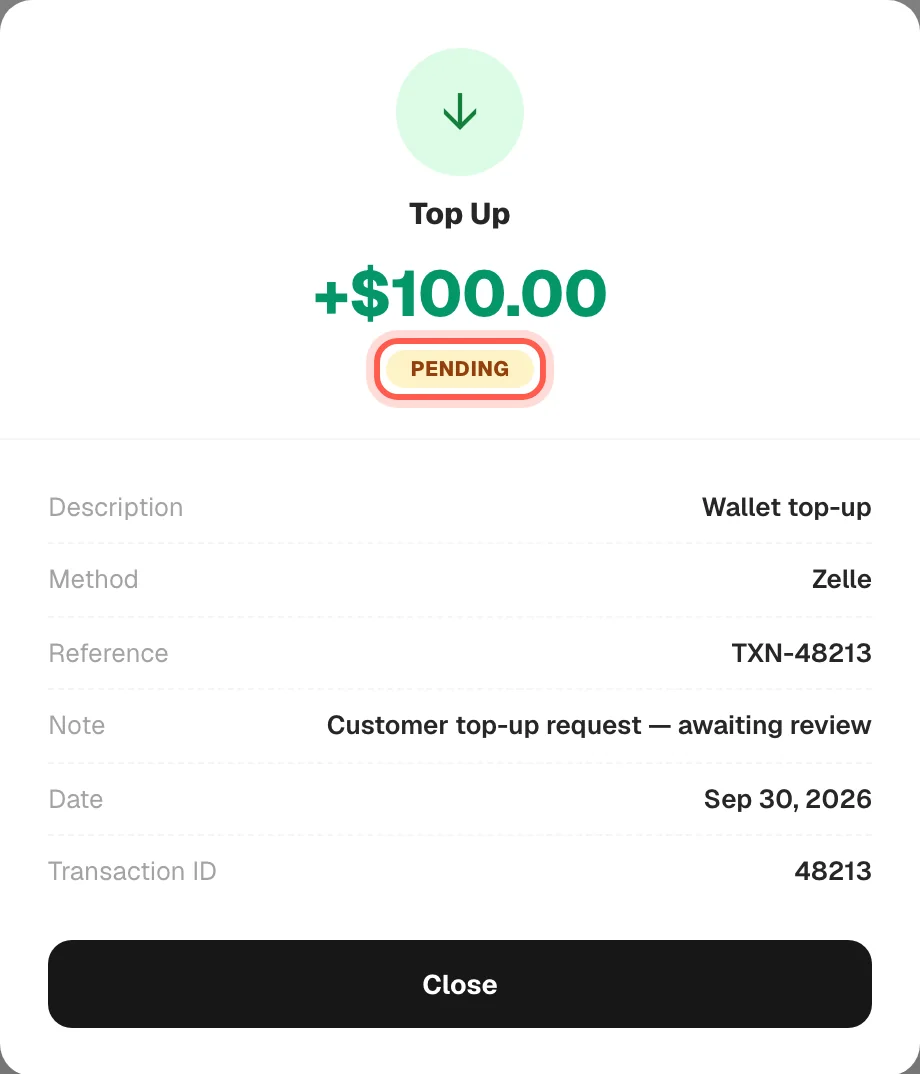
-
You can also see the same row on the "Wallet" page, under "Transactions". Click "View all" to see the full list.
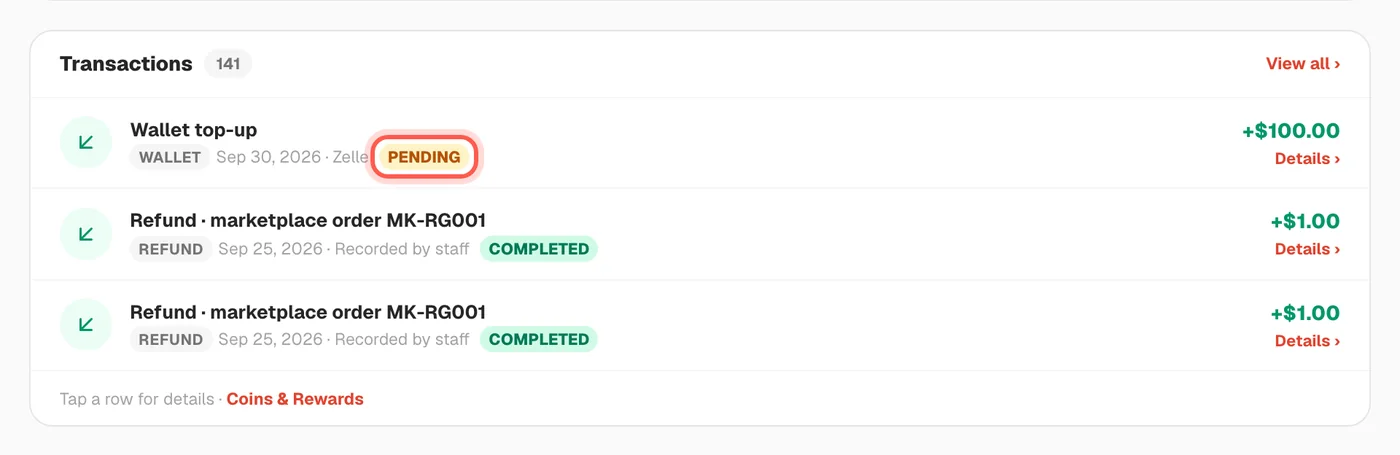
- Wait for our team to approve it. The row changes to "COMPLETED" and the money is added to your balance.
Do not send the same top-up again while it is pending. If it is still pending after 24 hours, contact support.
Open my transactionsIs there a fee for paying by card? 4 steps
Adding money to your wallet by card adds a 5% processing fee, shown in a popup before you confirm. Paying a shipment from your wallet balance has no card fee.
-
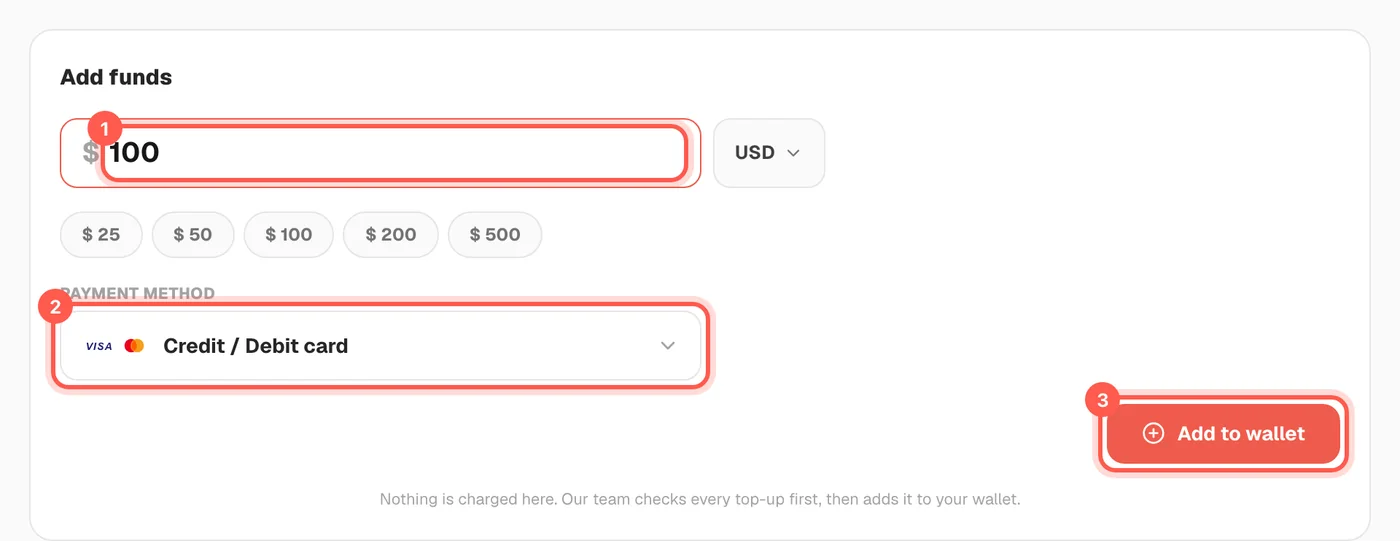
Open Settings, then "Wallet", and go to "Add funds". Type the amount (1), choose "Credit / Debit card" (2), then click "Add to wallet" (3).
-
Read the "Confirm card top-up" popup. It shows the "Credit-card fee (5%)" (1) and the total charged to your card (2) before you confirm.
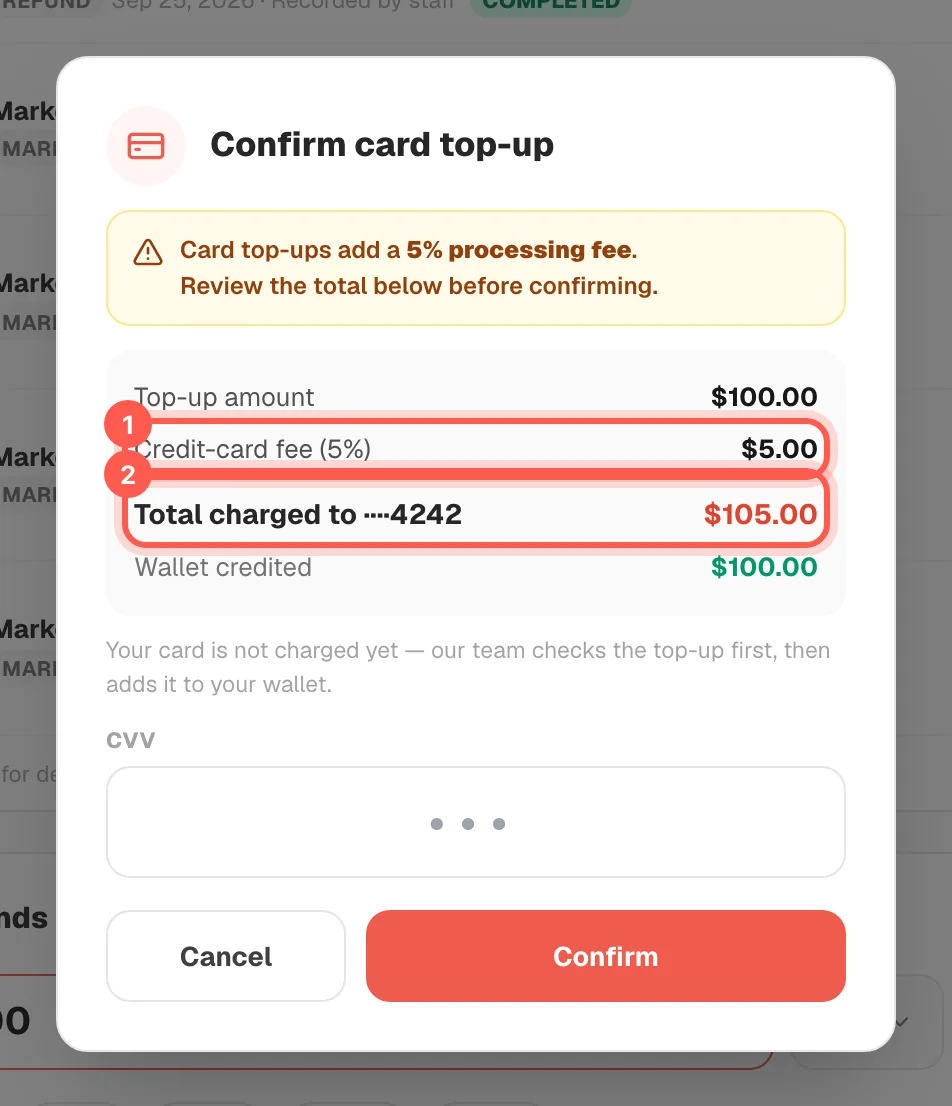
- Click "Cancel" if you do not agree with the fee. Nothing is charged until you click "Confirm".
-
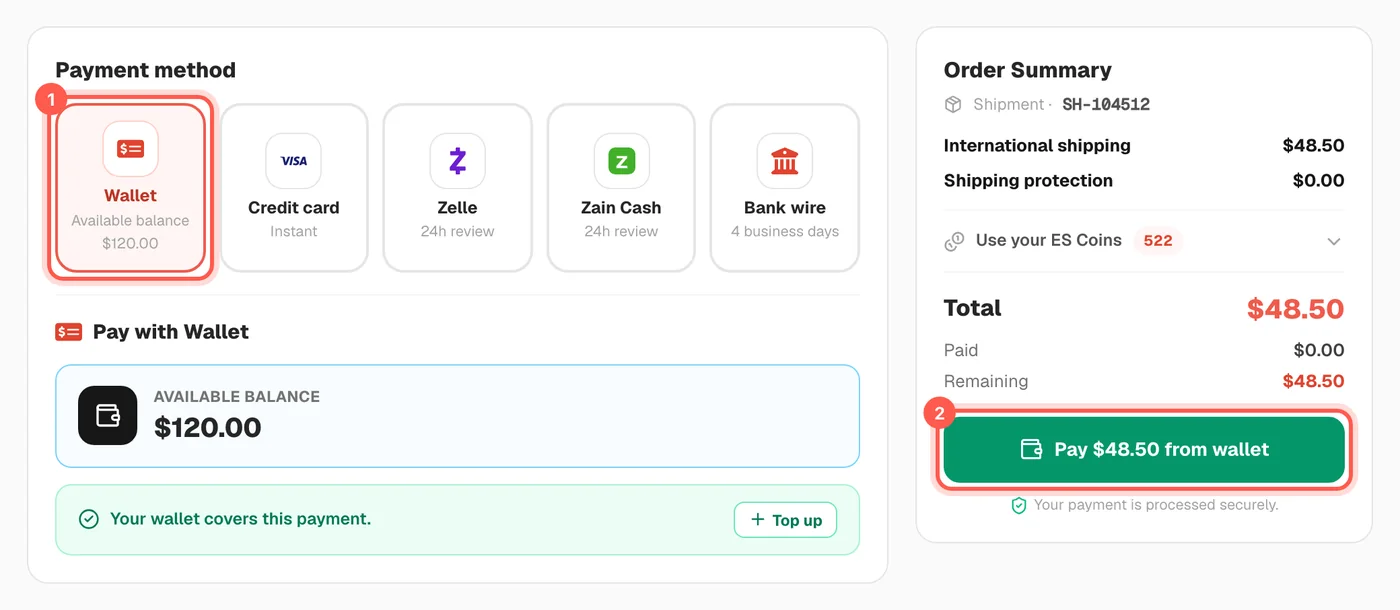
To pay with no card fee, choose "Wallet" (1) on the "Payment" page. The button (2) shows the same amount as the "Total".
Zelle, Zain Cash and Bank wire top-ups have no card fee, but our team must check them first. Paying a shipment directly by card adds the same 5% fee.
Open my walletWhen will I be charged for a shipment? 4 steps
You are charged on the "Payment" page, only after you click the pay button and confirm. With the wallet, the money leaves your balance at that moment, and a warning first shows your balance before and after.
-
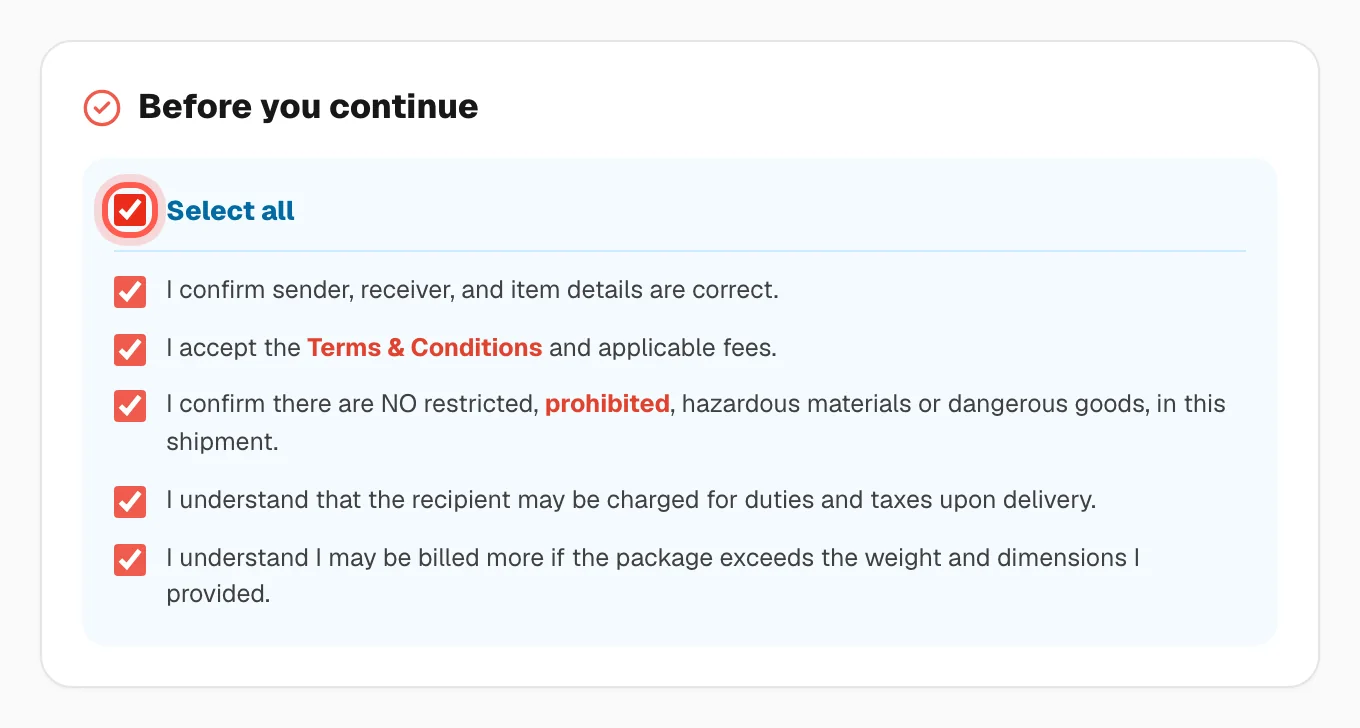
Open the "Payment" page of your shipment. Under "Before you continue", tick "Select all" to accept the statements.
-
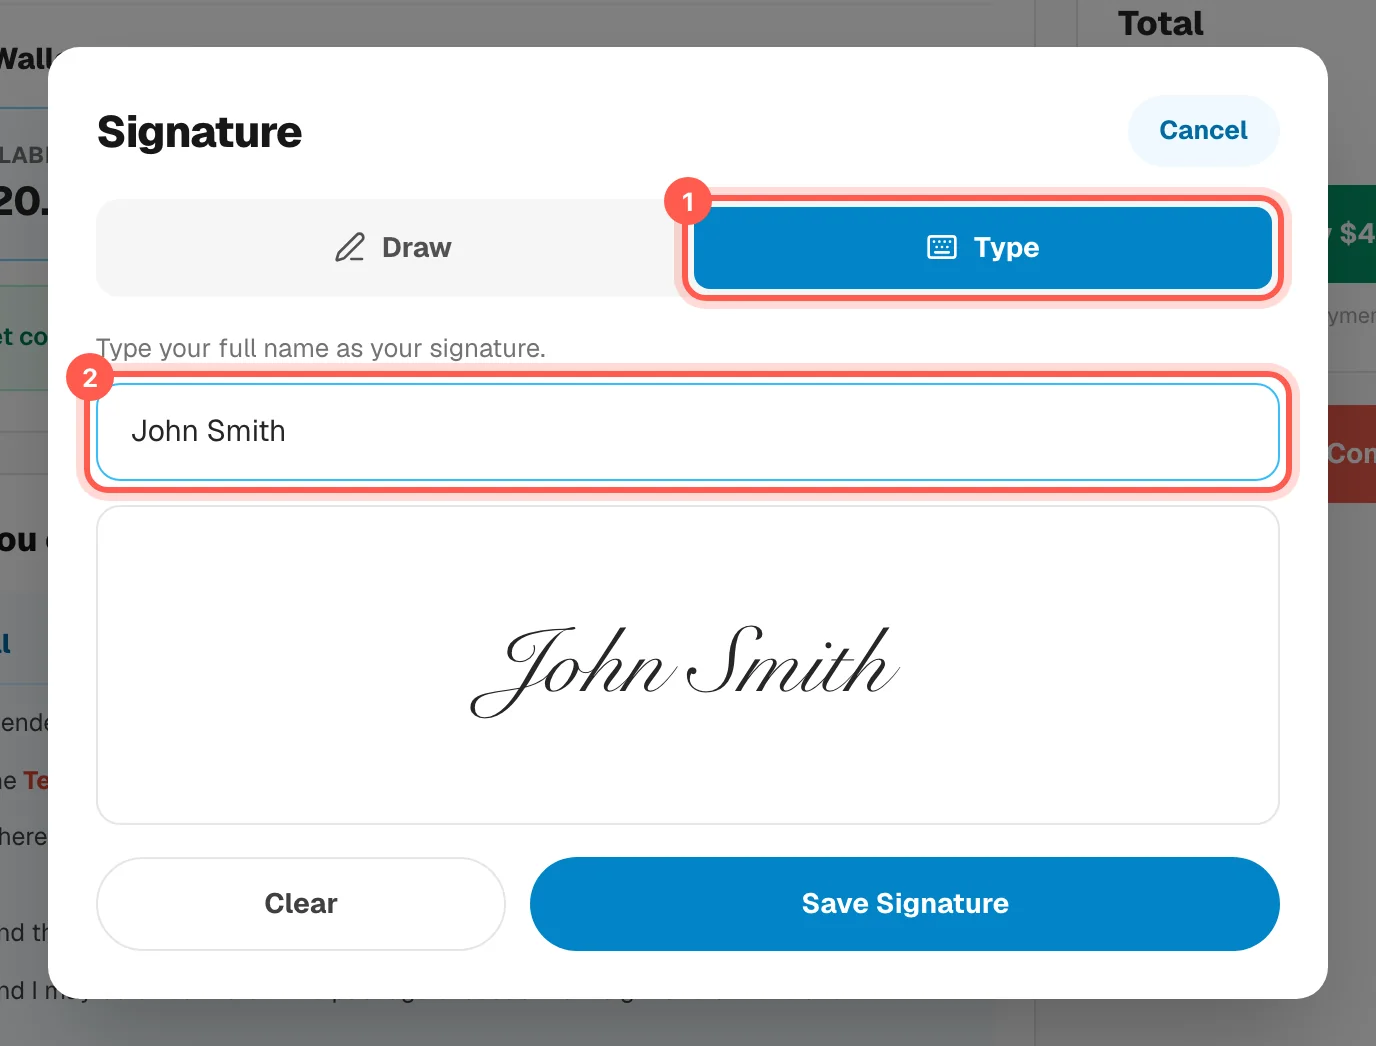
Click "Tap to sign". Choose "Type" (1), write your full name (2), then click "Save Signature".
-
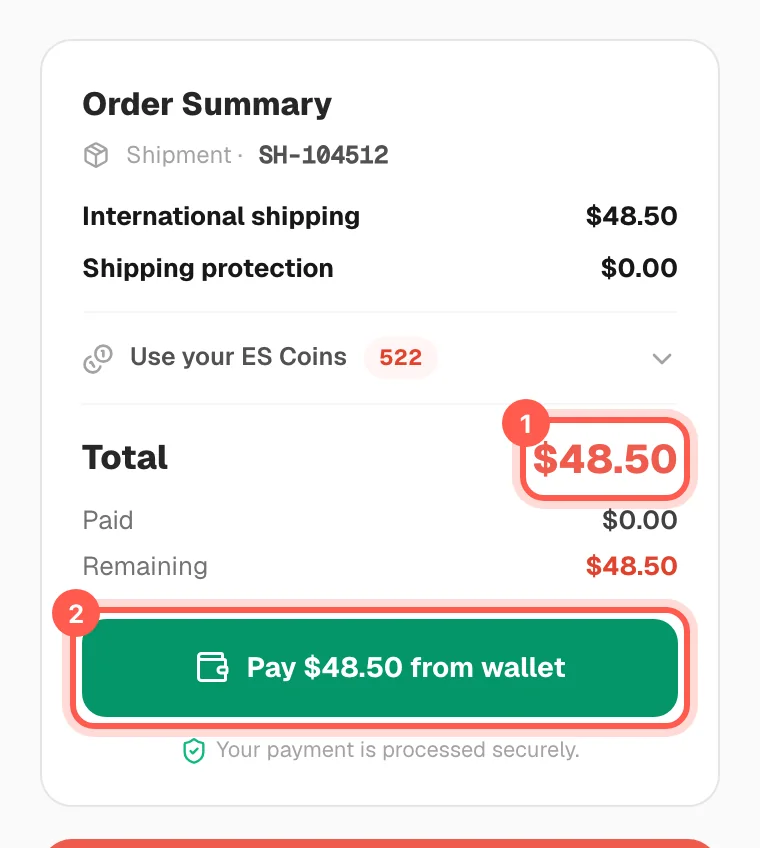
Check the "Total" (1) in "Order Summary". Then click the green button "Pay ... from wallet" (2).
-
Read the warning "Pay from your wallet?". It shows "Wallet balance" and "Balance after payment". Click "Yes, pay now" to pay, or "Cancel" to stop.
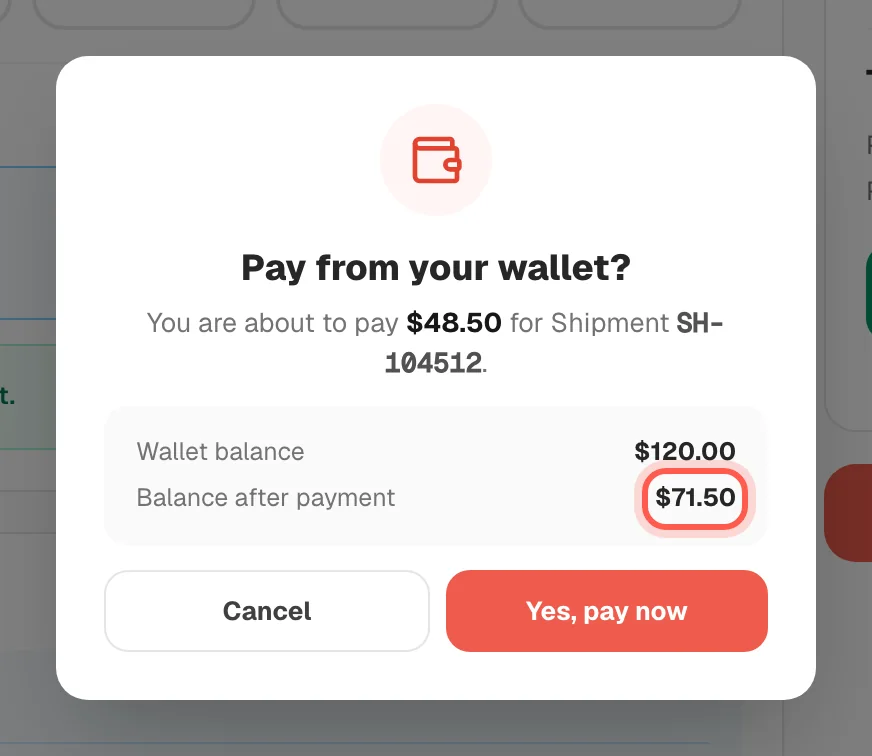
Nothing is taken from your wallet until you click "Yes, pay now". With Zelle, Zain Cash or Bank wire, the shipment is marked paid after our team checks your receipt.
Go to my shipmentsHow do I add and verify a card? 6 steps
Open "Profile & Settings", go to "Cards" and click "Add a card". We charge a small amount ($0.01-$5.00) to the card; enter that exact amount to verify it. You get 3 tries.
-
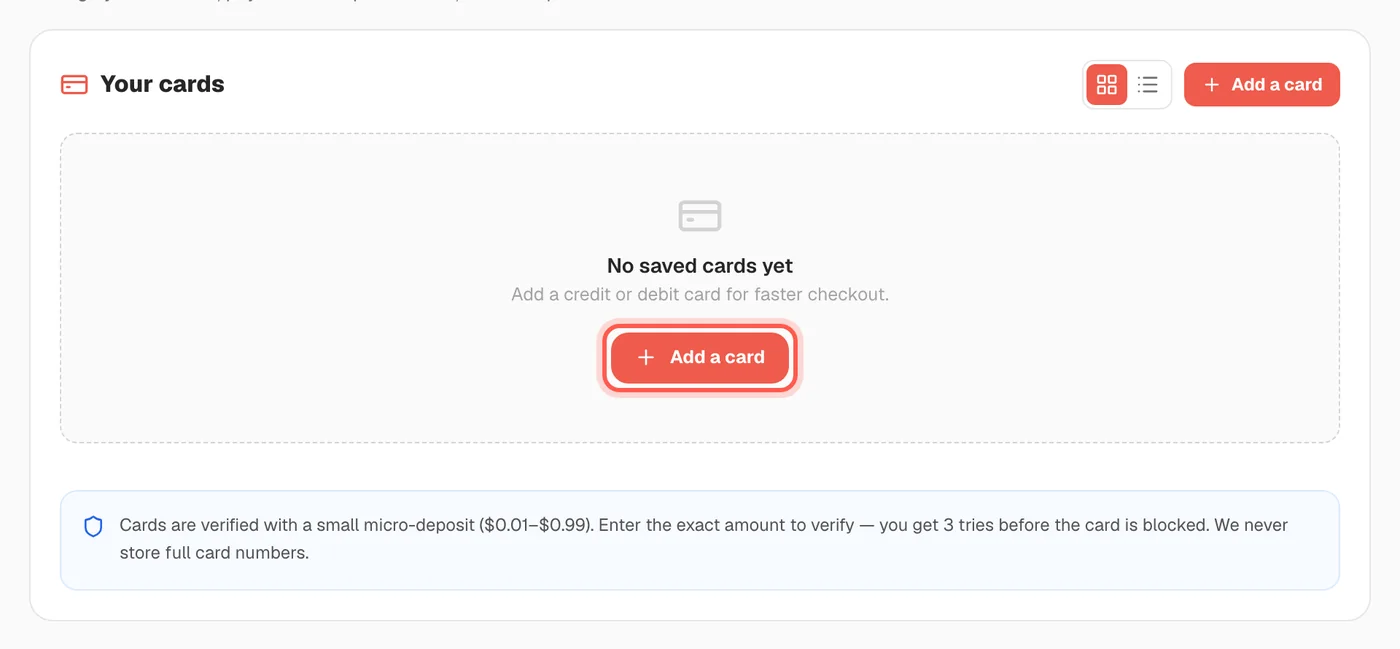
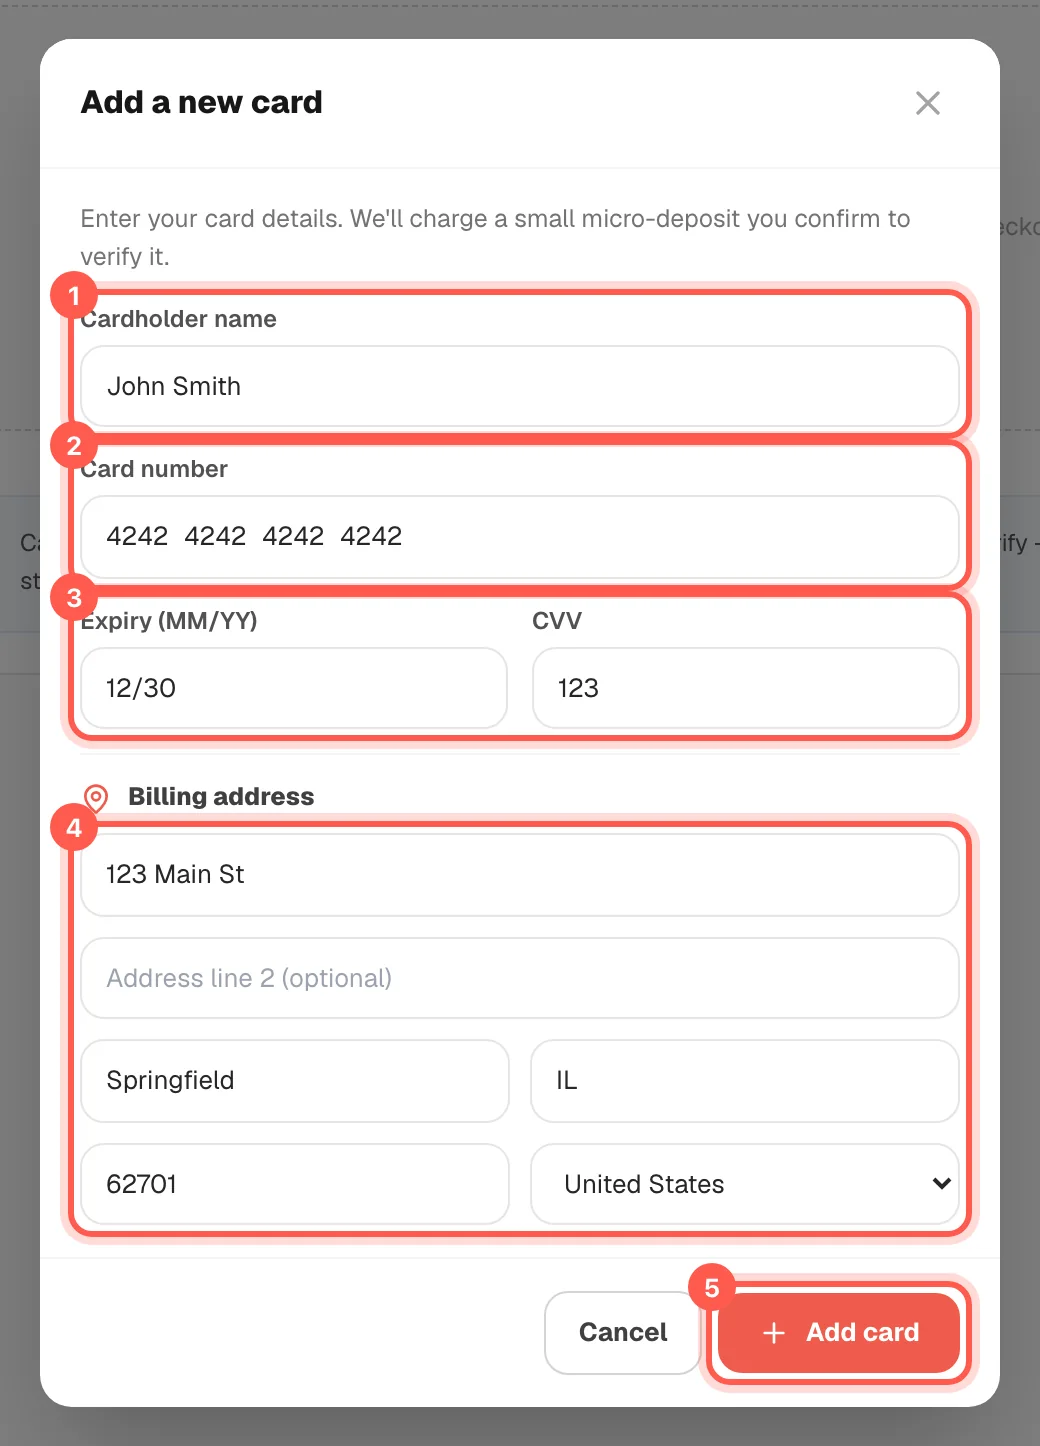
Open "Profile & Settings", click the "Cards" tab, then click "Add a card".
-
Type the (1) cardholder name, (2) card number, (3) expiry and CVV, and (4) billing address. Then click (5) "Add card".
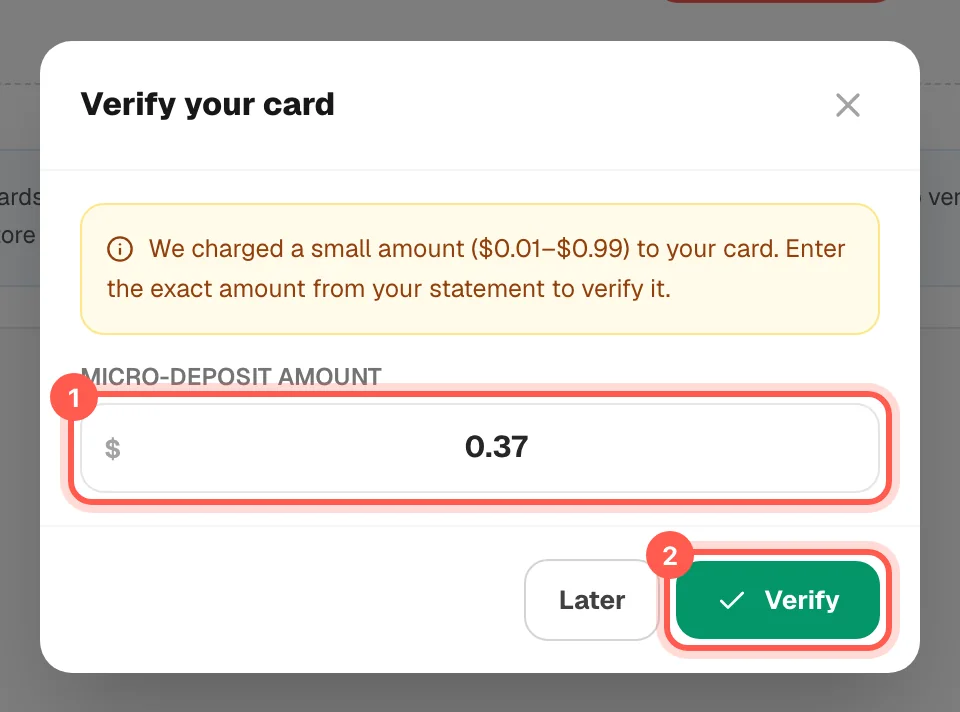
- Look at your bank or card statement. Find the small charge from us, between $0.01 and $5.00.
-
Type the exact amount in (1) "Micro-deposit amount", then click (2) "Verify".
-
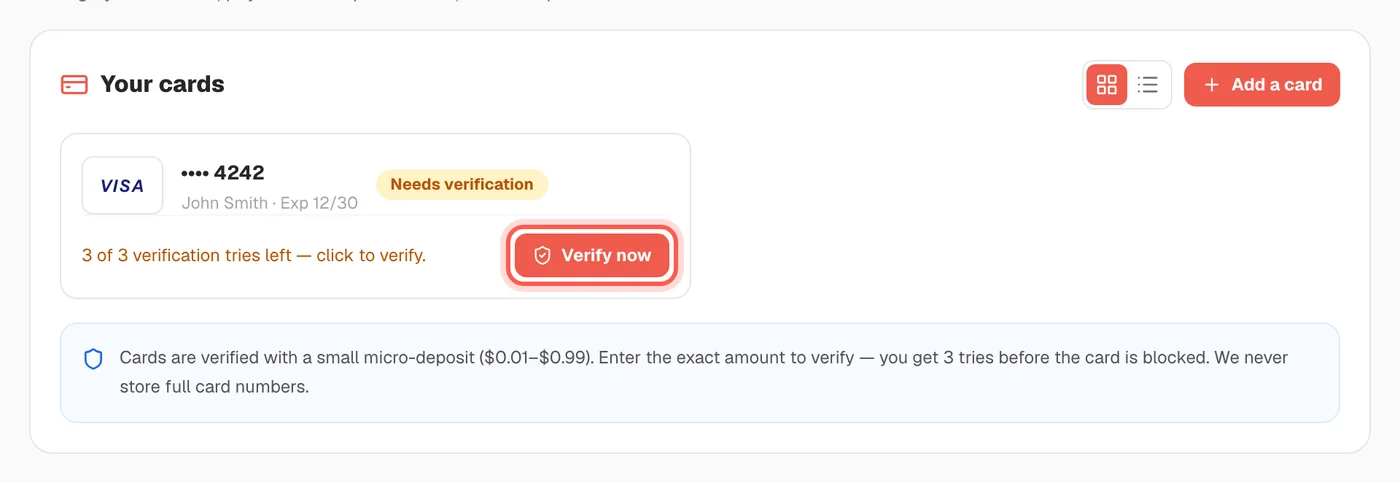
Click "Later" if you do not see the charge yet. Come back and click "Verify now" on the card.
-
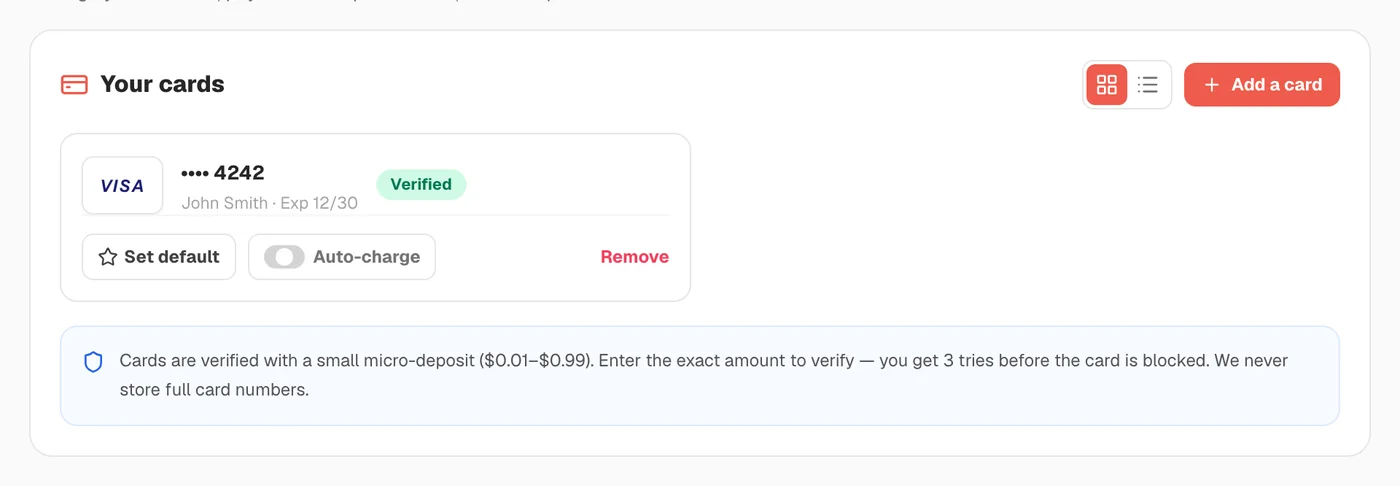
Check that the card now shows the green "Verified" label. You can now pay with it.
Do not guess the amount. You only have 3 tries, so wait until you can see the charge on your statement.
Go to my cardsWhat happens if I enter the wrong verification amount? 4 steps
You have 3 tries. After 3 wrong amounts the card is blocked and cannot be added again - contact support to unblock it.
-
Read the red message after a wrong amount. It tells you how many tries remain, for example "Incorrect amount - 2 tries remaining."
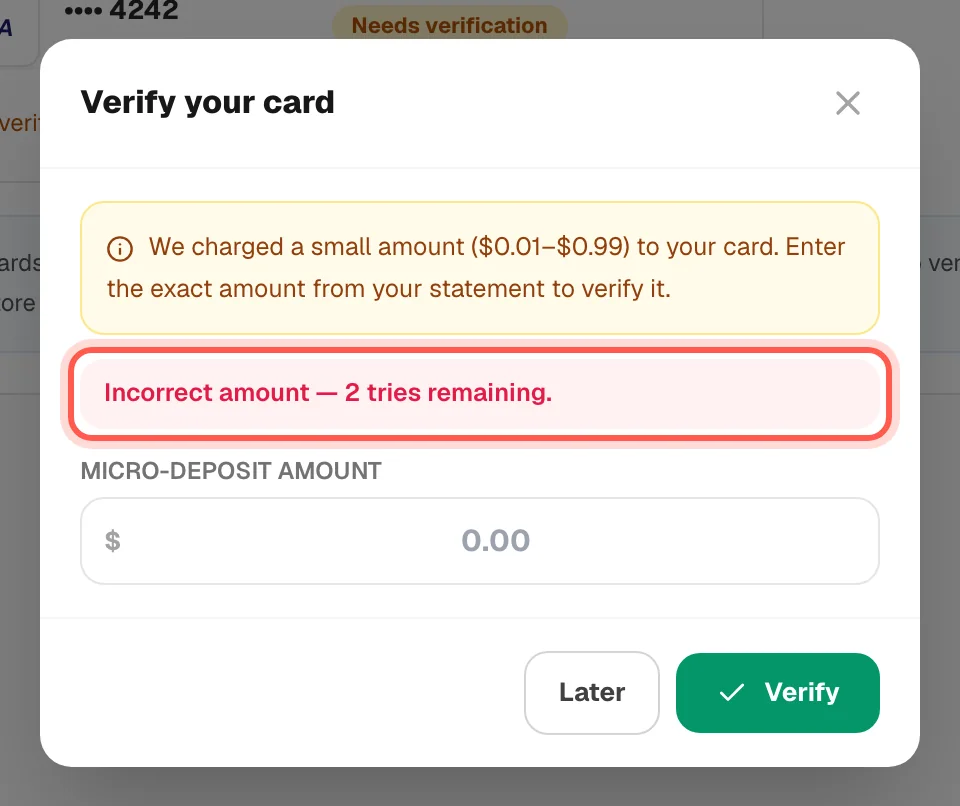
- Check your card statement again for the exact amount. Click "Later" if you need more time.
-
Open the "Cards" tab later. The card shows how many tries are left. Click "Verify now" to try again.
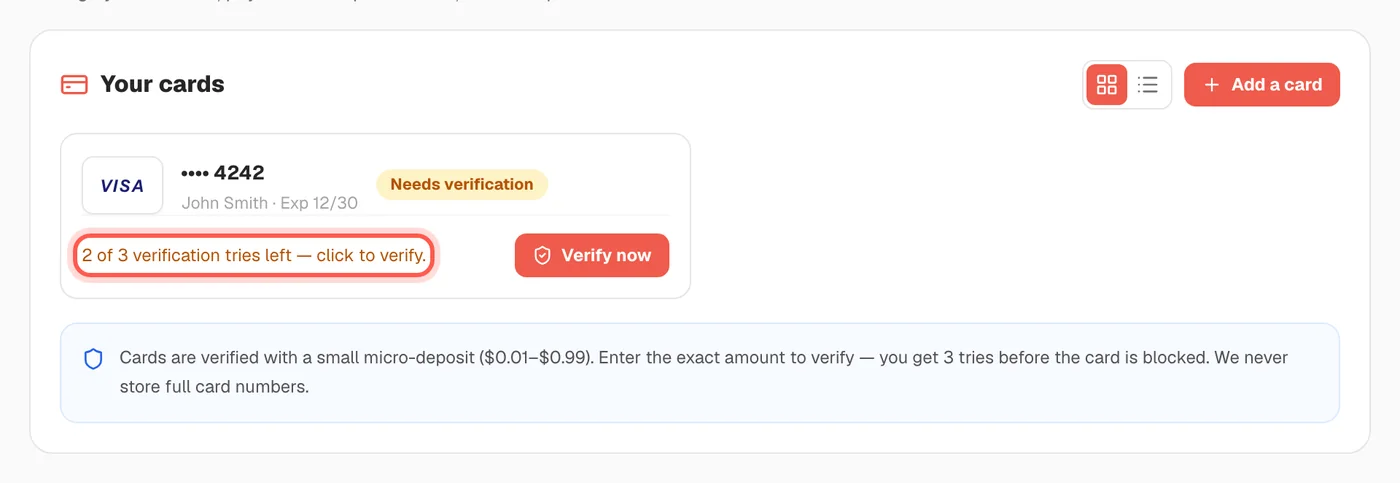
-
After 3 wrong amounts the card shows "Blocked". Contact support to unblock it.
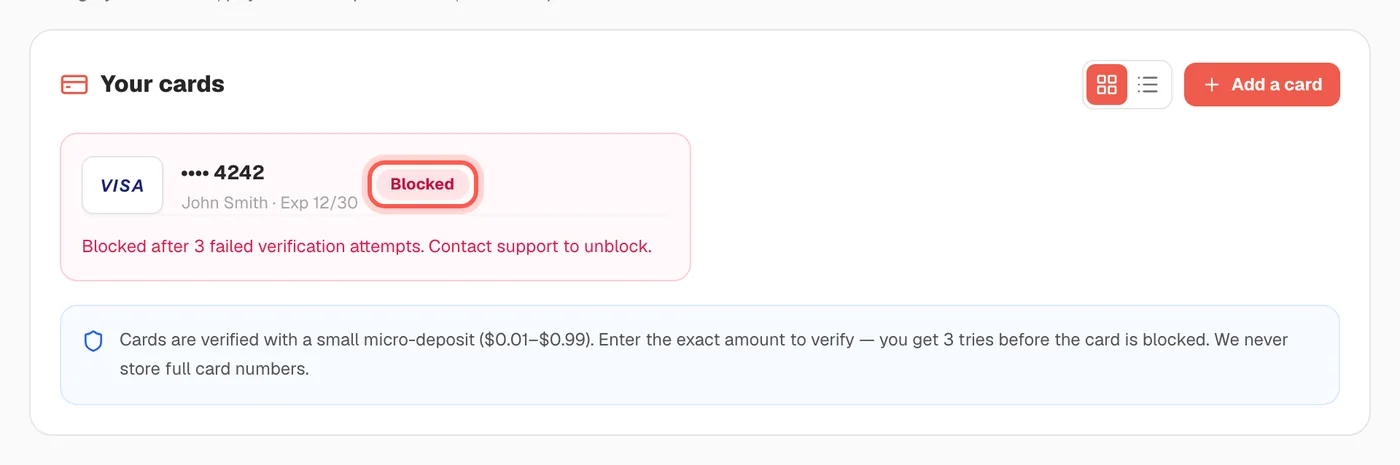
A blocked card cannot be added again by you. Only support can unblock it.
Go to my cardsCan I set a default card or auto-charge? 4 steps
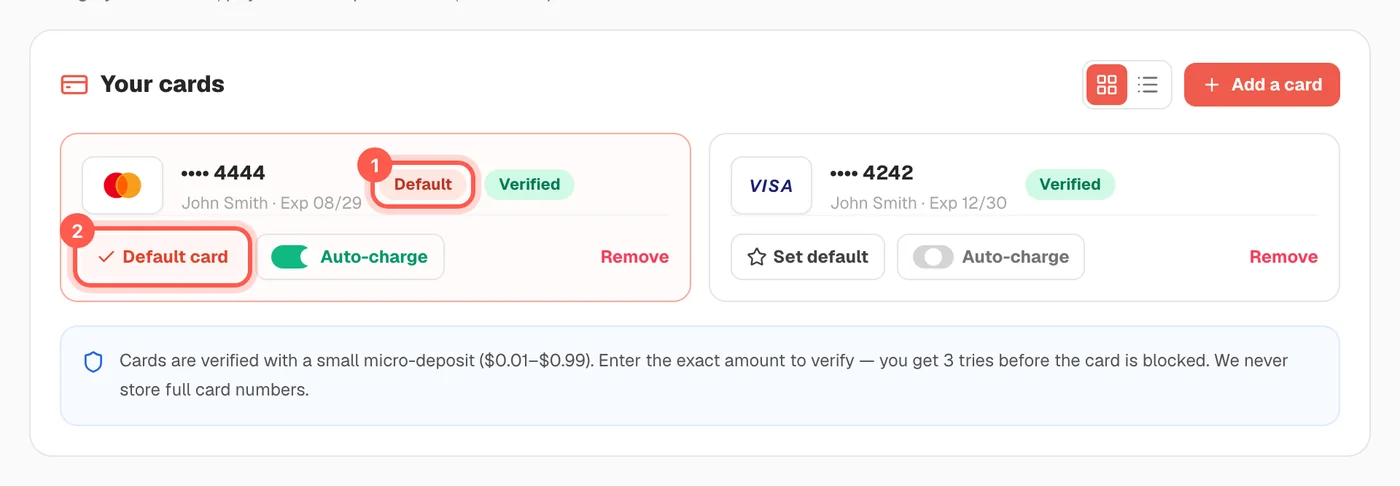
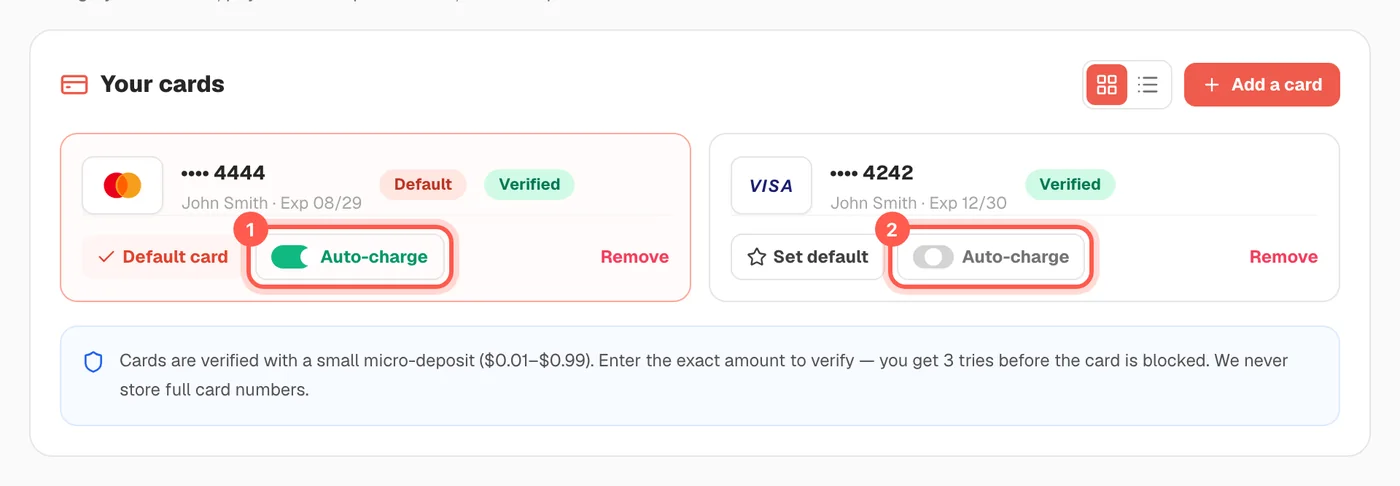
Yes. On the "Cards" tab, a verified card can be set as your default (one at a time) and has an "Auto-charge" switch. Setting a default card also moves auto-charge to that card.
- Open "Profile & Settings" and click the "Cards" tab. Find a card with the green "Verified" label.
-
Click "Set default" on the card you want to use first.
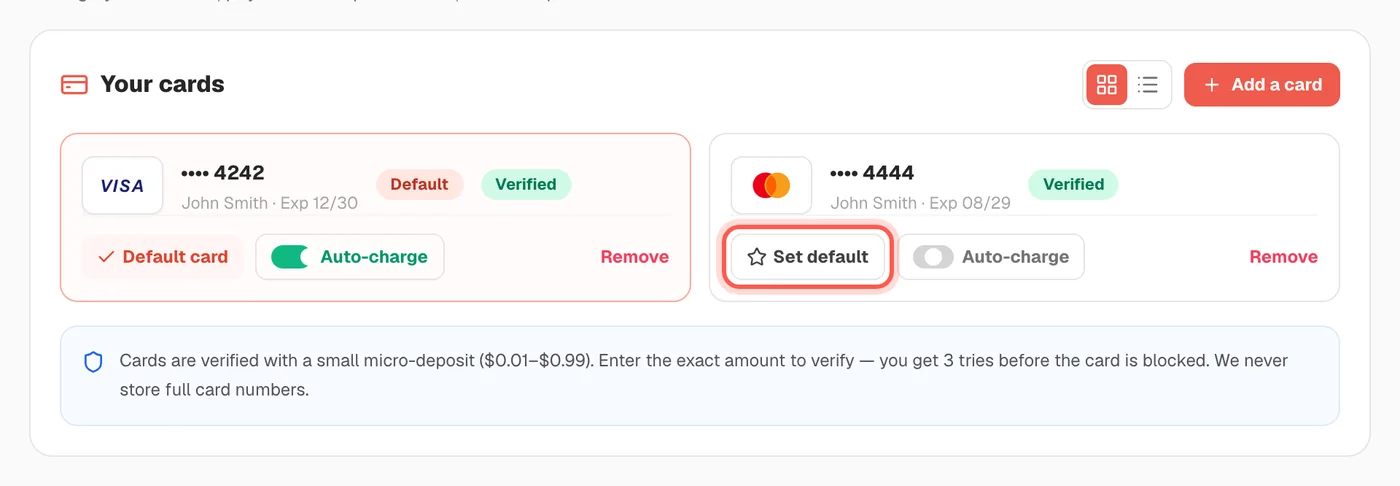
-
Check the card now shows (1) the "Default" label and (2) "Default card". Only one card can be the default.
-
Click the "Auto-charge" switch on a card to turn it on (green) or off (grey).
A card that still says "Needs verification" cannot be the default. Verify it first.
Go to my cardsHow do I earn and use ES Coins? New 4 steps
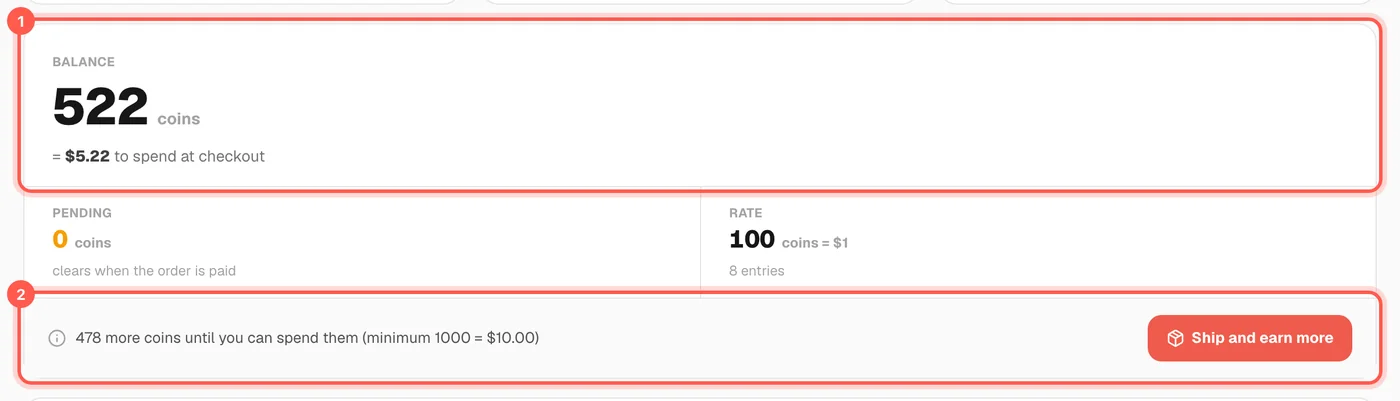
You earn coins every time you pay, and more when you invite friends. Coins take money off your next payment once you have the minimum shown on the page.
-
Open "Coins & Rewards" from the menu. The top of the page shows the ways to earn coins.

-
See your balance and its value in dollars (1). The line below tells you how many more coins you need before you can spend them (2).
- When you pay for a shipment, open "Use your ES Coins" on the payment page and type how many coins to use. The total goes down.
-
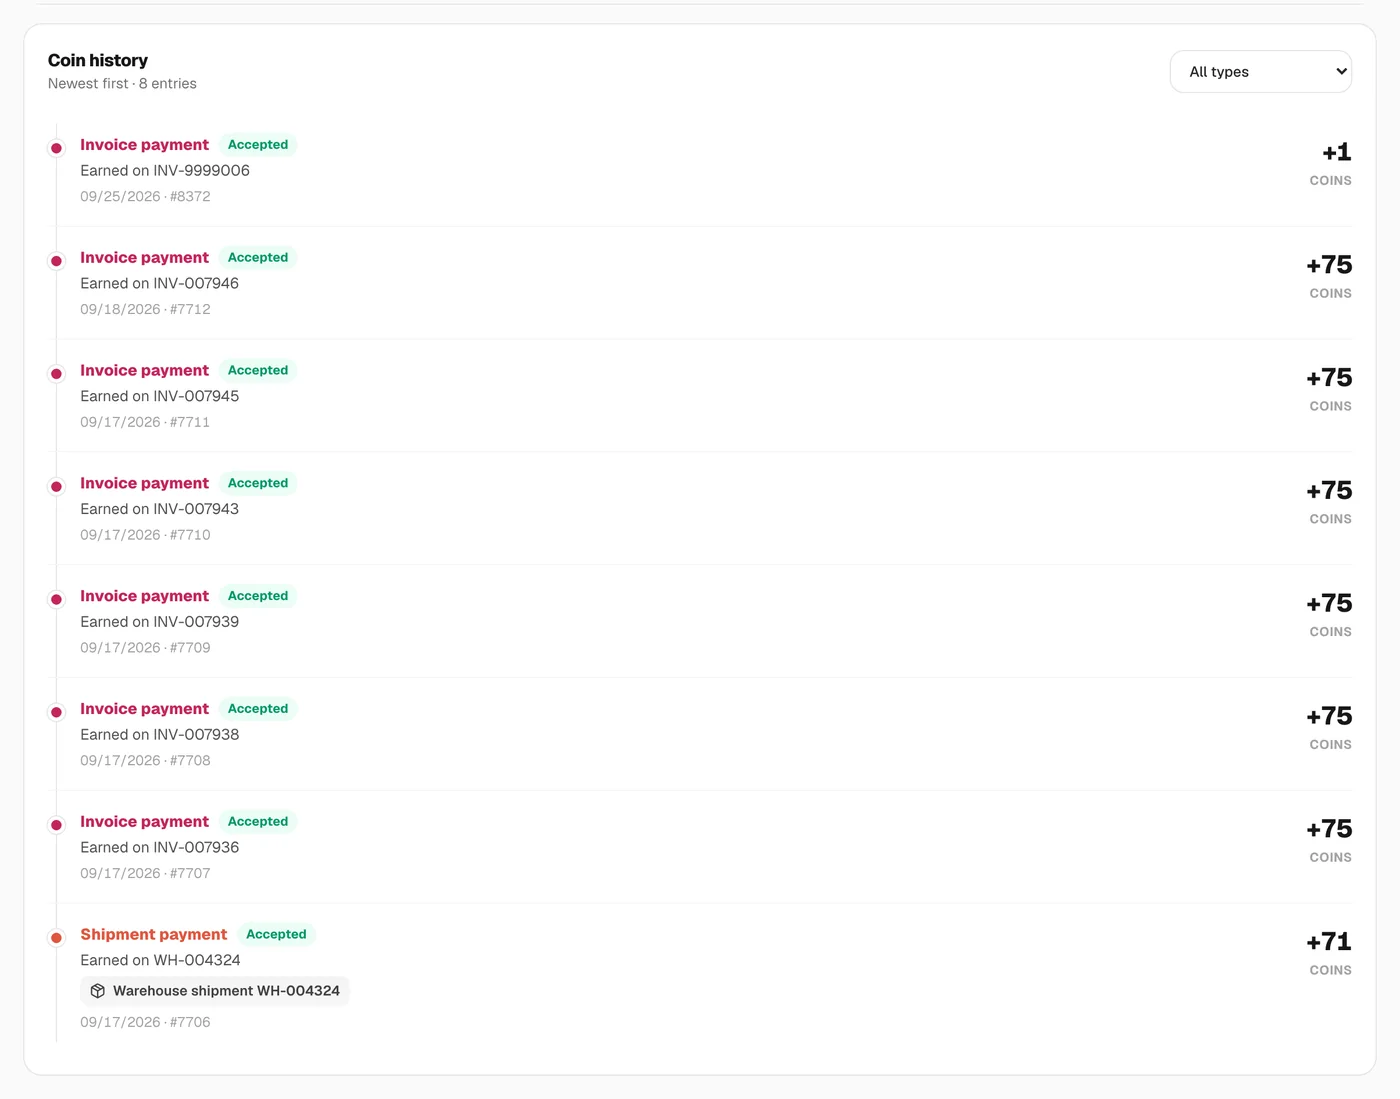
Every coin you earn or spend is listed in "Coin history".
How do I use my referral code? New 3 steps
Share your invite link with friends. You earn coins once a friend who signed up with it makes their first payment, and more on every payment that friend makes.
-
Open "Refer & Earn" from the menu. Click "Copy" (1) to copy your invite link, or share it by WhatsApp, Telegram or email (2).

-
Your friend opens the link and creates an account. Your code is added for them automatically.

-
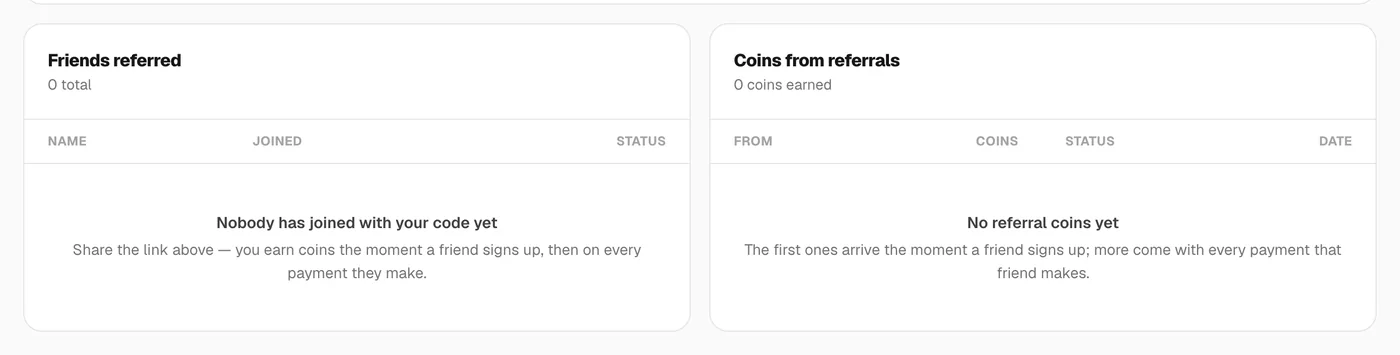
See who joined and the coins you earned under "Friends referred" and "Coins from referrals".
Where do I find my tracking number? 5 steps
Your tracking number is shown in My Shipments, under the shipment number, and on the Shipment Details page. It appears after the shipment is paid, and you can follow it any time on the Tracking page.
-
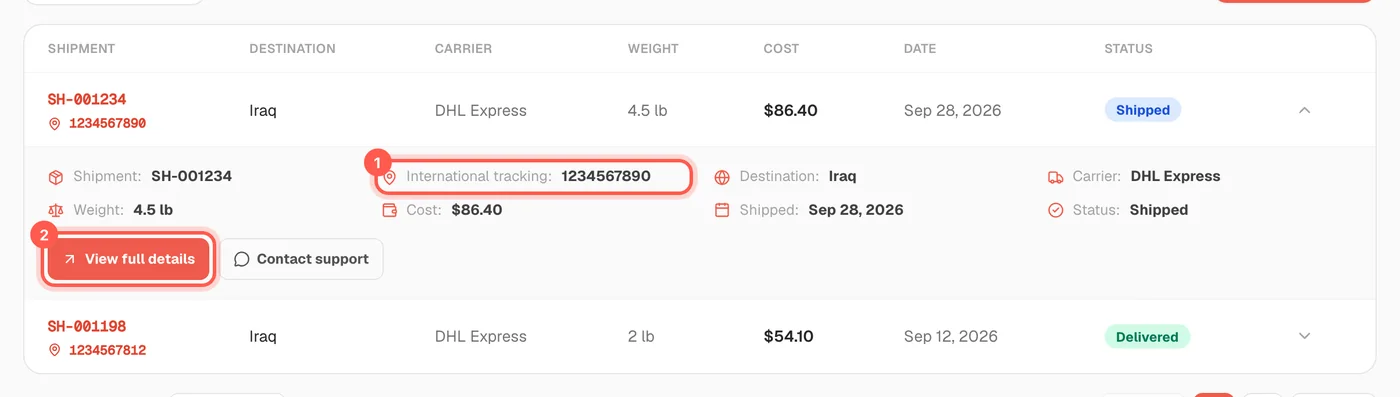
Open "Shipments" in the left menu, then click "All shipments". The tracking number is the small number under the shipment number.

-
Click the small arrow at the end of the row. Read the number next to "International tracking:" (1), then click "View full details" (2).
-
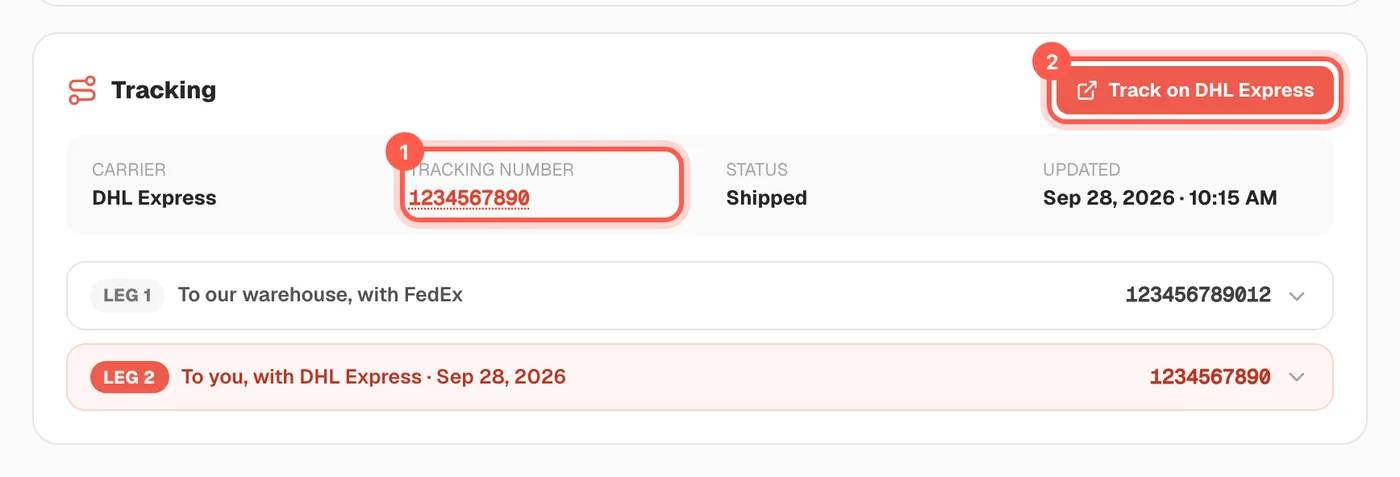
Look at the top of the "Shipment Details" page. The number is in the box named "Tracking".

-
Scroll down to the "Tracking" card. Read "Tracking number" (1), or click "Track on DHL Express" (2) to open the carrier website.
-
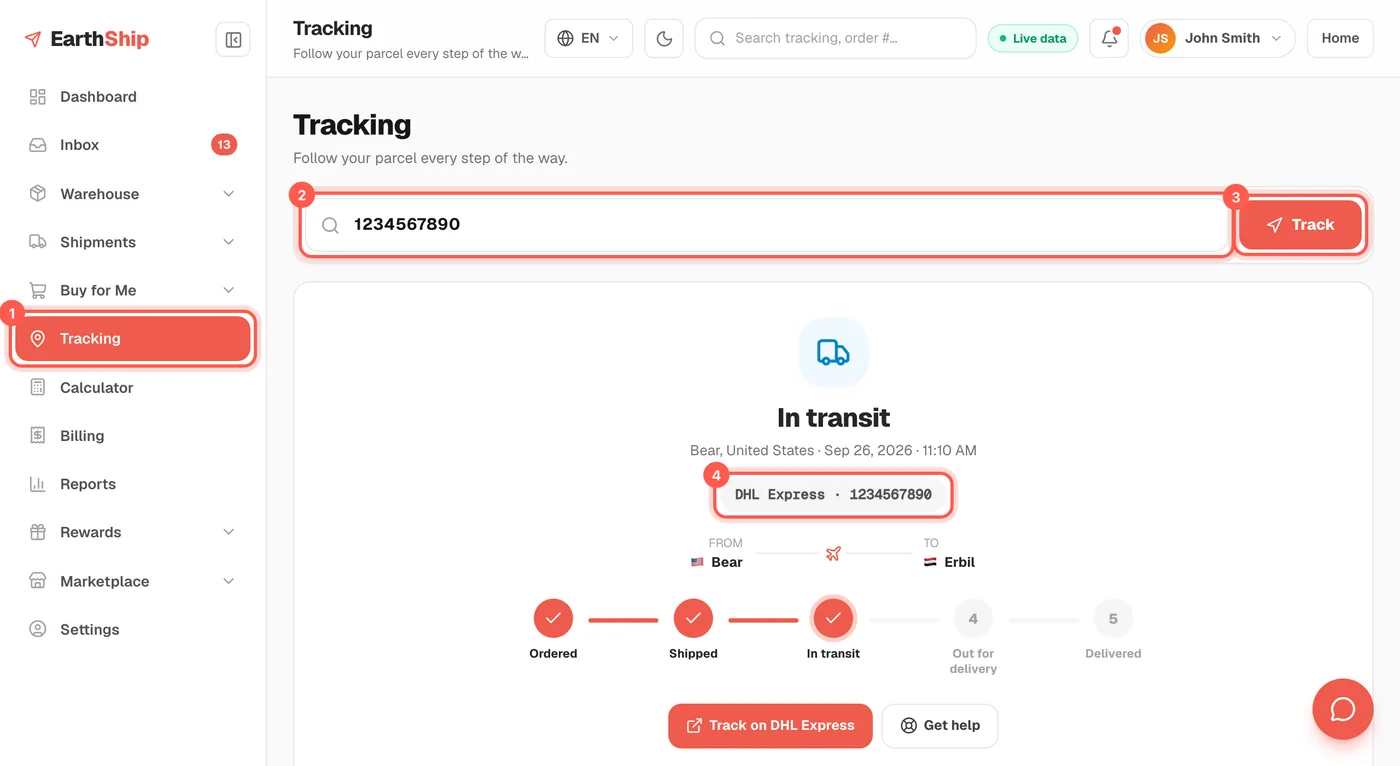
Click "Tracking" in the left menu (1). Type your tracking number or order number (2), click "Track" (3), and see the carrier and number (4).
If the "Tracking" box says "Pending", the shipment is not paid yet or the parcel has not left our warehouse yet. We email you when it leaves.
Open my shipmentsWhat do the tracking statuses mean? 5 steps
The Tracking page shows five steps: Ordered, Shipped, In transit, Out for delivery, Delivered. The big word at the top is where your parcel is now, and "Full history" lists each event with its place and time.
-
Open "Tracking" in the left menu and search your number. The big word (1) is the status now. The red circles (2) are the finished steps.
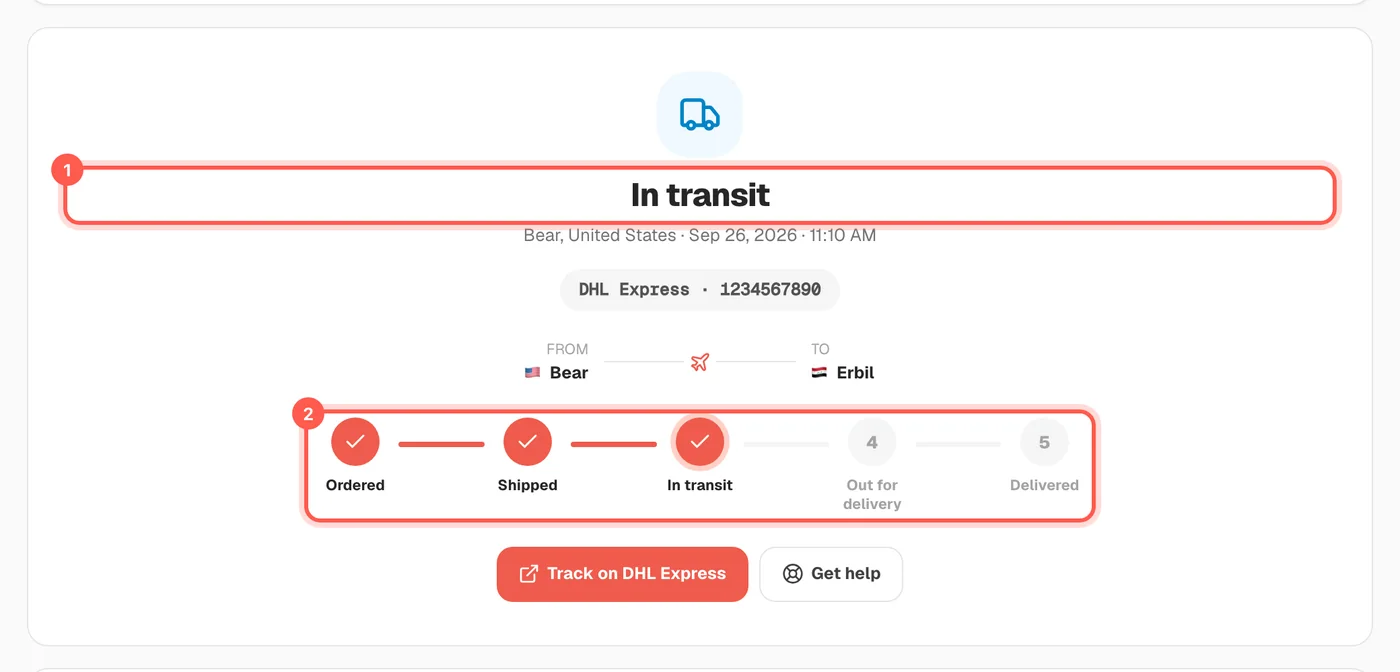
- Read the five steps: "Ordered" = order placed, "Shipped" = left our warehouse, "In transit" = on the way, "Out for delivery" = with the local driver, "Delivered" = received.
-
Scroll down to "Full history". The newest event is at the top in red, with the place and the time.
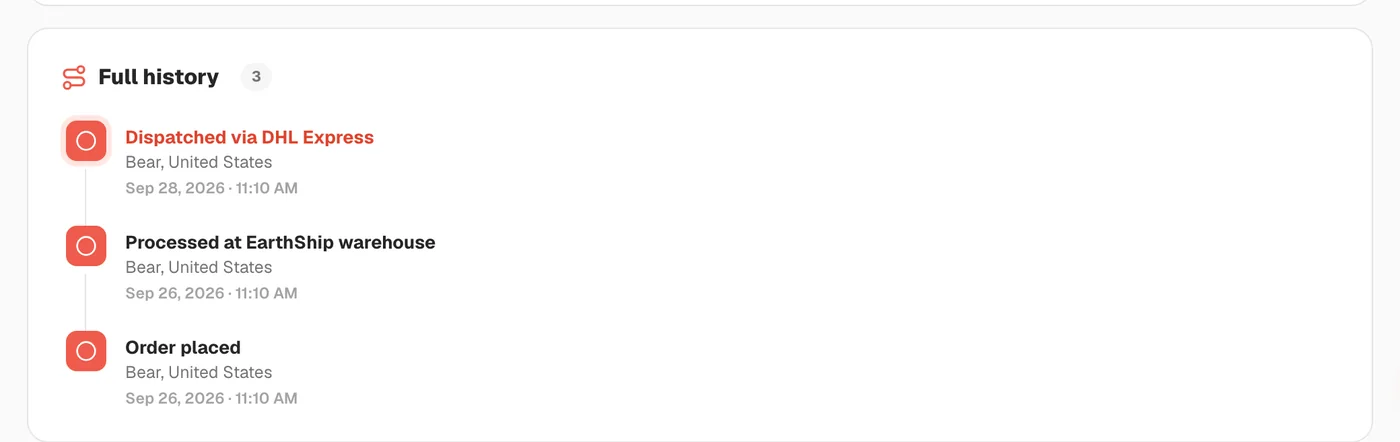
-
Open a shipment to see the short bar on "Shipment Details": "Created", "Paid", "Shipped", "Delivered". The red step is the current one.

-
Check the "Status" column in the Shipments list. "Shipped" means the parcel left our warehouse. "Delivered" means it arrived.

If the status says "Pending payment", pay the shipment first. Tracking starts only after payment.
Open TrackingHow do I request a refund? 5 steps
Open "Billing", find the paid invoice, and click "Request refund". Choose a reason and send it. Our billing team answers in your Inbox, usually within 1 business day.
-
Open "Billing" in the left menu (1). Find the invoice with the green "Paid" label and click "Request refund" (2).
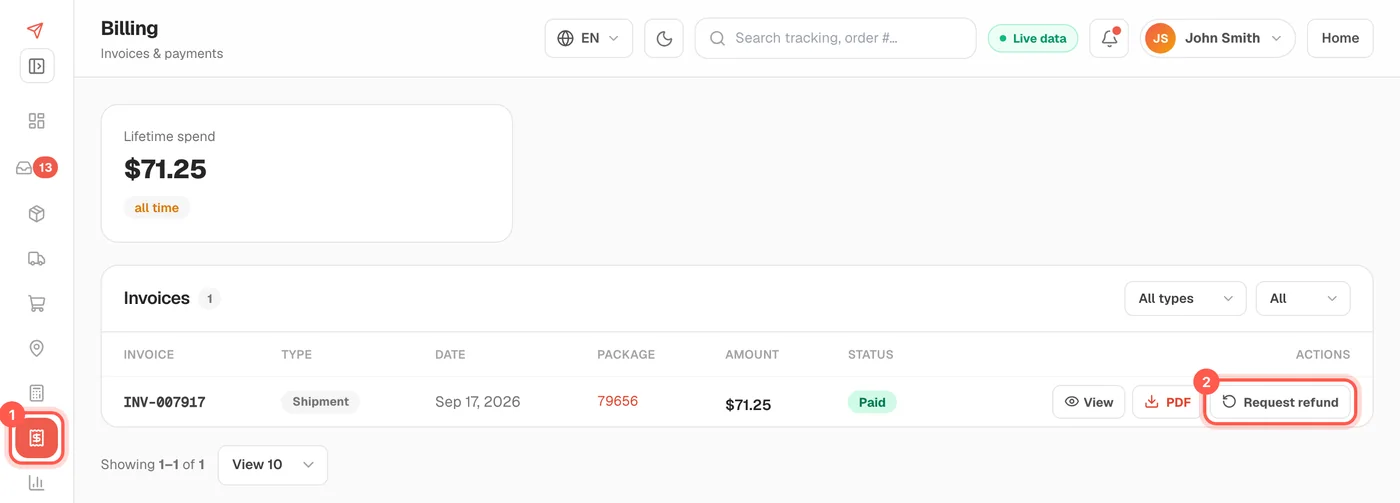
-
Choose a "Reason" from the list (1). You must choose one before you can send.
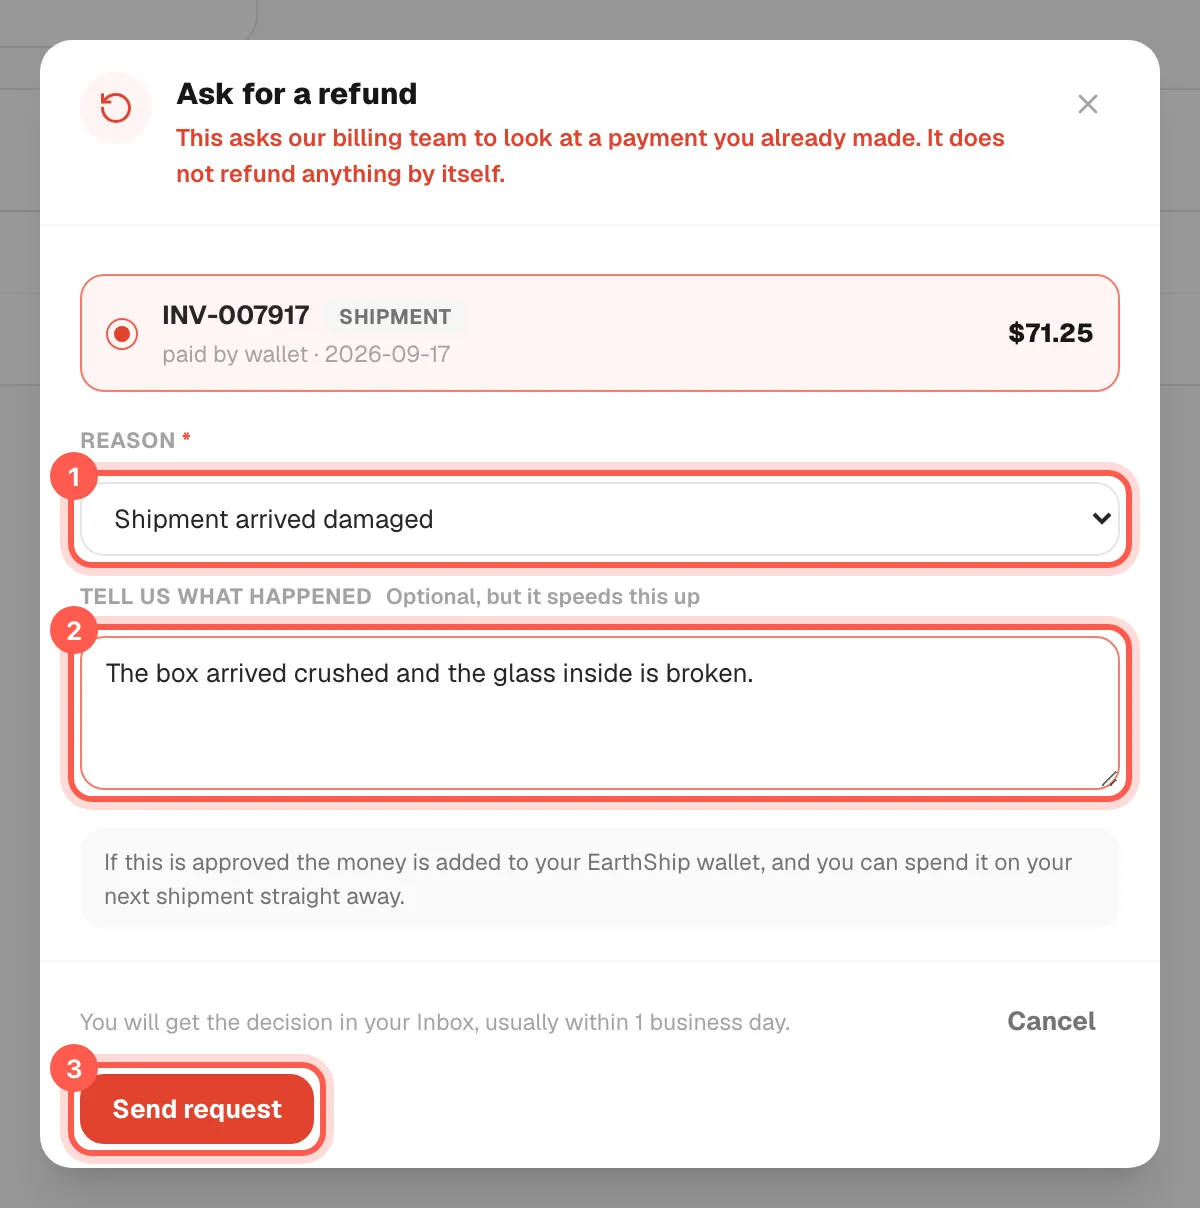
- Write what happened under "Tell us what happened" (2). Then click "Send request" (3).
-
Or open the paid order itself and click "Request a refund" on the right side. It opens the same form.
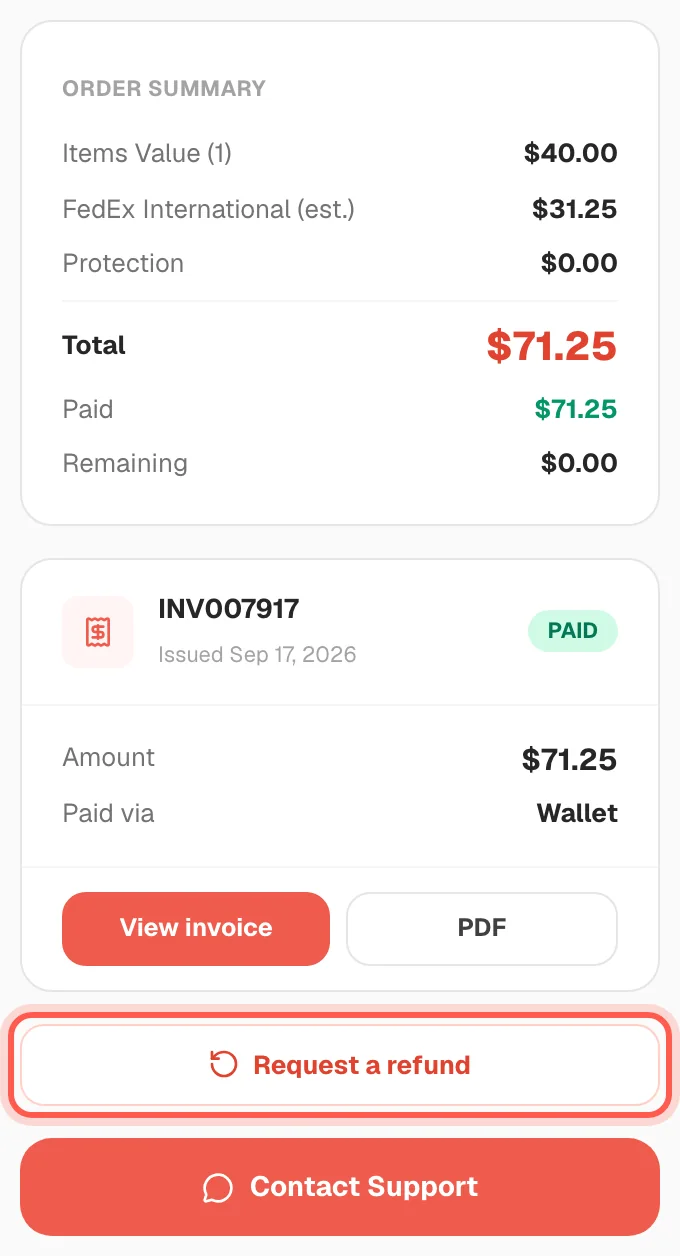
- Check the answer later in your "Inbox". Every refund request opens a ticket there, and our billing team replies to it.
Sending the form does not return the money by itself. Our billing team must approve it first. Approved money is added to your EarthShip wallet.
Open BillingMy package arrived damaged - what do I do? 6 steps
Open a new message in your Inbox with the topic "Claim / damage", choose the shipment, describe the damage and attach photos. If you bought shipping protection, our team reviews the claim against the covered amount.
-
Open "Inbox" in the left menu (1), then click "New message" (2).

-
Choose the topic "Claim / damage". It is the one that says "Lost or damaged parcel".
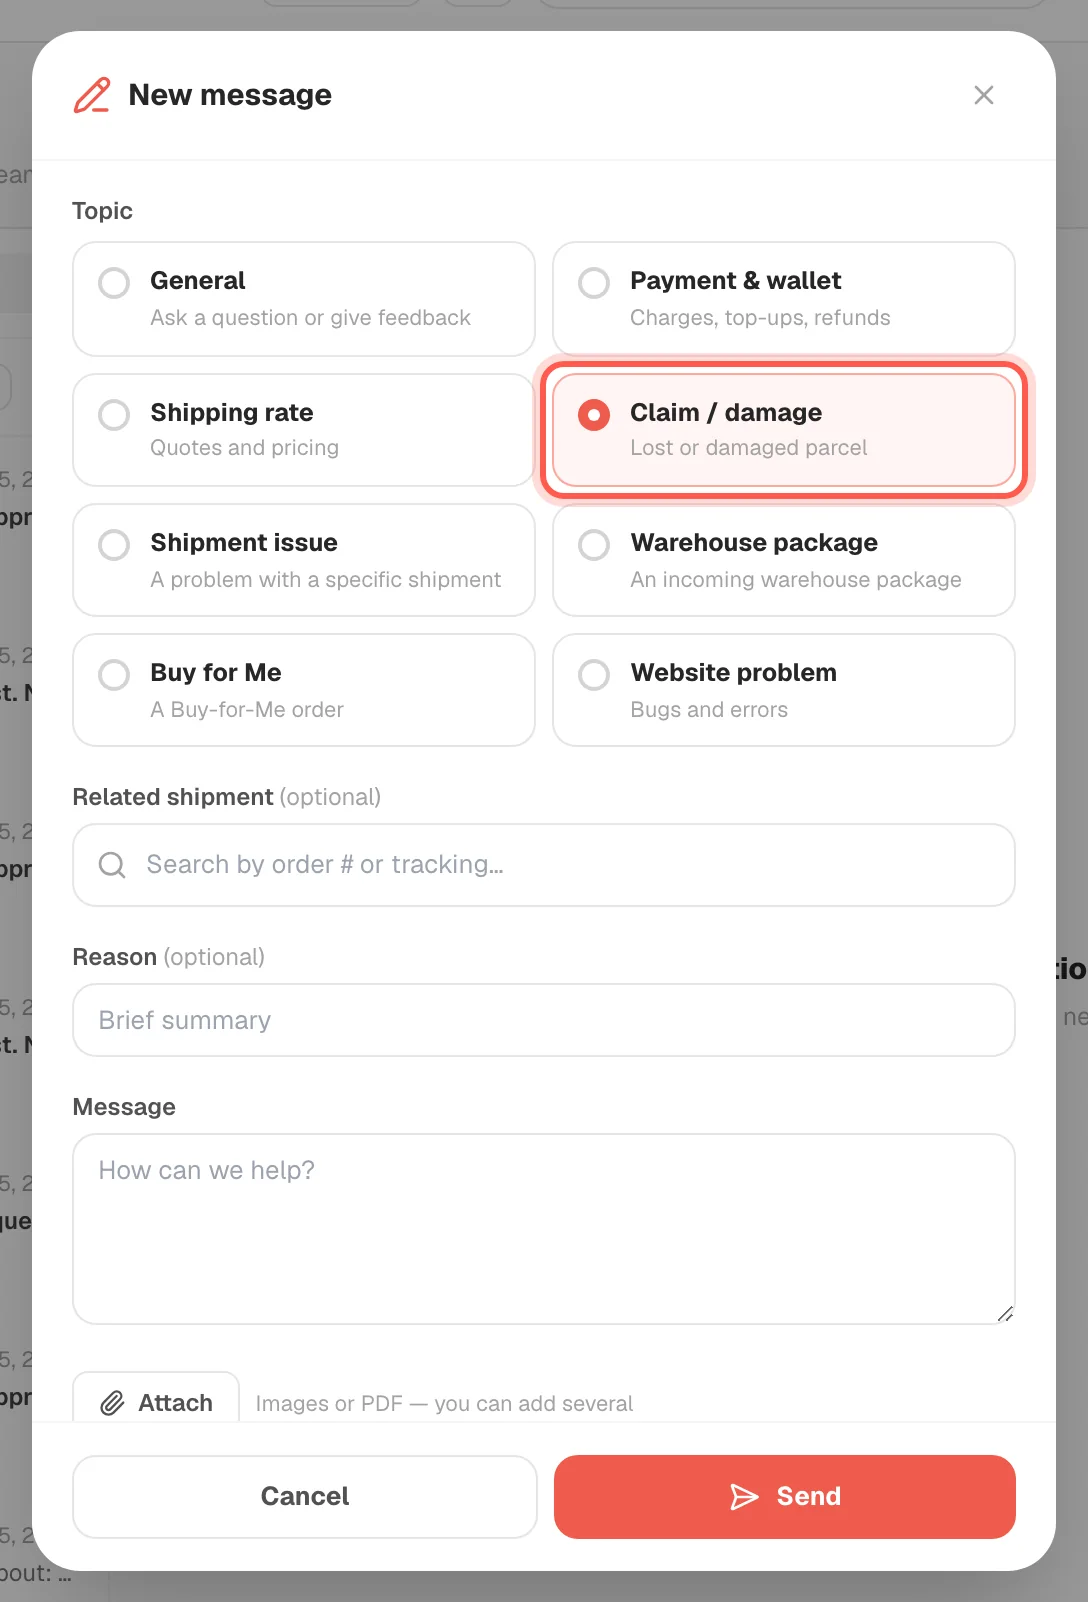
-
Pick your shipment under "Related shipment" (1) and describe the damage under "Message" (2).
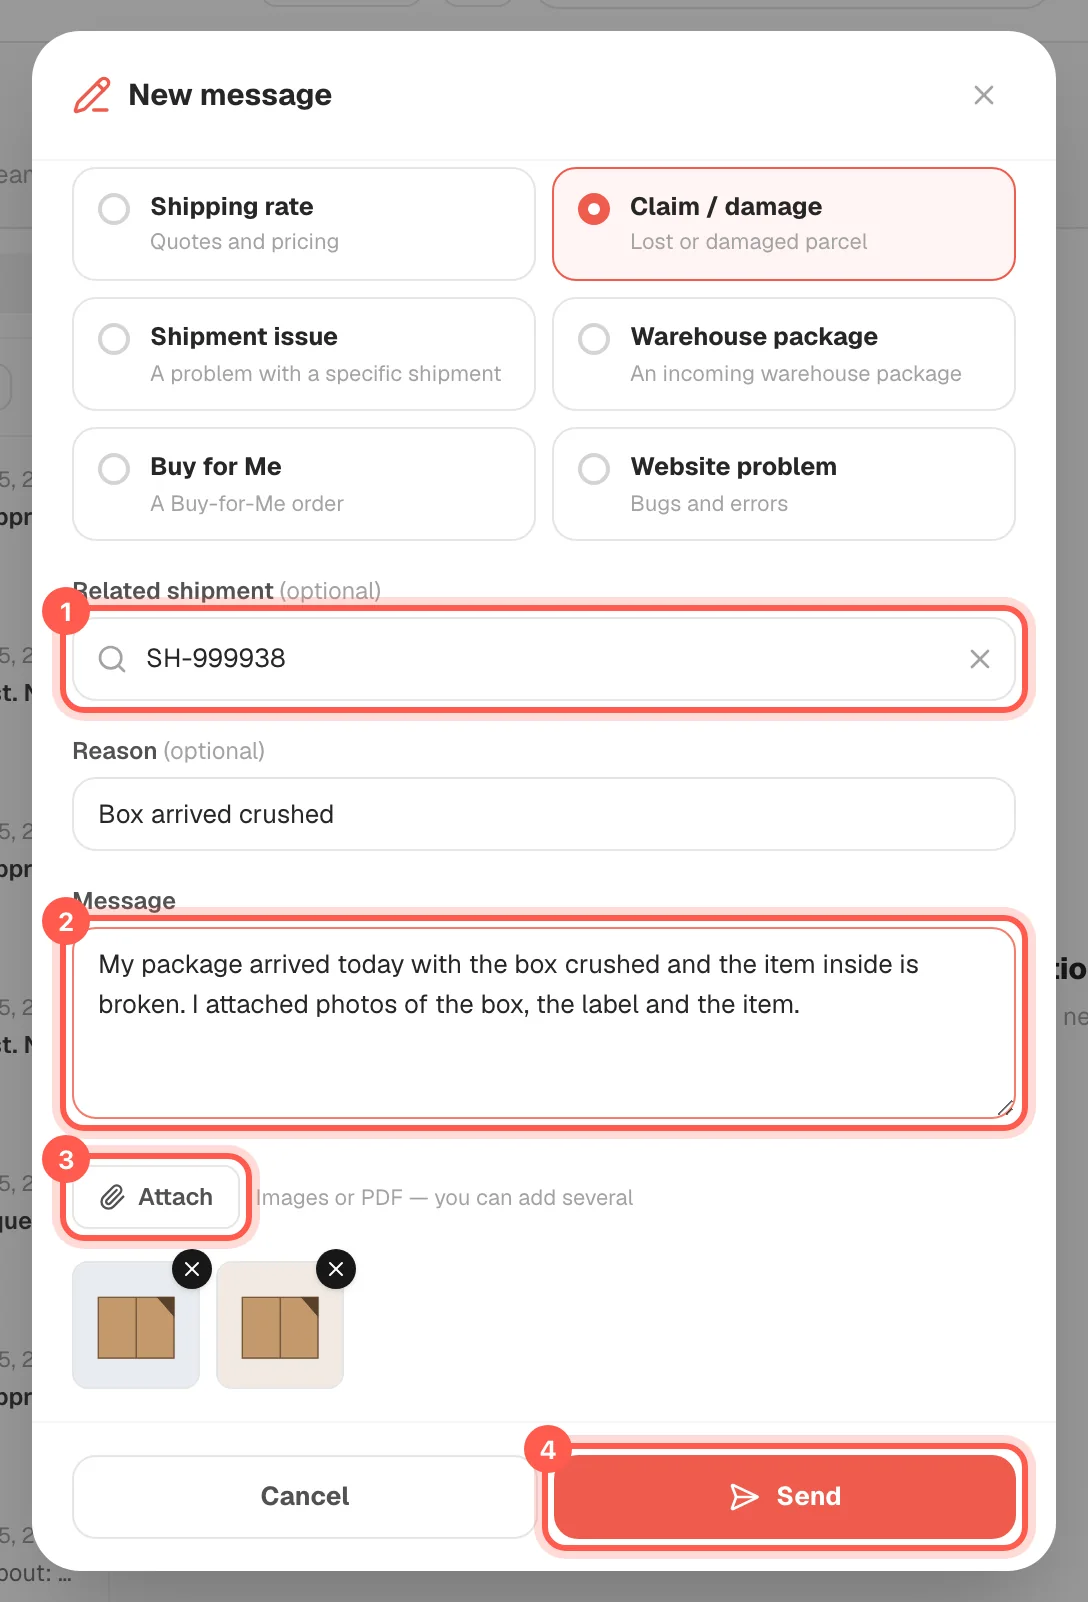
- Click "Attach" (3) and add photos of the box, the label and the damaged item.
- Click "Send" (4). Our team answers in the same Inbox conversation.
-
Check your protection: open the shipment and find "Shipping protection" in the "Order Summary" box.
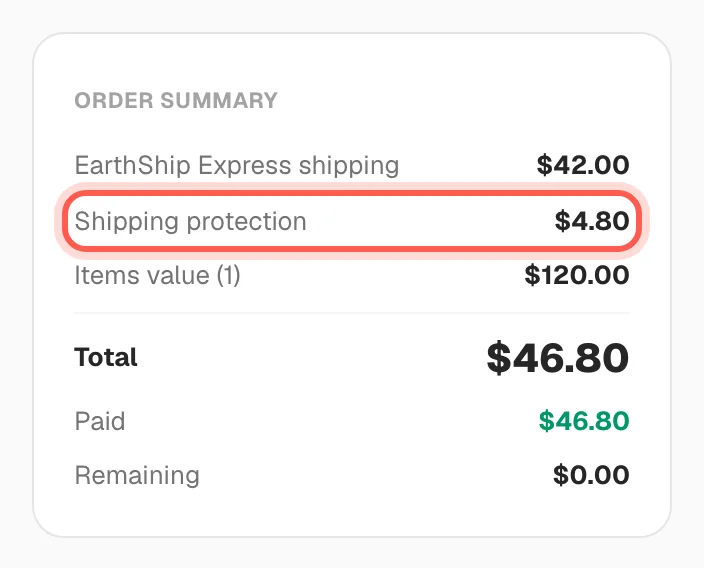
Keep the box and all packing until the claim is closed. You can attach up to 6 photos or PDFs, 15 MB each.
Open my InboxHow do I change my password? 6 steps
Open your Profile, go down to the "Change password" box, type your current password and a new one (at least 8 characters), then click "Update password".
-
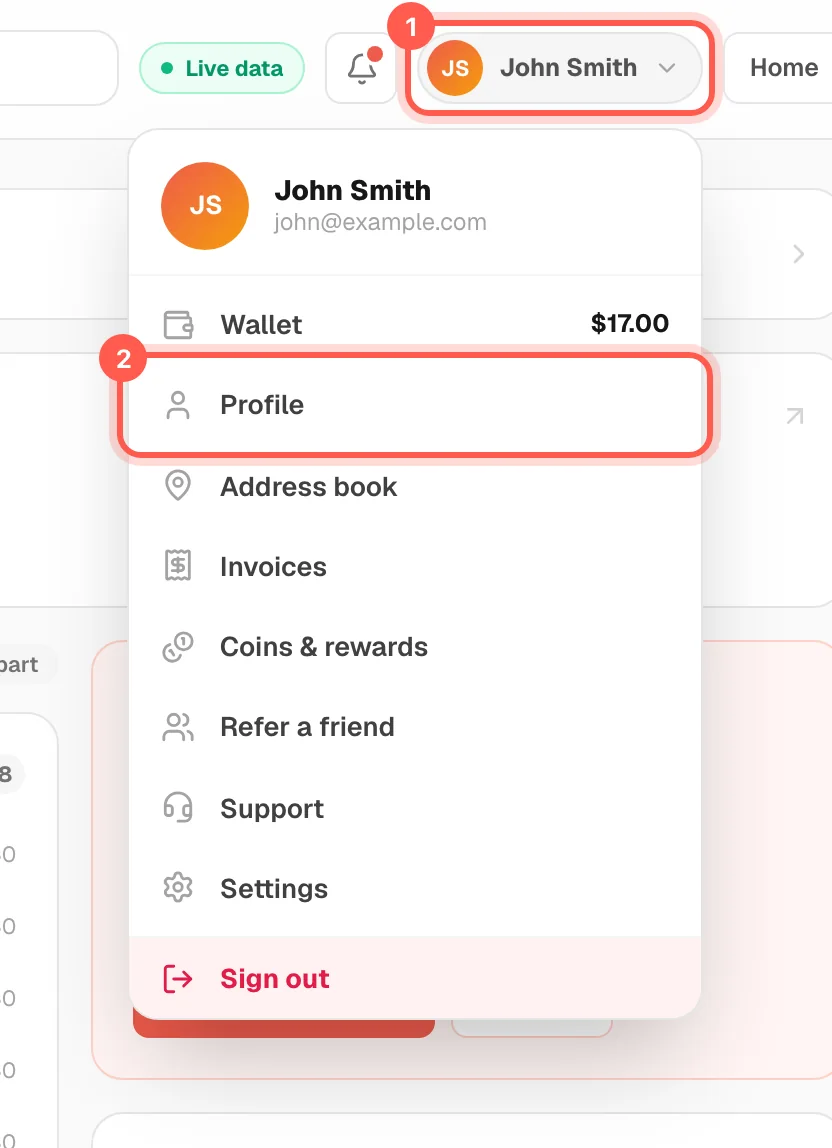
Click your name at the top right of the page (1), then click "Profile" (2).
-
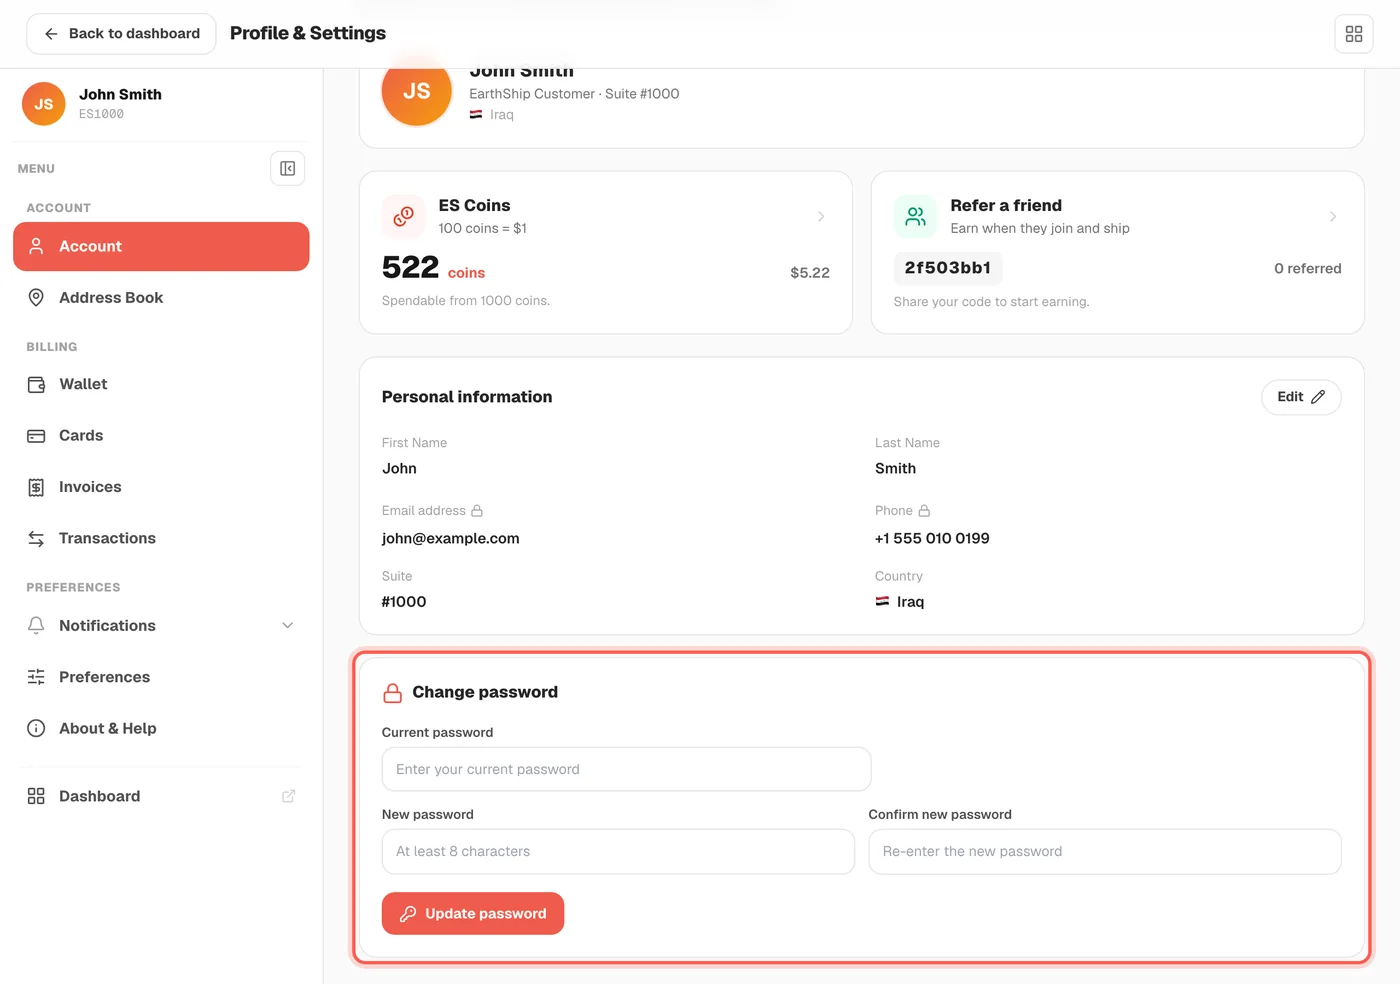
Scroll down the "Account" page to the box named "Change password".
-
Type your current password in "Current password" (1).
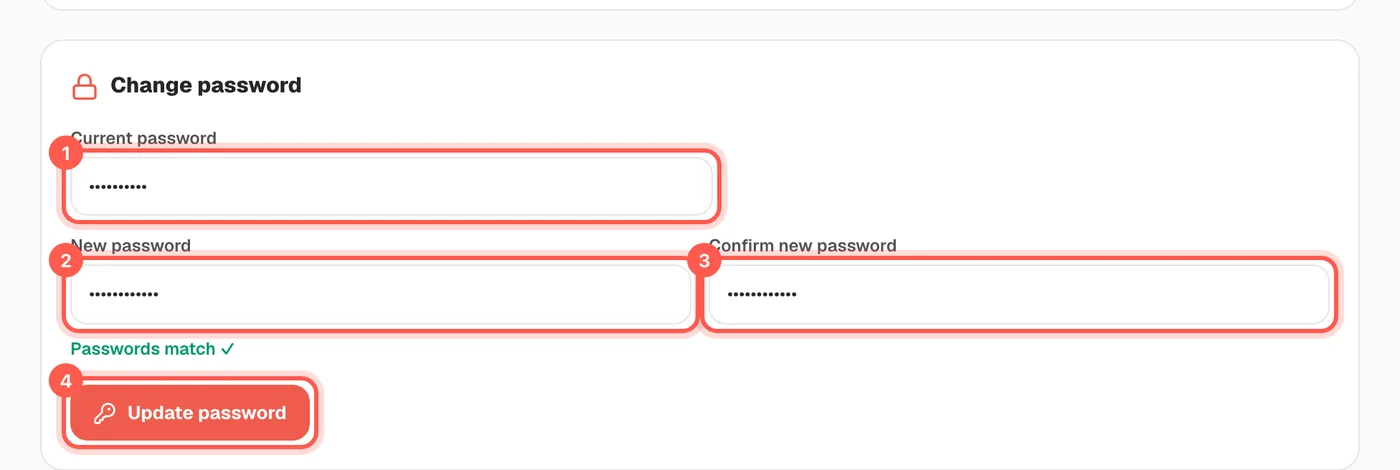
- Type your new password in "New password" (2). Use at least 8 characters.
- Type the same new password again in "Confirm new password" (3). Wait for the green text "Passwords match".
- Click "Update password" (4). Use the new password the next time you sign in.
If you see "Passwords do not match yet.", type the new password again in both boxes until the green text appears.
Open Change passwordI forgot my password. How do I reset it? New 3 steps
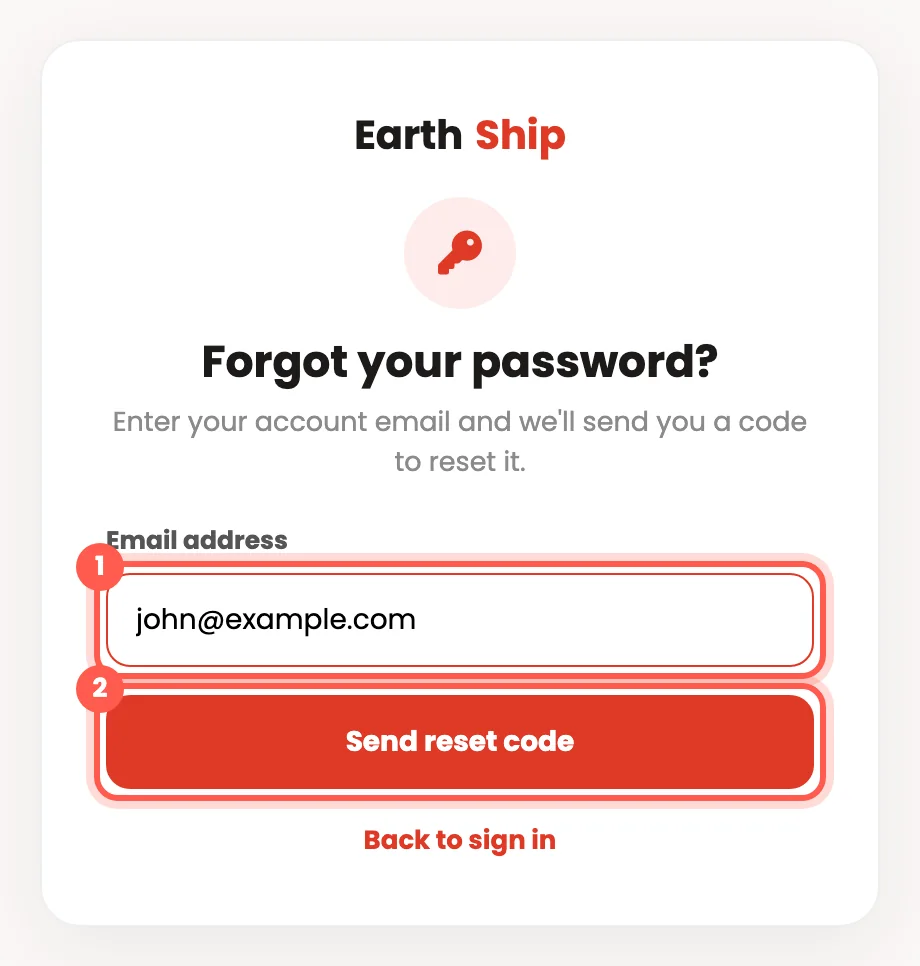
You can set a new password yourself with a code we send to your email.
-
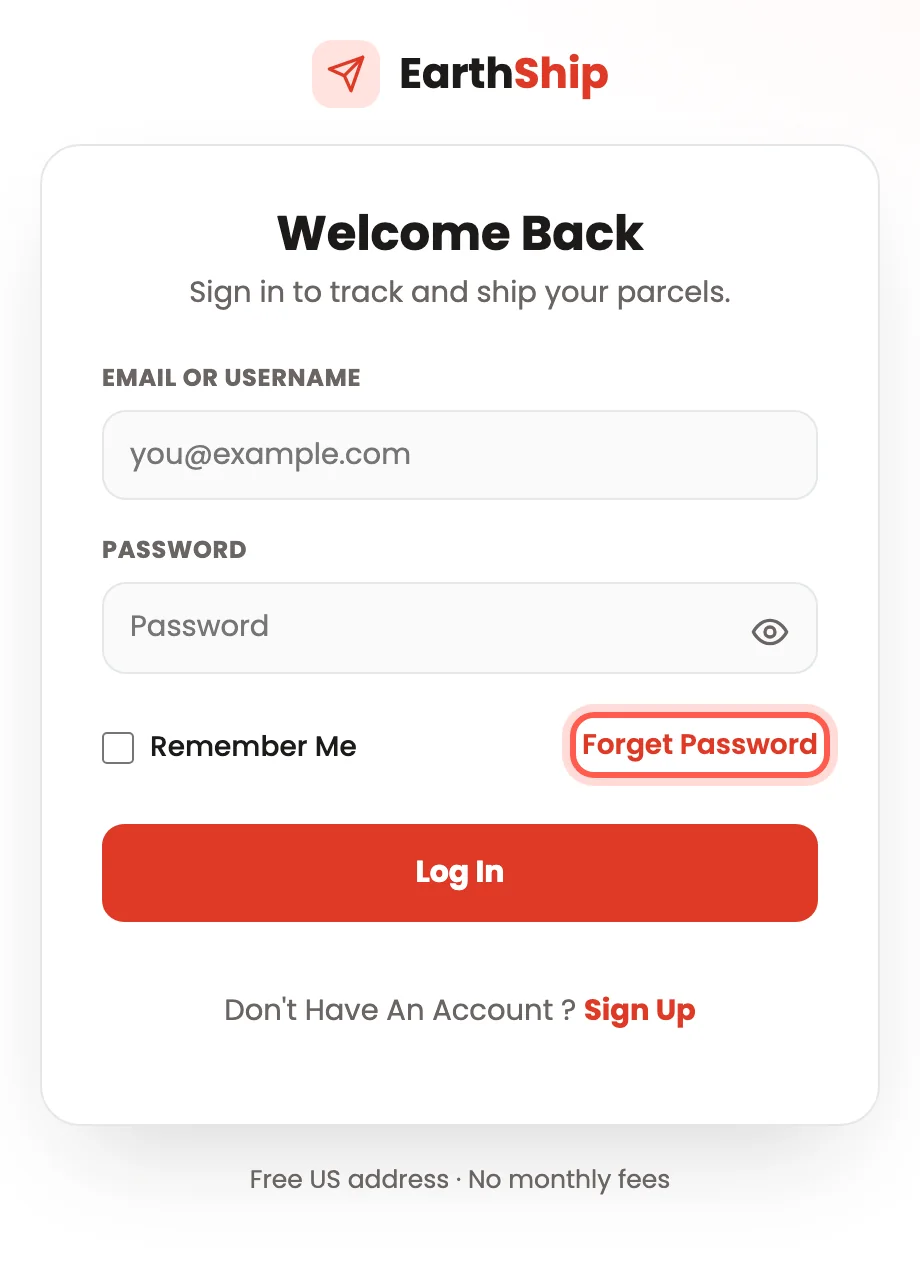
On the sign-in page, click "Forget Password".
-
Type your account email (1) and click "Send reset code" (2).
-
Open the email from us. Type the code in "Reset code" (1), type your new password twice (2) (3), then click "Reset password" (4).
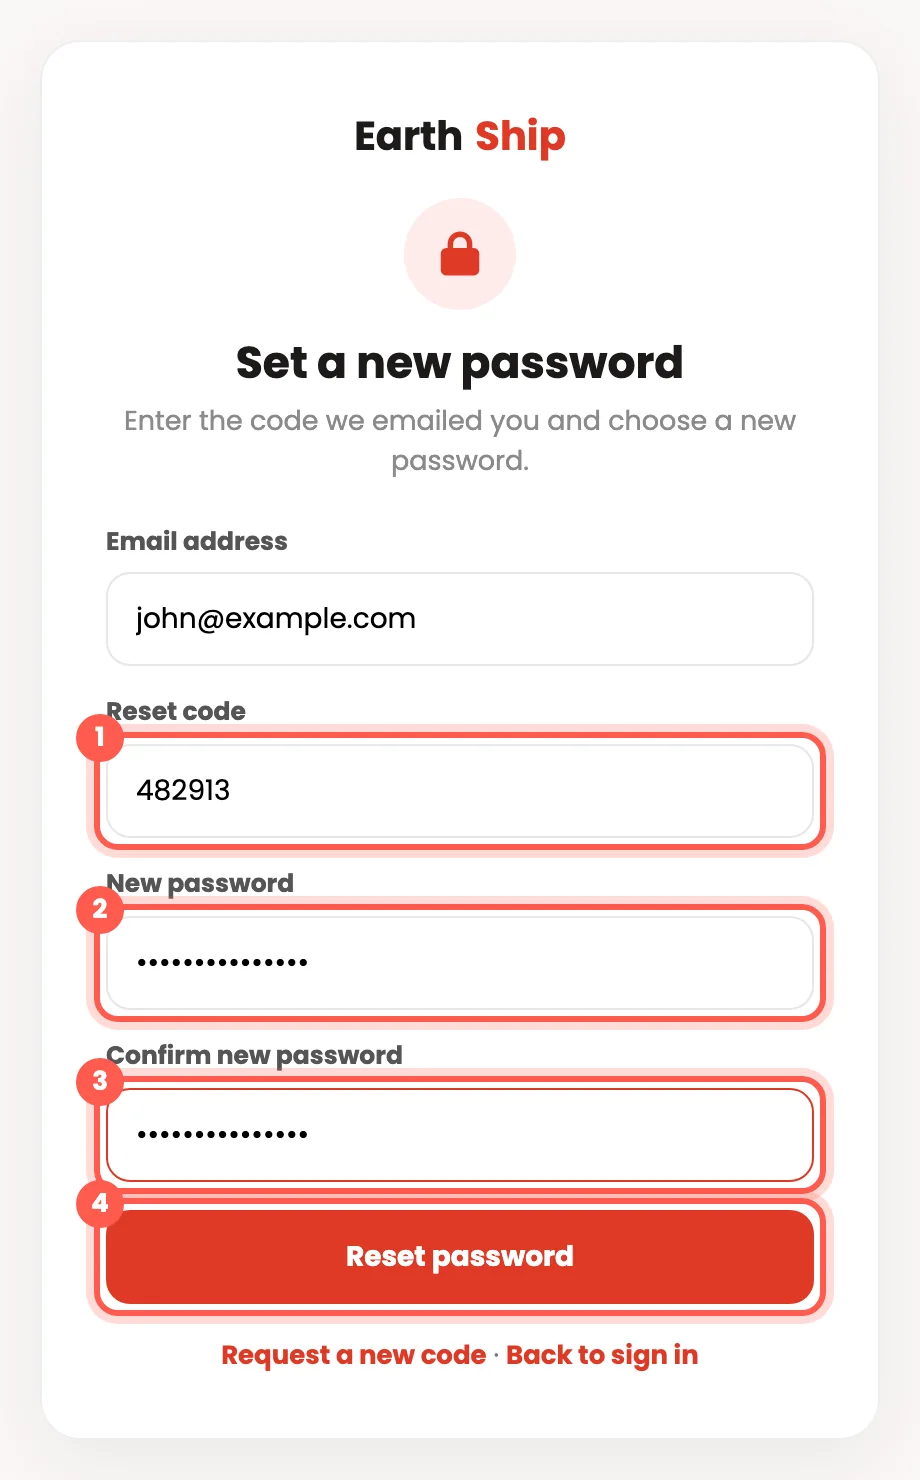
The code works for 60 minutes. If it has expired, click "Request a new code".
Reset my passwordWhy can't I edit my email, phone or country? 5 steps
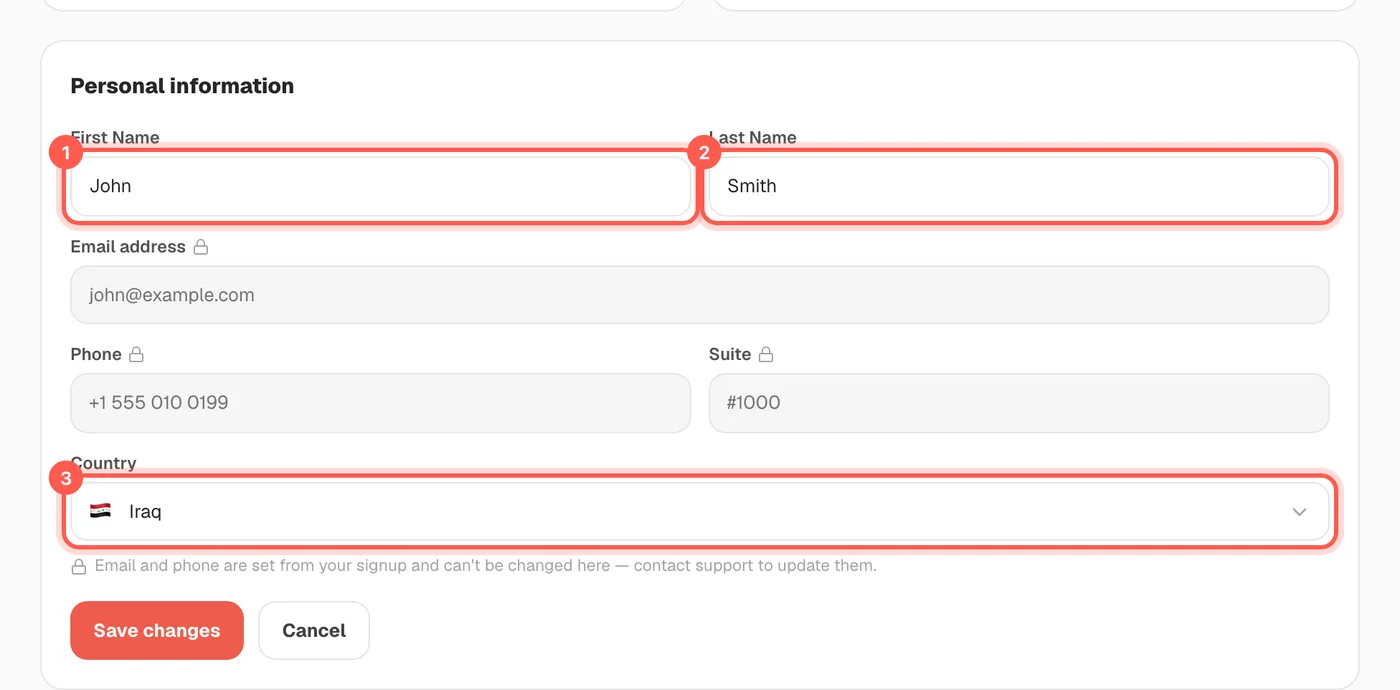
Your email, phone and suite number are set when you sign up and are locked for security, so contact support to change email or phone. Your country is not locked: you can change it yourself with the "Edit" button.
-
Open your Profile and find the box "Personal information". A small lock icon marks "Email address" (1) and "Phone" (2).
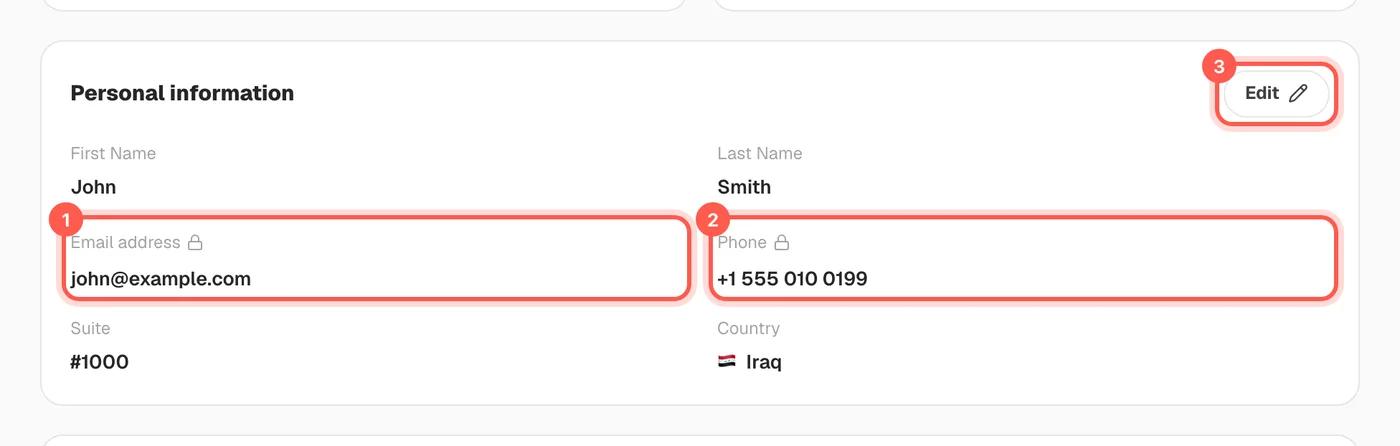
- Click "Edit" (3) to open the form.
-
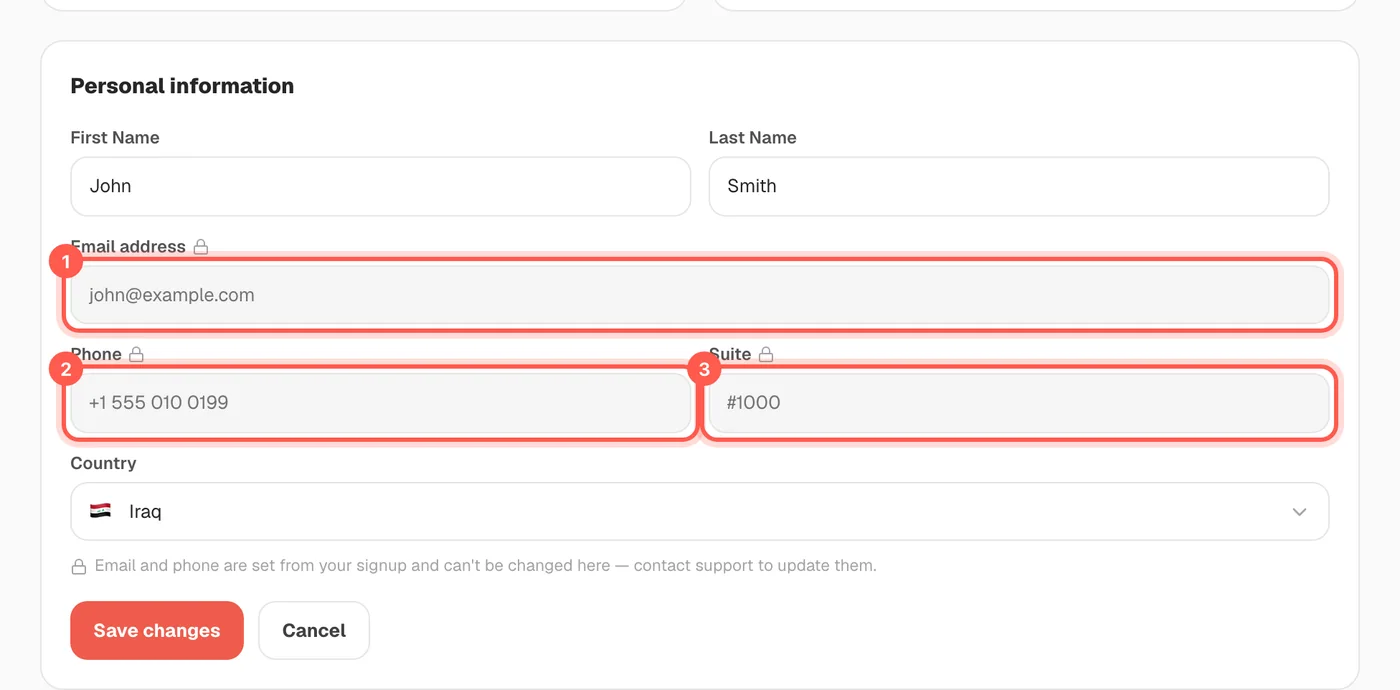
See the grey boxes: "Email address" (1), "Phone" (2) and "Suite" (3) are locked. You cannot type in them.
-
Change what is open: "First Name" (1), "Last Name" (2) and "Country" (3). Then click "Save changes".
- To change your email or phone, click your name at the top right, click "Support", and ask our team.
Your suite number never changes. It is part of your US address, so sellers always send to the same place.
Open my profileHow do I contact support? 6 steps
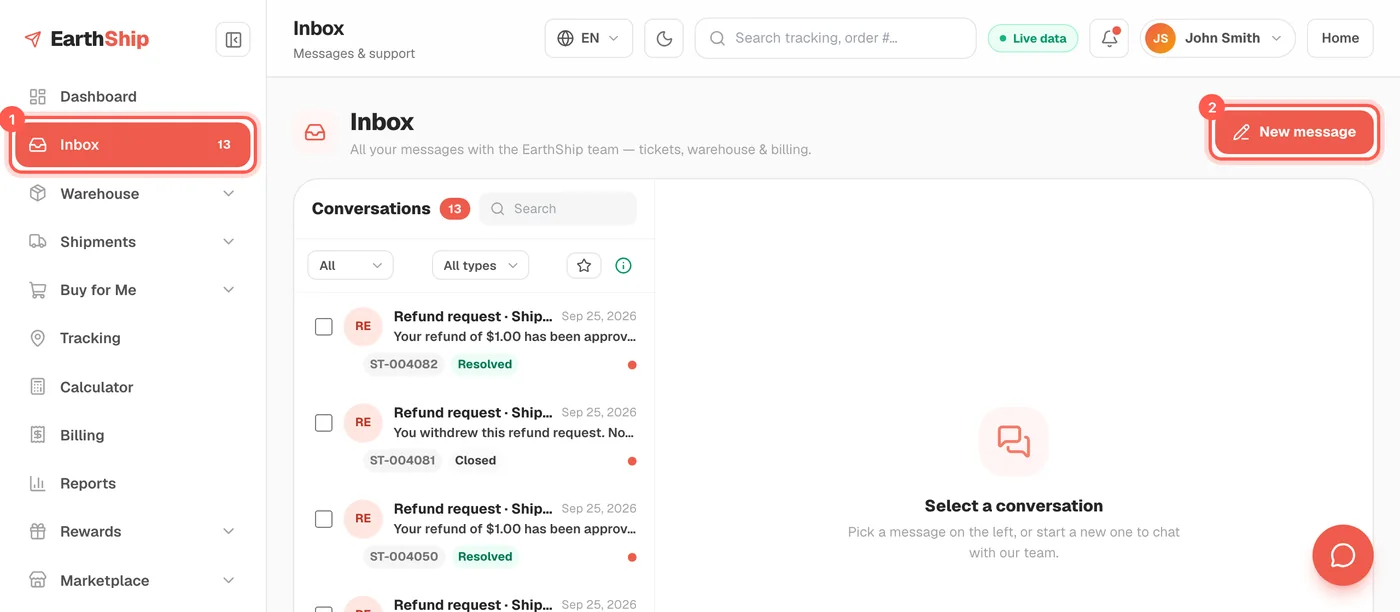
Send us a message from your Inbox - you can attach photos or a PDF, and our answer appears in the same place. You can also email support@earthshipments.com or call +1-844-888-8857. We typically reply within 24 hours.
-
Open "Inbox" in the left menu (1), then click the "New message" button at the top right (2).
-
Choose a "Topic" (1), write your question under "Message" (2), and click "Attach" (3) to add photos or a PDF.
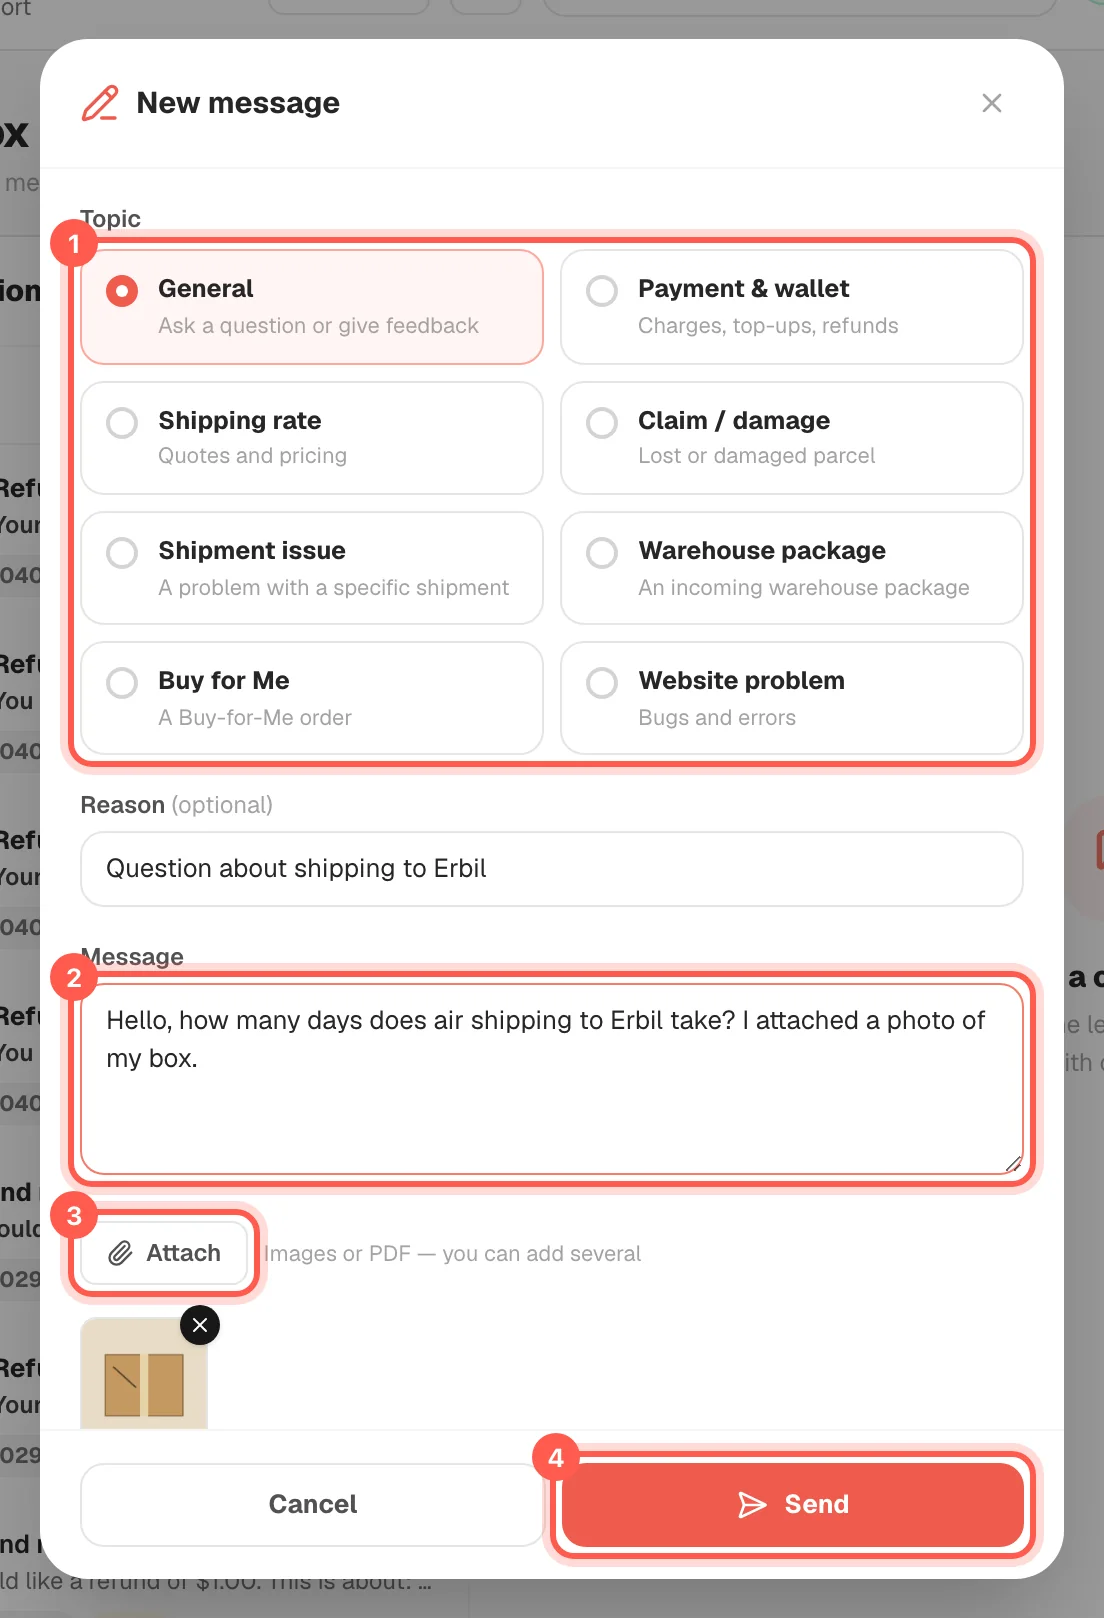
- Click "Send" (4). Your message is saved as a conversation in your Inbox.
-
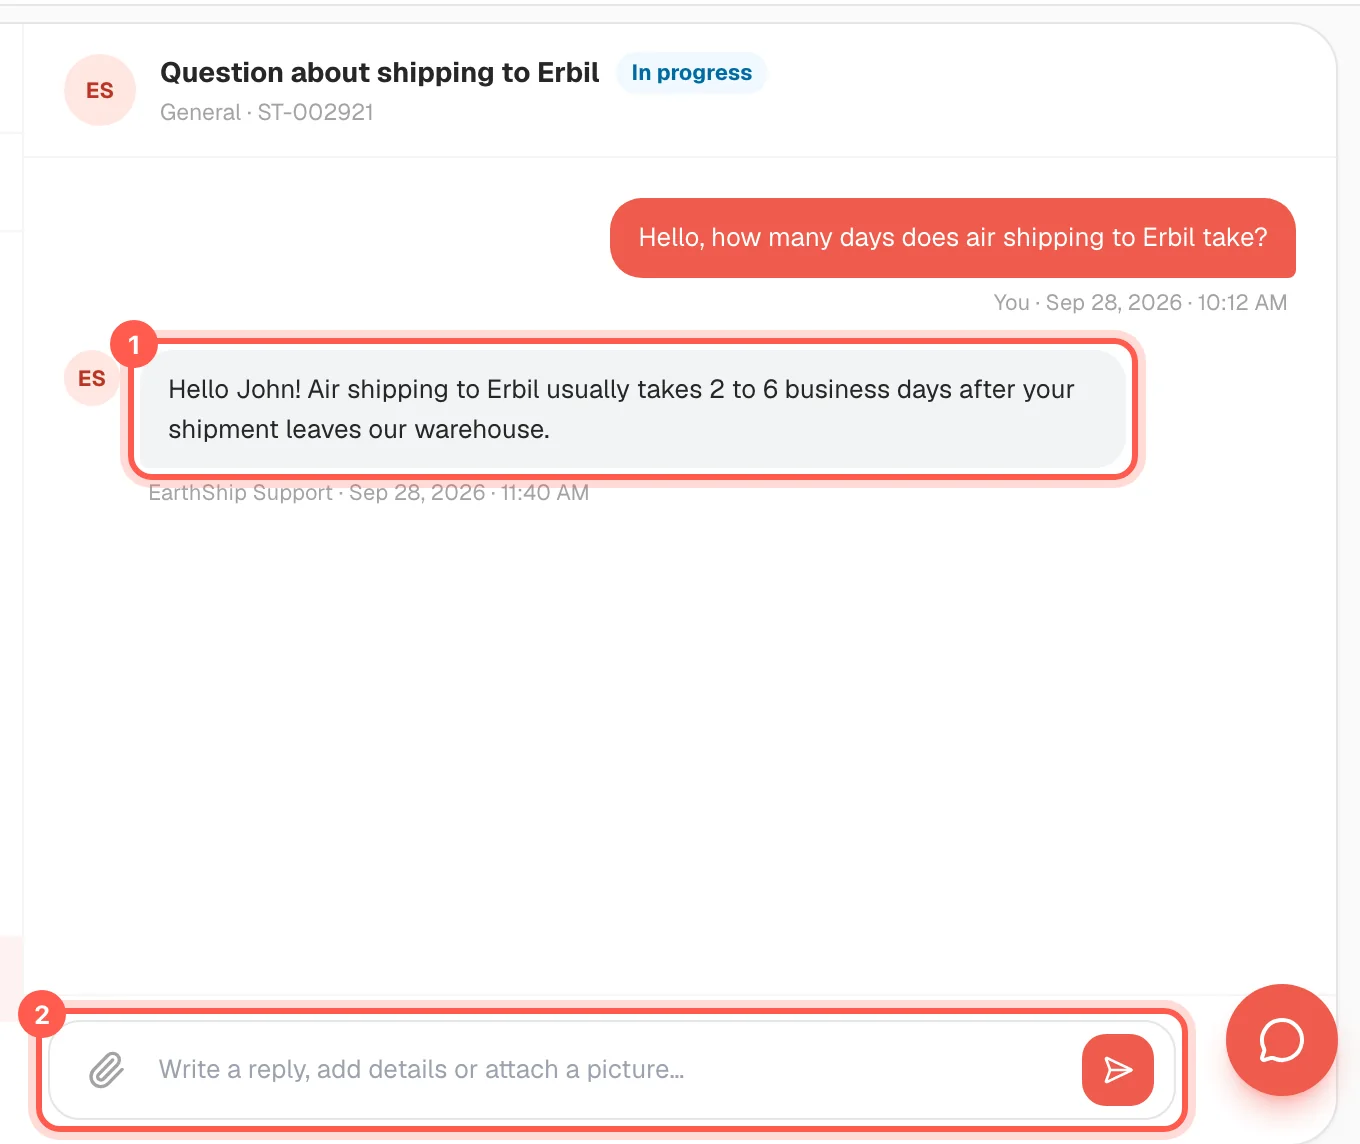
Open the conversation in your Inbox to read our answer (1). Write in the box at the bottom to reply (2).
-
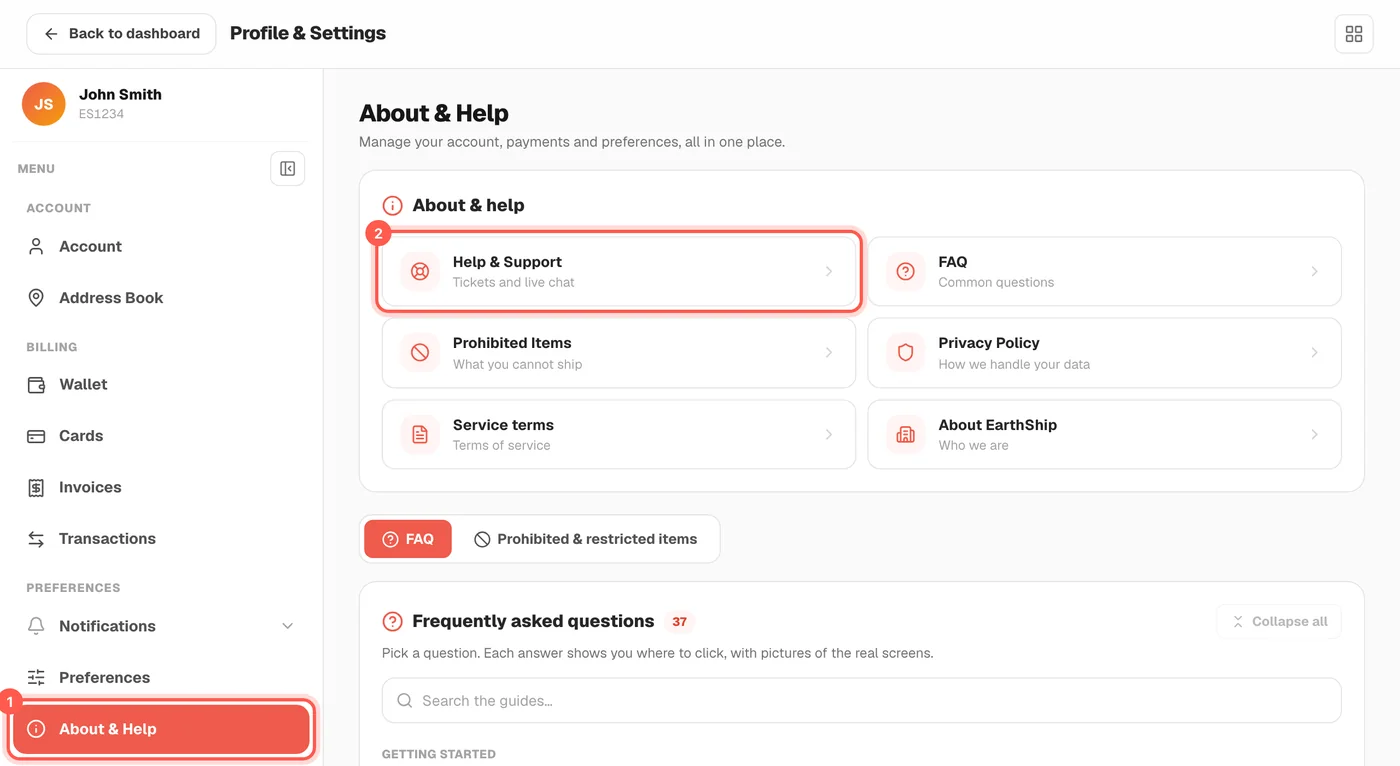
You can also reach the Inbox from Settings: open "About & Help" (1), then click "Help & Support" (2).
-
Prefer email or phone? Our email address and phone number are at the bottom of the "About & Help" page.
If your question is about one shipment or package, pick that topic. A search box appears so you can link the message to it.
Open my InboxHow do notifications work? New 4 steps
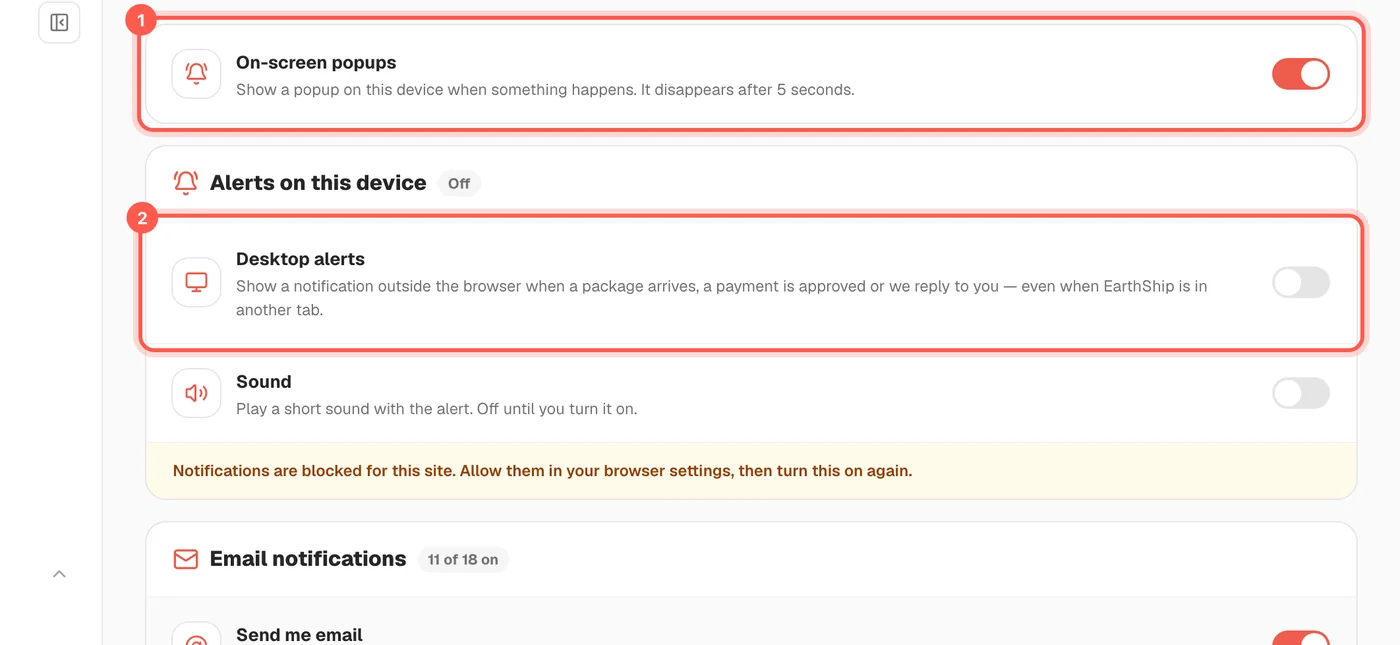
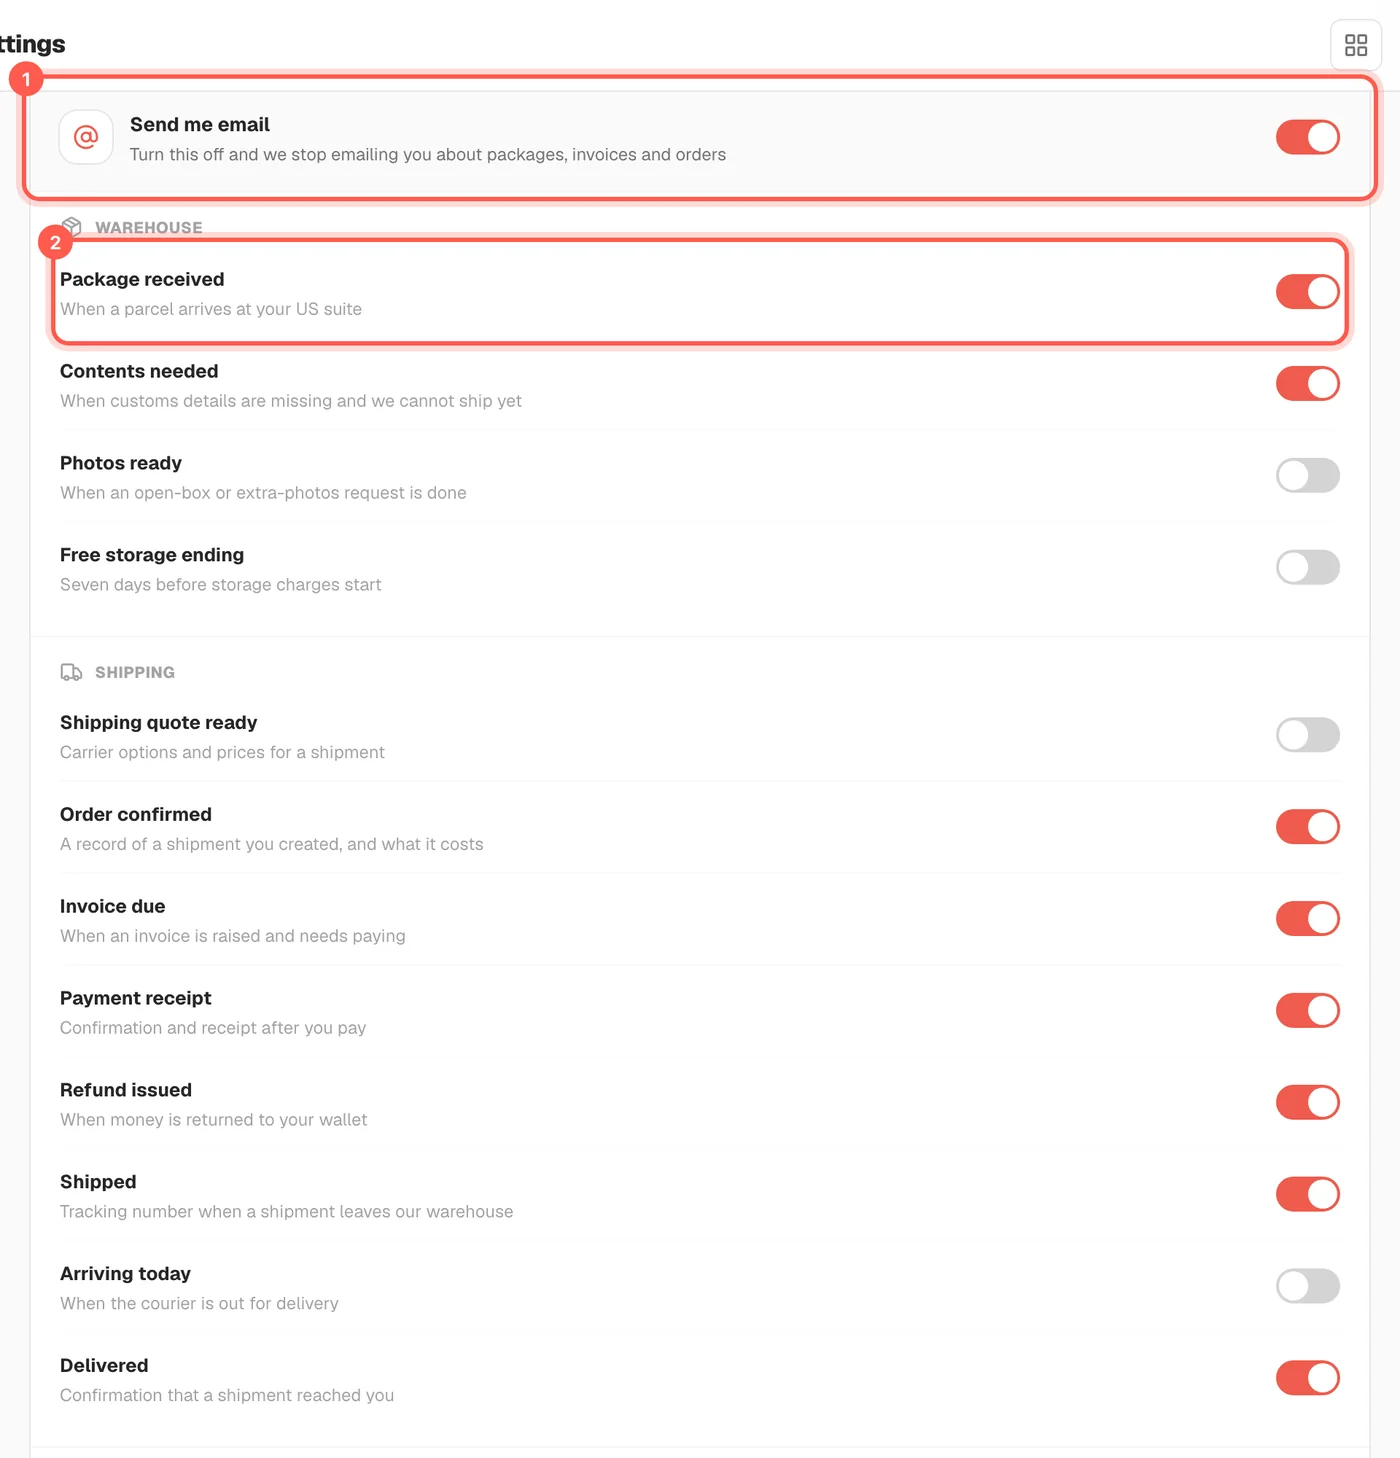
We tell you when a package arrives, a payment is approved, a shipment leaves or we answer you. You choose which emails and alerts you get.
-
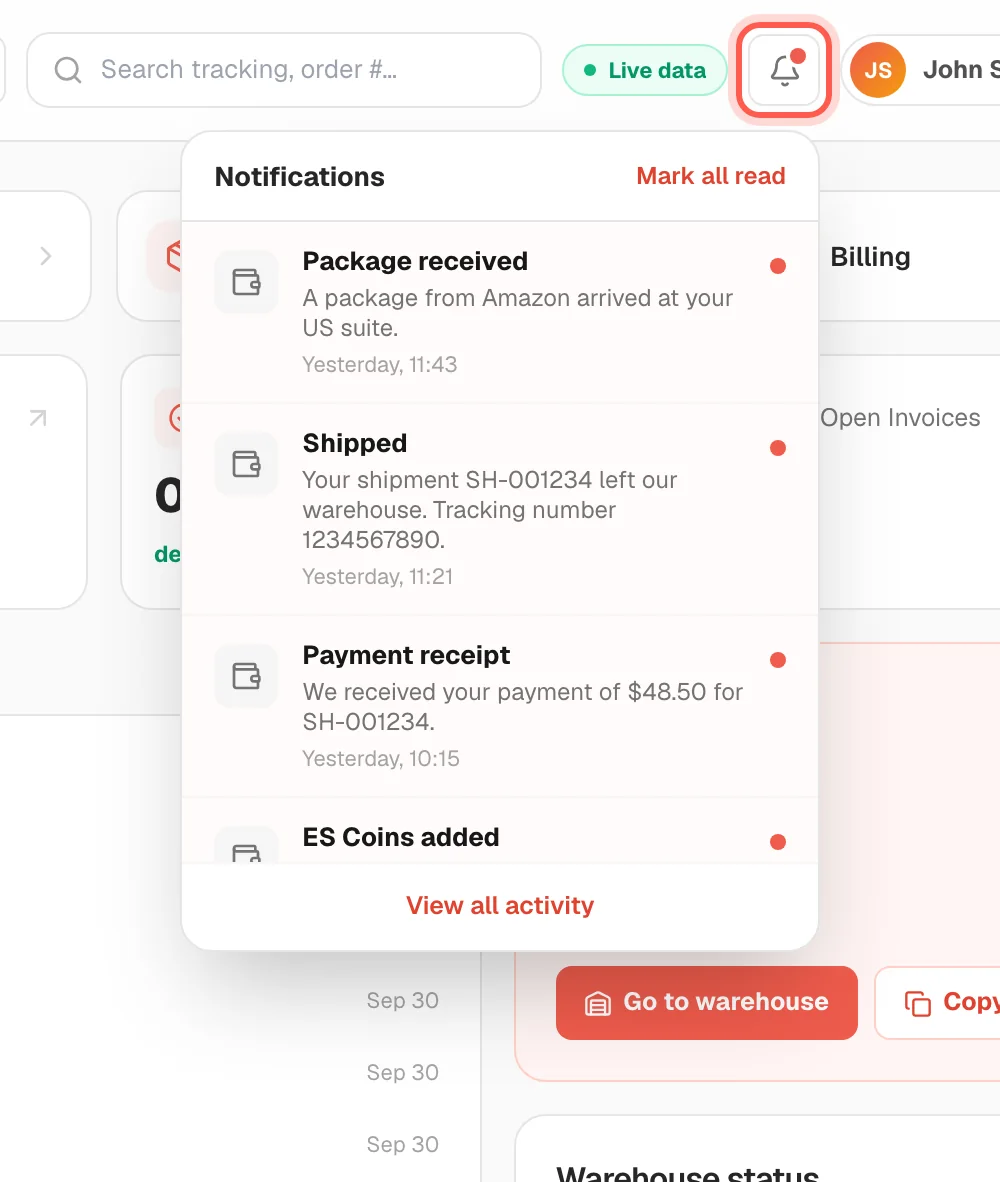
Click the bell at the top of any page to see your newest notifications. A red dot means something is new.
-
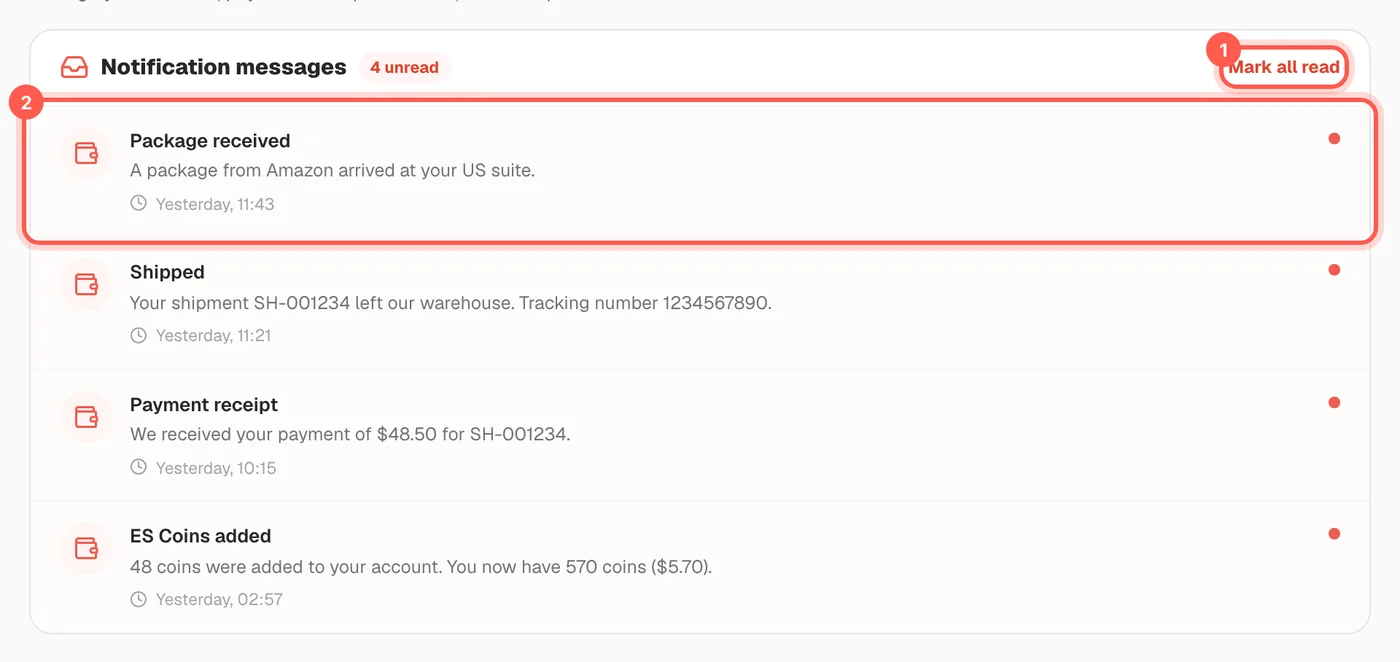
Open Settings, then "Notifications" > "Messages" to see them all. Click "Mark all read" (1), or click one message (2) to open it.
-
Under "Notifications" > "Settings", switch "On-screen popups" (1) and "Desktop alerts" (2) on or off.
-
In "Email notifications", switch off "Send me email" (1) to stop all emails, or switch single emails on or off (2).
Security emails, such as confirmation and password codes, are always sent.
Open notification settingsHow do I chat with support? 5 steps
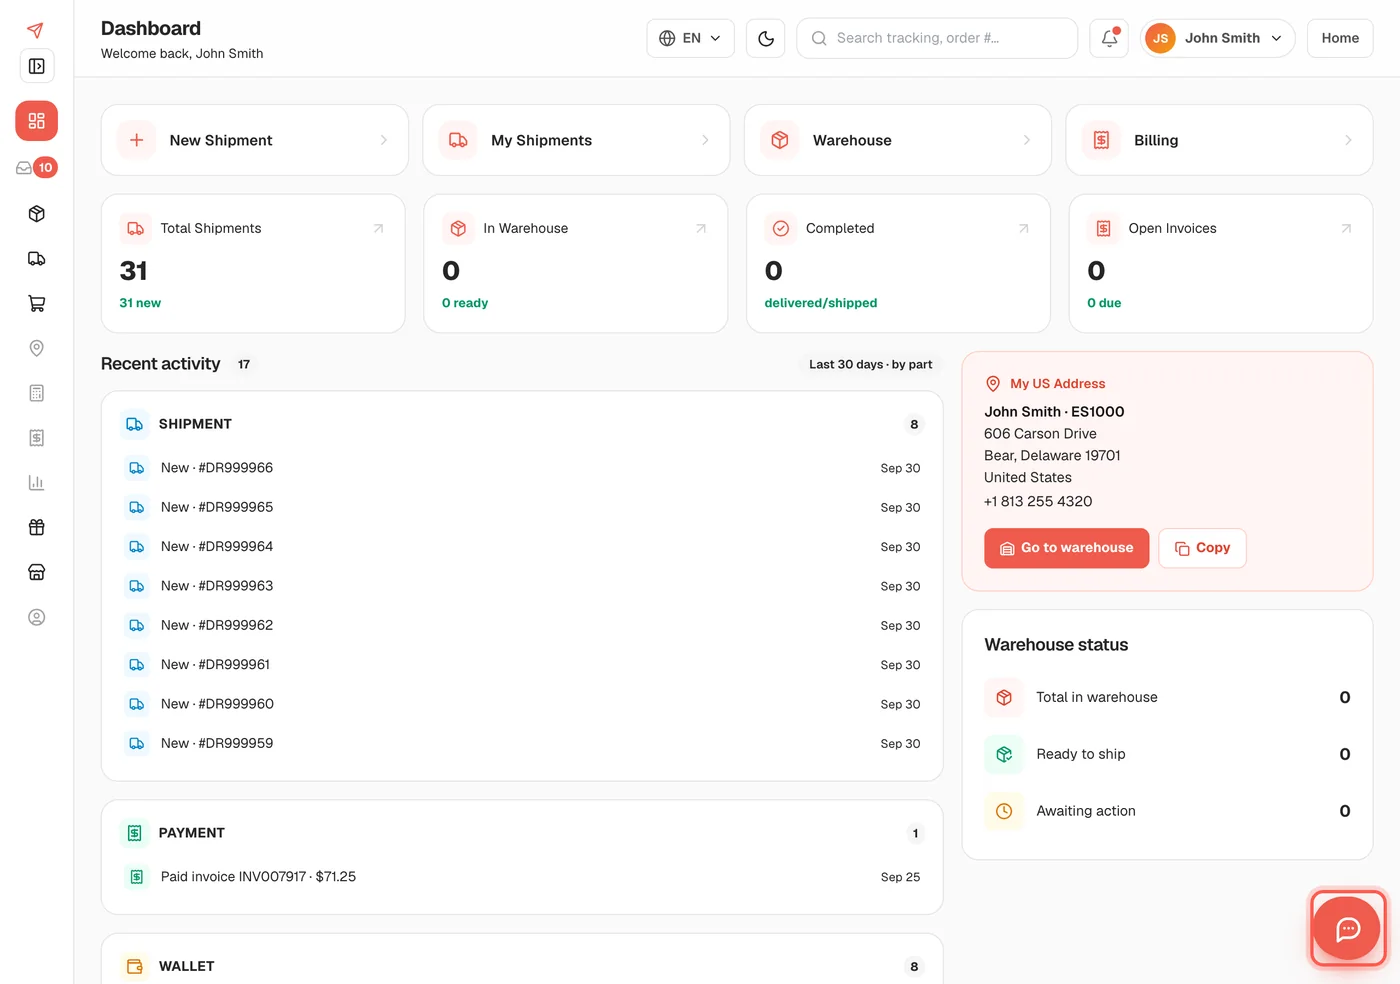
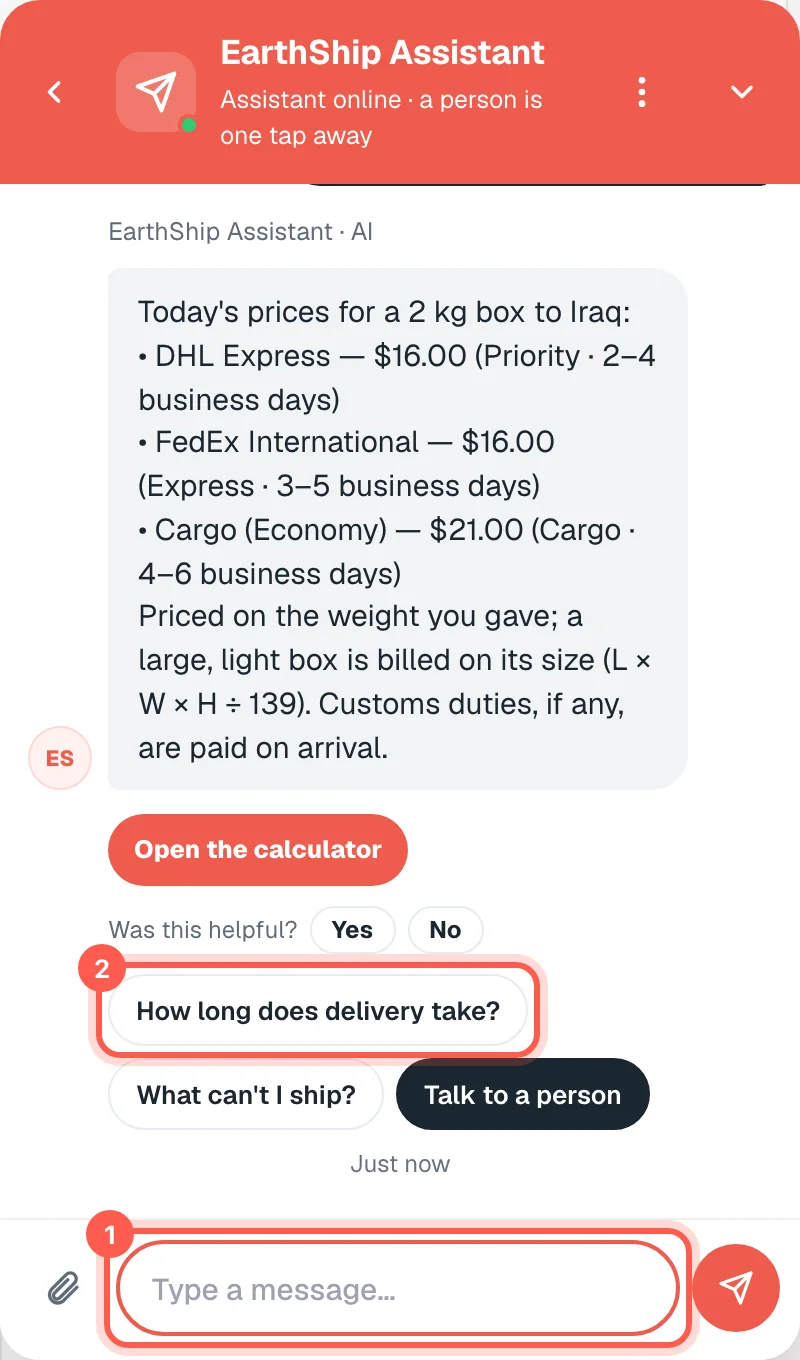
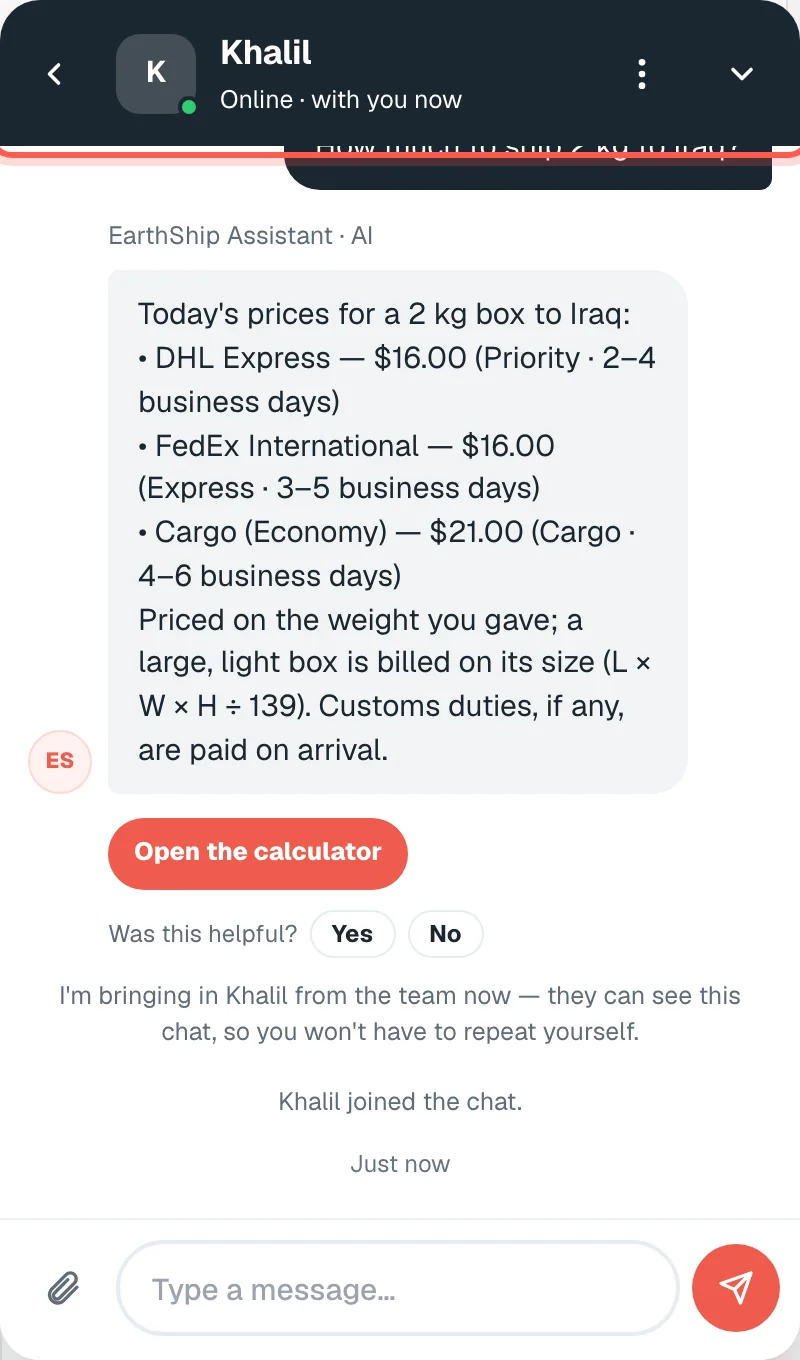
The coral chat bubble at the bottom right of every page opens live chat. The EarthShip Assistant answers at once, prices, tracking, what you can ship, and a real person is one tap away. Your past chats stay in the list, and you can email yourself a copy.
-
Press the coral chat bubble at the bottom right of any page.
-
Type your question or tap a topic. The assistant replies right away and offers related questions.
-
Want a person? Tap "Talk to a person" (or type it). You will see when someone from the team joins.
-
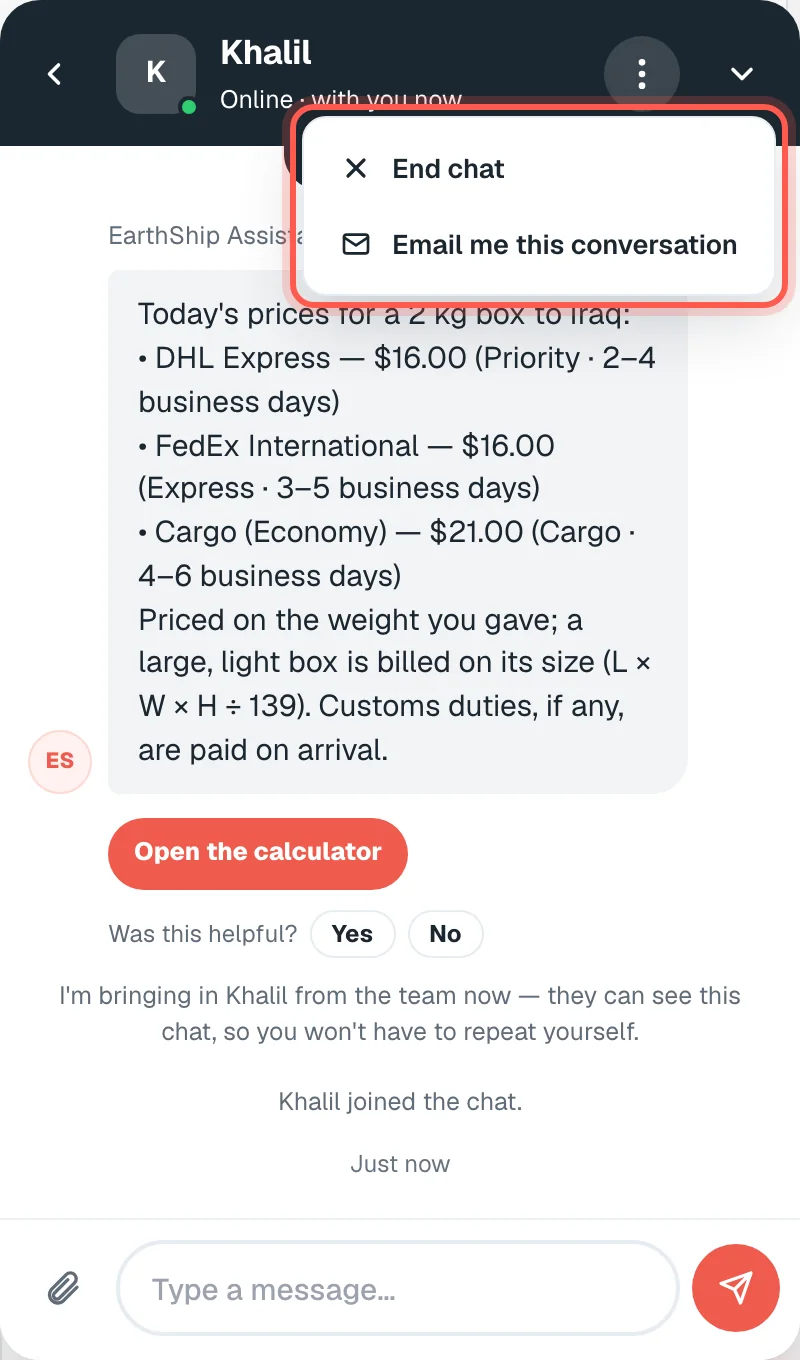
The ⋮ menu lets you end the chat or email yourself a copy of it.
-
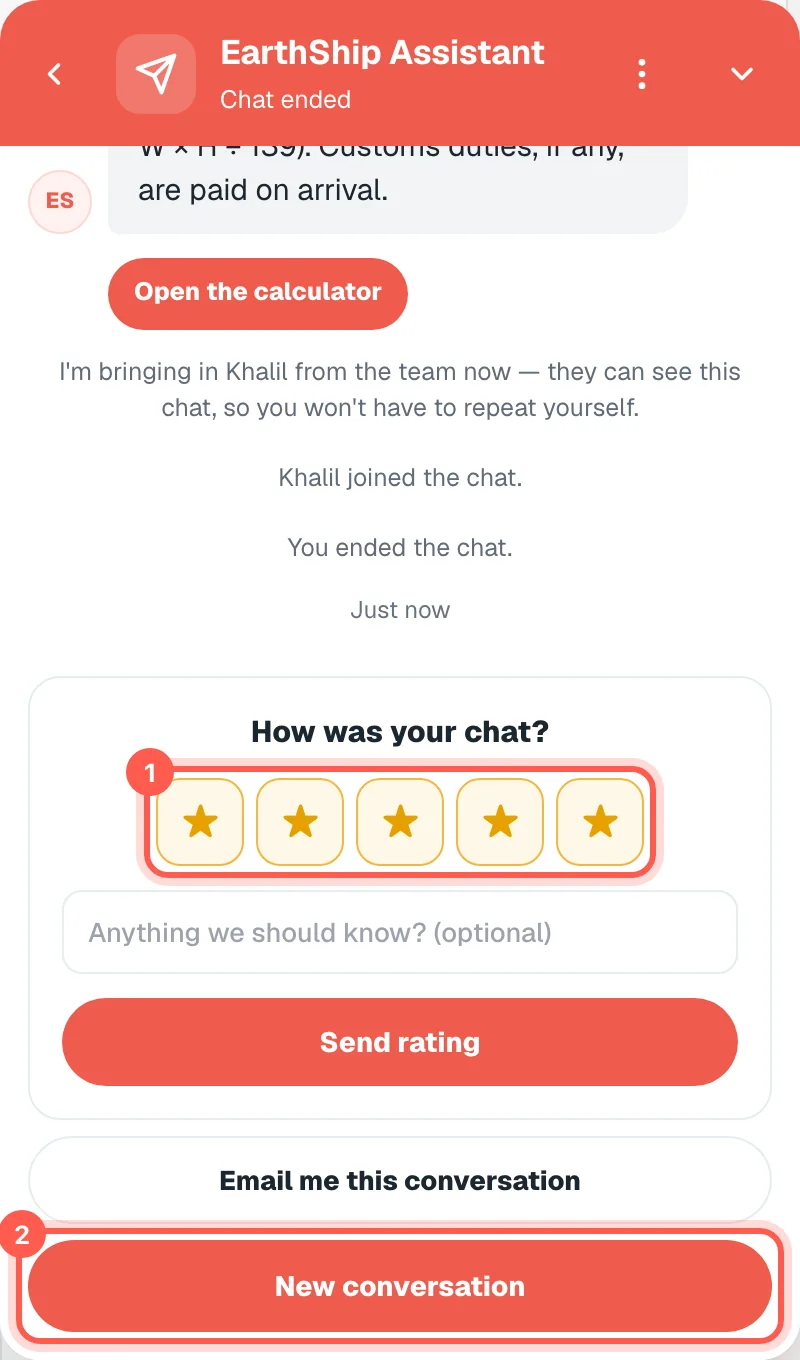
After a chat you can rate it. "Conversations" lists your past chats, start a new one any time.
Signed in, the chat already knows your account: ask "where is my package?" and it answers with your own parcels.
Open the chatHow do I change the dark mode colour? New 5 steps
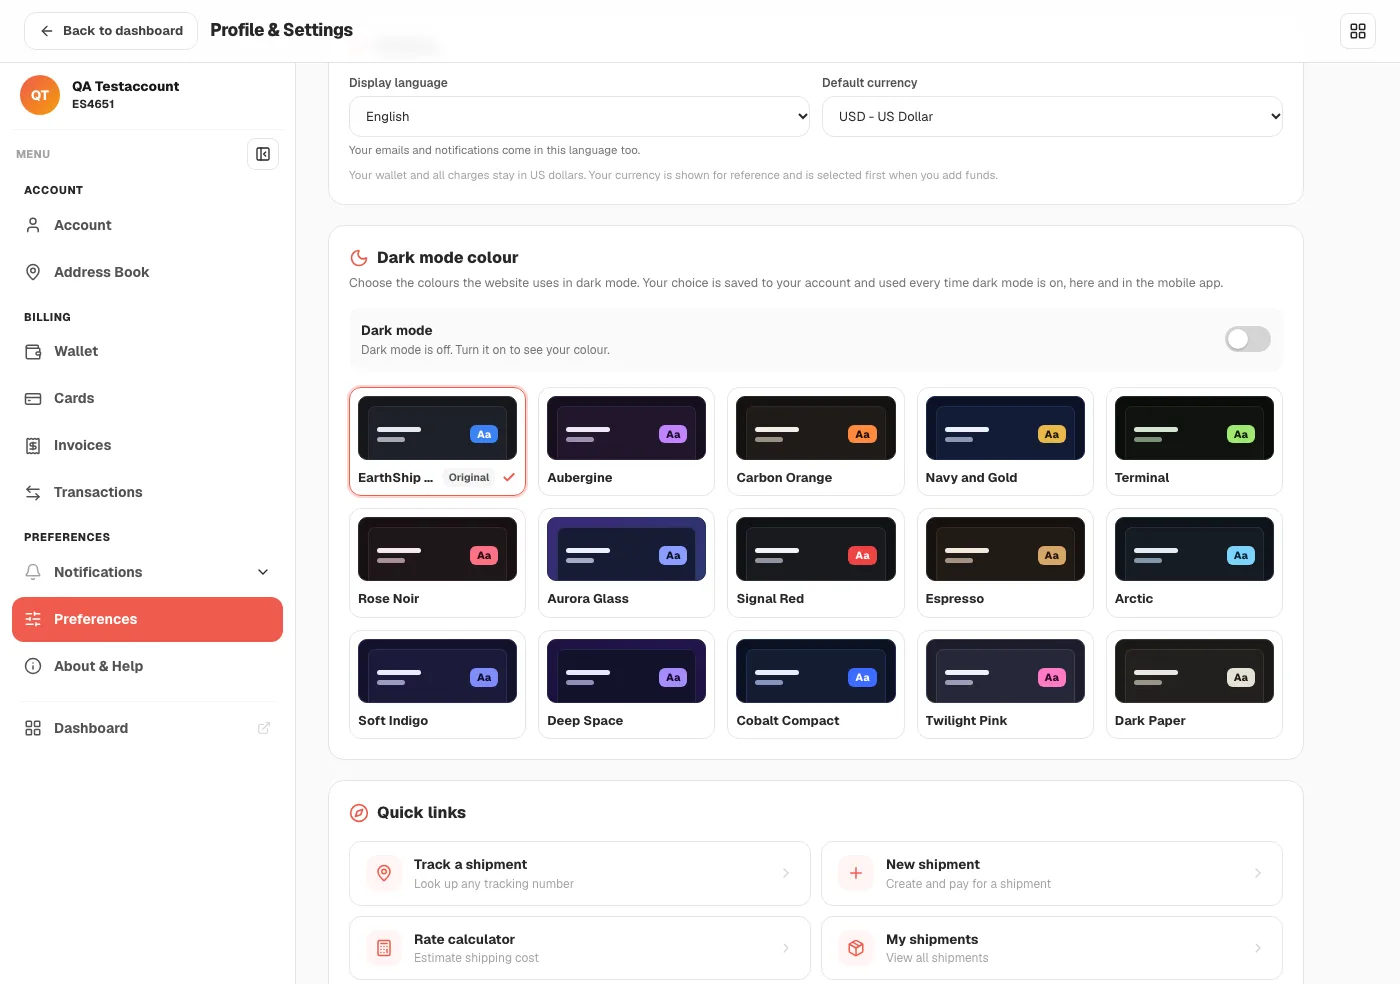
Dark mode comes in 22 colours. Choose one in Settings, under Preferences, and it is saved to your account: every time dark mode is on, the website and the mobile app use your colour. The colours are EarthShip Dark (the original), Aubergine, Carbon Orange, Navy and Gold, Terminal, Rose Noir, Aurora Glass, Signal Red, Espresso, Arctic, Soft Indigo, Deep Space, Cobalt Compact, Twilight Pink, Dark Paper, Blush, Cherry Blossom, Lavender Dream, Orchid, Raspberry, Peach Sorbet and Rose Gold. The last seven are soft pink, lilac and peach colours.
-
Open Settings and choose Preferences. Scroll to "Dark mode colour".
-
Turn on the Dark mode switch so you can see the colours as you choose.
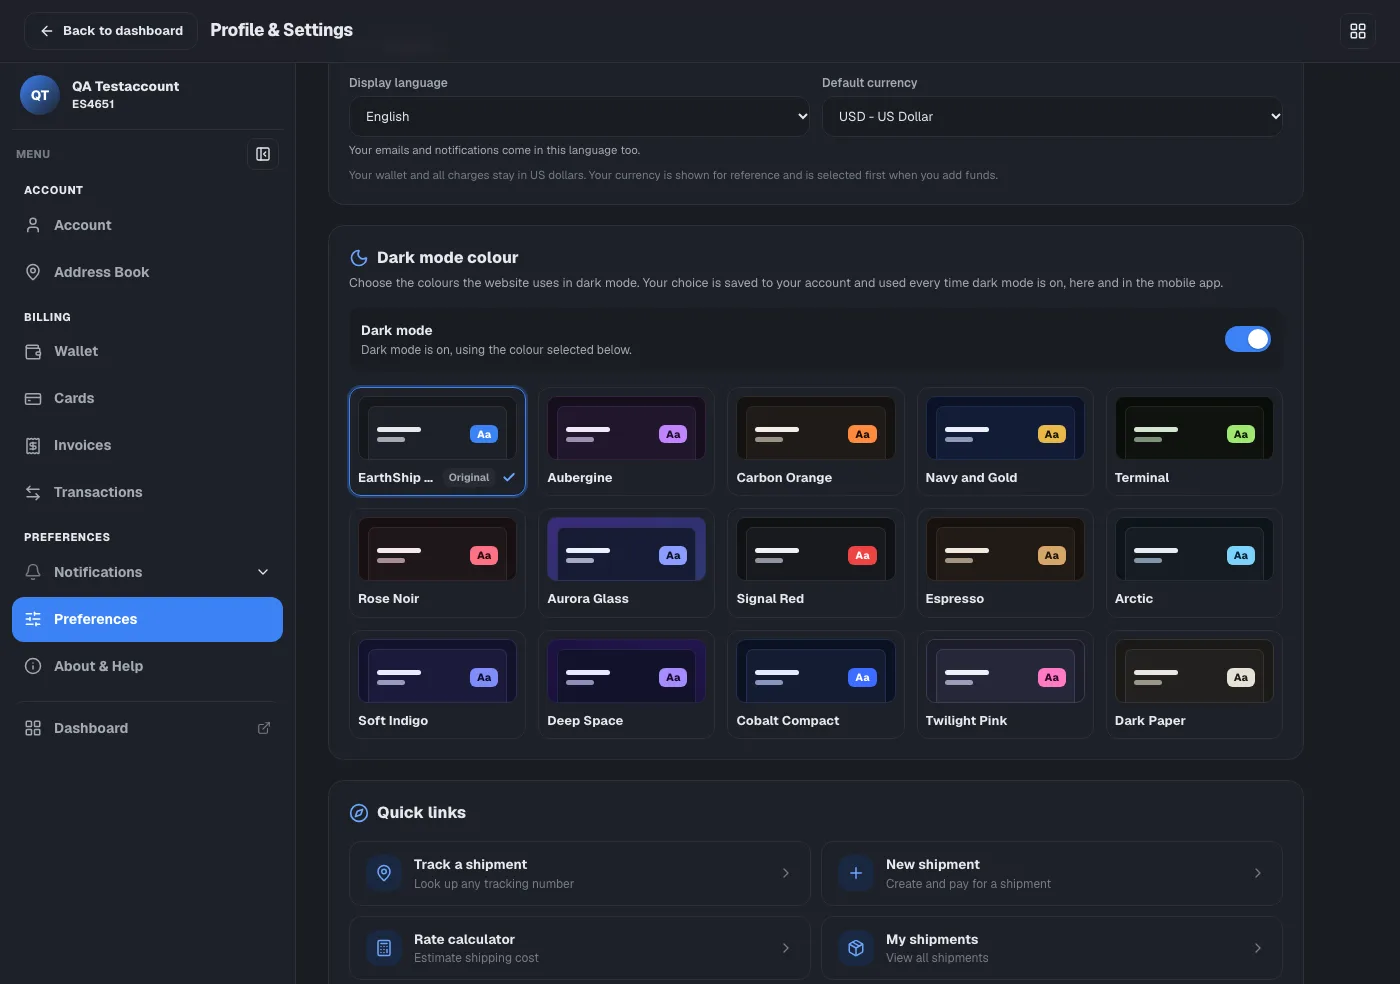
-
Tap the colour you like. It is saved at once and marked with a tick.
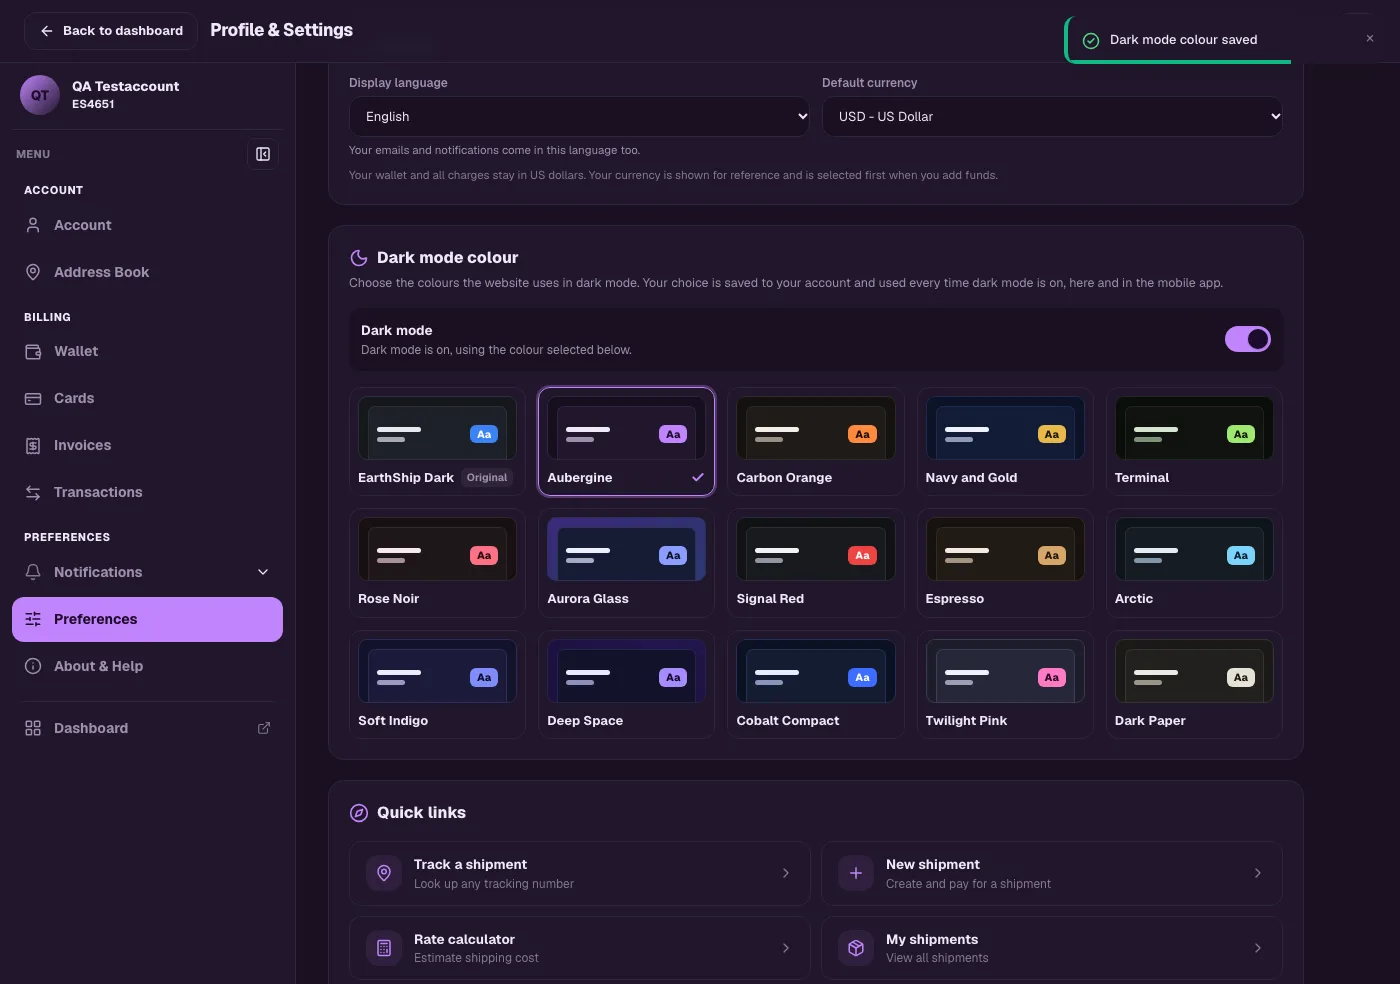
-
Every page now uses your colour whenever dark mode is on.
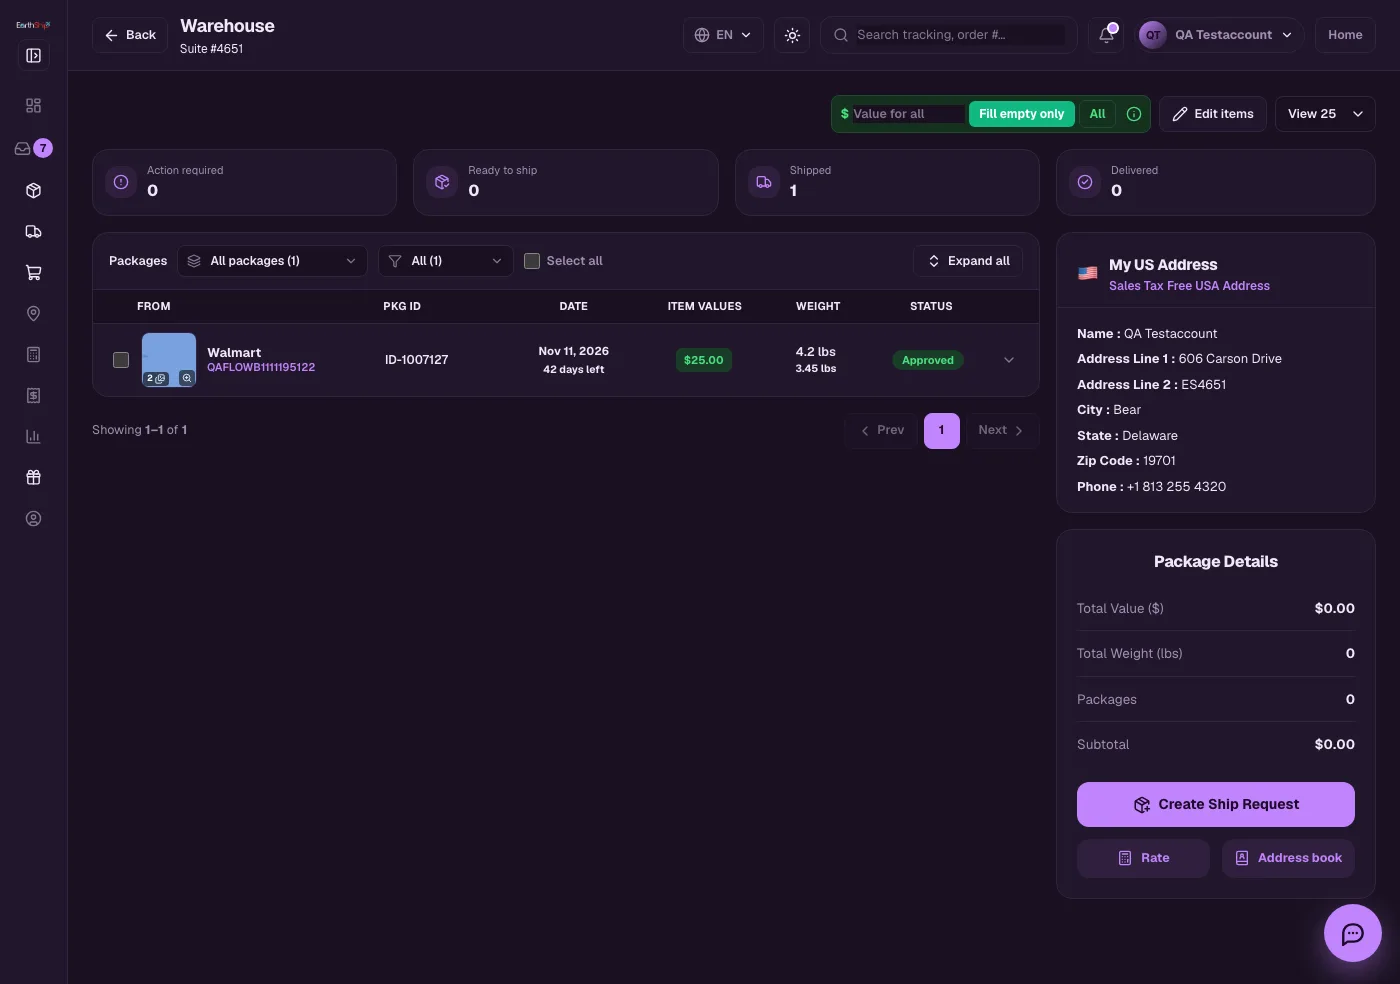
-
In the mobile app, open More and tap Appearance under Preferences. Choose Light or Dark, then pick your dark colour. The app and the website share the same choice.
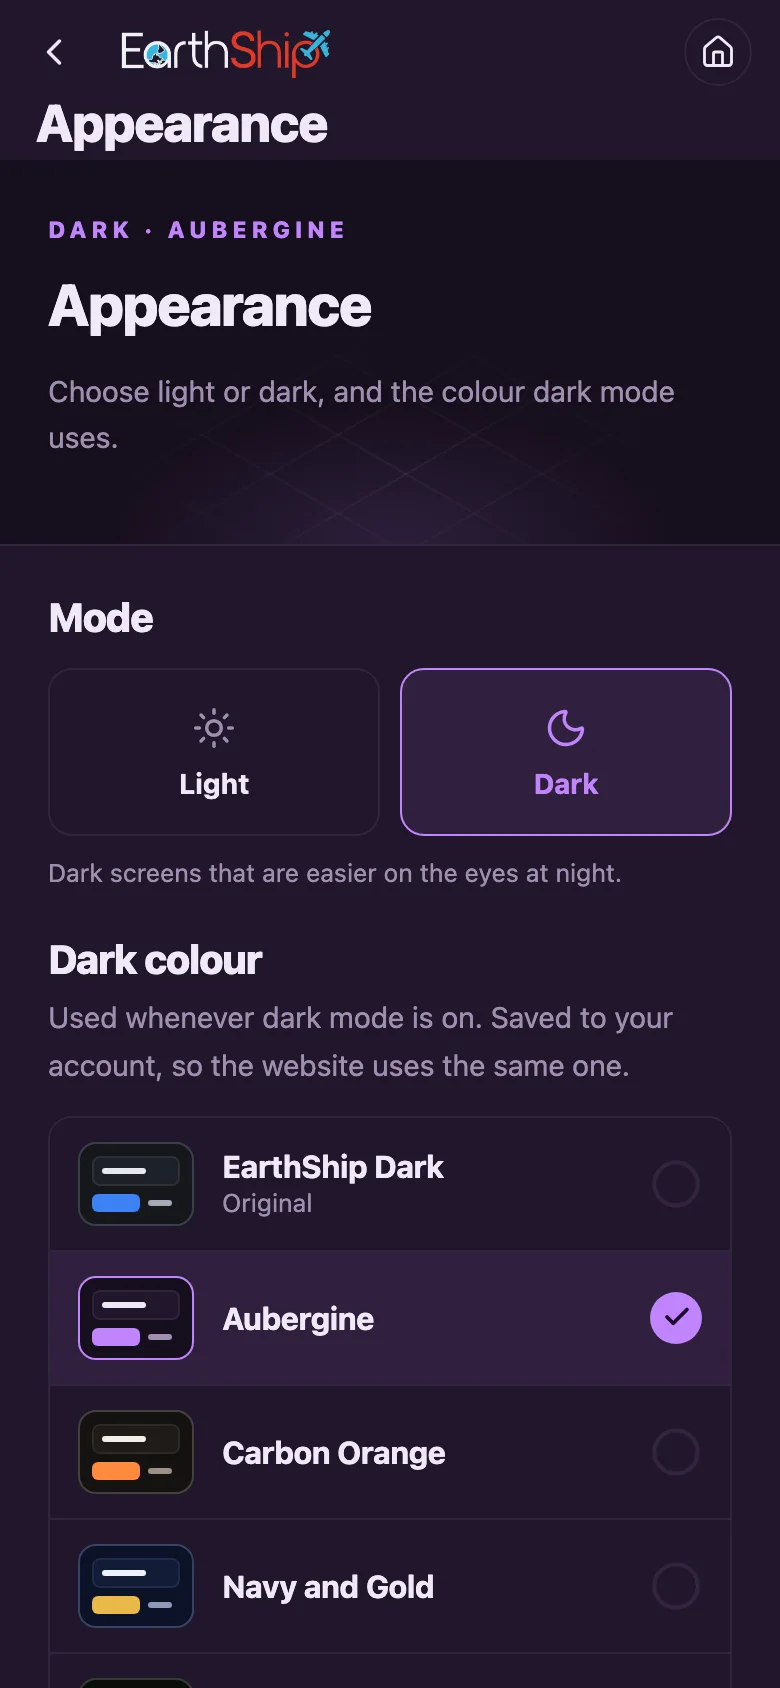
Only dark mode changes. Light mode always looks the same, and you can switch between light and dark at any time with the sun and moon button at the top of the page.
Open Preferences